CCNA Security
Chapter 7 Lab A, Exploring Encryption Methods Instructor Version
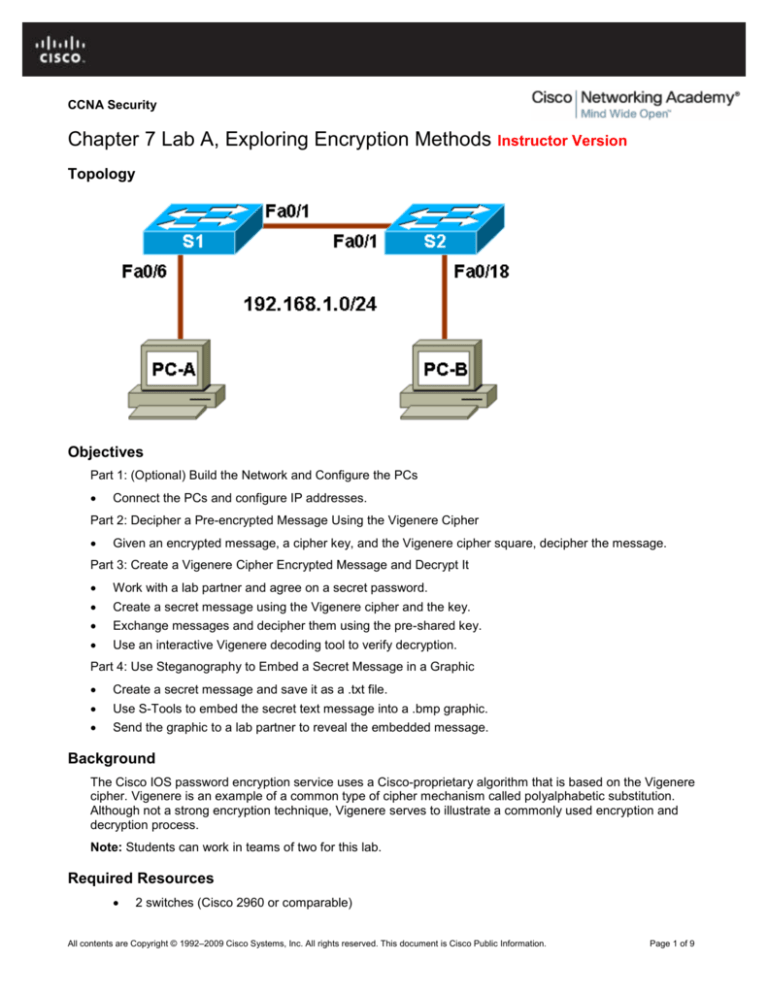
Topology
Objectives
Part 1: (Optional) Build the Network and Configure the PCs
Connect the PCs and configure IP addresses.
Part 2: Decipher a Pre-encrypted Message Using the Vigenere Cipher
Given an encrypted message, a cipher key, and the Vigenere cipher square, decipher the message.
Part 3: Create a Vigenere Cipher Encrypted Message and Decrypt It
Work with a lab partner and agree on a secret password.
Create a secret message using the Vigenere cipher and the key.
Exchange messages and decipher them using the pre-shared key.
Use an interactive Vigenere decoding tool to verify decryption.
Part 4: Use Steganography to Embed a Secret Message in a Graphic
Create a secret message and save it as a .txt file.
Use S-Tools to embed the secret text message into a .bmp graphic.
Send the graphic to a lab partner to reveal the embedded message.
Background
The Cisco IOS password encryption service uses a Cisco-proprietary algorithm that is based on the Vigenere
cipher. Vigenere is an example of a common type of cipher mechanism called polyalphabetic substitution.
Although not a strong encryption technique, Vigenere serves to illustrate a commonly used encryption and
decryption process.
Note: Students can work in teams of two for this lab.
Required Resources
2 switches (Cisco 2960 or comparable)
All contents are Copyright © 1992–2009 Cisco Systems, Inc. All rights reserved. This document is Cisco Public Information.
Page 1 of 9
CCNA Security
PC-A (Windows XP or Vista)
PC-B (Windows XP or Vista)
Ethernet cables as necessary
Instructor Notes:
This lab is divided into four parts. The parts should be performed sequentially, but can be performed
independently if necessary, because of time constraints. The main goal is to expose students to a common
type of encryption/decryption cipher known as Vigenere and to use an application called S-Tools to embed
text messages in graphics files.
If students are not working with a partner, they can perform the parts of the lab where a partner is referenced
using their own files.
Part 1: (Optional) Build the Network and Configure the PCs
In Part 1 of this lab, you connect the PCs and configure IP addresses. This is not required to perform the lab,
unless you want to copy files between PCs.
Step 1: Cable the network as shown in the topology.
Attach the devices shown in the topology diagram, and cable as necessary.
Note: The switches in the topology can be omitted and the PCs connected directly together using a crossover
cable, if desired. This is only necessary if the files used in the lab are to be exchanged by copying them from
one PC to the other, If files are to be exchanged using removable media, such as a flash drive or floppy disk,
no cabling is required.
Step 2: Configure PC host IP settings.
Configure a static IP address and subnet mask for PC-A and PC-B as shown below. A default gateway is not
required because the PCs are on the same local network.
PC-A IP address: 192.168.1.1, Subnet mask 255.255.255.0
PC-B IP address: 192.168.1.2, Subnet mask 255.255.255.0
Step 3: Verify connectivity between PC-A and PC-B.
Ping from PC-A to PC-B.
Are the ping results successful? Yes
If the pings are not successful, troubleshoot the basic device configurations before continuing.
All contents are Copyright © 1992–2009 Cisco Systems, Inc. All rights reserved. This document is Cisco Public Information.
Page 2 of 9
CCNA Security
Part 2: Decipher a Pre-encrypted Message Using the Vigenere Cipher
In Part 2 of this lab, you analyze an encrypted message and decrypt it using a cipher key and the Vigenere
cipher square.
Step 1: Review the encrypted message.
The following message has been encrypted using the Vigenere cipher.
VECIHXEJZXMA
Can you tell what the message says? Not likely
Step 2: Review the cipher keyword.
The cipher keyword TCPIP was used to encrypt the message. The same keyword will be used to decrypt or
decipher the message.
Step 3: Review the structure of the Vigenere square.
A standard Vigenere square or table is used with the keyword to decipher the message.
All contents are Copyright © 1992–2009 Cisco Systems, Inc. All rights reserved. This document is Cisco Public Information.
Page 3 of 9
CCNA Security
Step 4: Decrypt the message using the keyword and Vigenere square.
a. Use the table below to help you decrypt the message. Start by entering the letters of the encrypted
message in the second row of cells, from left to right.
b. Enter the keyword TCPIP in the top row, repeating the letters until there is a keyword letter for each
letter of the encrypted message, even if the keyword letters at the end do not represent the complete
keyword.
c.
Refer to the Vigenere square or table shown in Step 3 and find the horizontal row that starts with the
first letter of the keyword (the letter T). Scan across that row and locate the first letter of the encrypted
message in the row (the letter V). The letter at the top of the column where the encrypted message
letter appears is the first letter of the decrypted message (the letter C).
d. Continue this process until you have decrypted the entire message and enter it in the following table.
Cipher
Keyword
T
C
P
I
P
T
C
P
I
P
T
C
Encrypted
Message
V
E
C
I
H
X
E
J
Z
X
M
A
Decrypted
Message
C
C
N
A
S
E
C
U
R
I
T
Y
All contents are Copyright © 1992–2009 Cisco Systems, Inc. All rights reserved. This document is Cisco Public Information.
Page 4 of 9
CCNA Security
Part 3: Create a Vigenere Cipher Encrypted Message and Decrypt It
In Part 3 of this lab, you work with a lab partner and agree on a secret password, referred to as the preshared key. Each lab partner creates a secret message using the Vigenere cipher and the key. Partners
exchange messages and decipher them using their pre-shared key.
Note: If you do not have a partner, you can perform the steps by yourself.
Step 1: Determine the cipher keyword.
With your partner, establish a cipher keyword and enter it here. Answers will vary
Step 2: Create a plain text message and encrypt it (both partners).
a. Create a plain text (decrypted) message to be encrypted by your partner. Answers will vary
b. You can use the following table to help you encrypt the message. You can enter the unencrypted
message and cipher keyword here, but do not let your partner see it.
c.
In the Vigenere table, locate the row that starts with the first letter of the cipher keyword. Next locate
the first letter to be encrypted at the top of the column in the table. The point (cell) at which the table
row (key letter) and column (message letter) intersect is the first letter of the encrypted message.
Continue this process until you have encrypted the entire message.
Note: This table is limited to messages of 12 characters. You can create longer messages if desired.
Message encryption and decryption is not case sensitive.
Cipher
Keyword
Encrypted
Message
Decrypted
Message
Step 3: Decrypt the message from your partner.
a. You can use the following table to help you decrypt your partner’s encrypted message. Enter the
encrypted message from your partner and the cipher keyword.
b. Use the same procedure described in Part 2, Step 4.
Note: This table is limited to messages of 12 characters. You can create longer messages if desired.
Cipher
Keyword
Encrypted
Message
Decrypted
Message
All contents are Copyright © 1992–2009 Cisco Systems, Inc. All rights reserved. This document is Cisco Public Information.
Page 5 of 9
CCNA Security
Step 4: Use an interactive decryption tool to confirm decryption.
a. A search for “vigenere decode” on the Internet shows that various cipher encryption and decryption
tools are available. Many of these are interactive.
b. One interactive tool is located at http://sharkysoft.com/misc/vigenere/. Go to this URL. Enter the
encrypted message from your partner in the top part of the screen and the cipher key in the middle.
Click the Decode button to see the clear text version of the message. You can also use this tool to
encrypt messages.
c.
The following example shows using Sharky’s Vigenere Cipher tool for decoding the encrypted
message from Part 1 of the lab.
All contents are Copyright © 1992–2009 Cisco Systems, Inc. All rights reserved. This document is Cisco Public Information.
Page 6 of 9
CCNA Security
Part 4: Use Steganography to Embed a Secret Message in a Graphic
In Part 4 of this lab, you create a secret message for your partner, embed it into a graphic file, and then give it
to your partner to retrieve it. You embed the message in a graphic file using S-Tools. S-Tools is a
steganography tool that hides files in BMP, GIF, and WAV files. You start by opening S-Tools and then drag
graphics and sounds into the blank window. To hide files, you drag them into open graphics or sound
windows. Data is compressed before being encrypted and then hidden.
Note: The following steps should be performed by both partners, one at PC-A and the other at PC-B. If you
do not have a partner, you can perform the steps by yourself.
Step 1: (Optional) Download and install S-Tools.
If the S-Tools application is not installed on the PC, download it from
http://www.spychecker.com/program/stools.html or another site and unzip the files to a folder.
Step 2: Create a secret message text file (both partners).
a. On PC-A or PC-B, open the Windows Notepad application and create a message.
b. Save the message in a folder on the desktop and name it secret.txt.
c.
Close the Notepad application.
Step 3: Create a simple .bmp graphics file.
a. Open the Windows Paint application and create a simple graphic. For example, you can write your
first name using the pencil tool or text tool and apply some color using the spray can or fill tool.
b. Save the graphic as a .bmp file in a folder on the desktop and name it graphic.bmp.
c.
Close the Paint application.
Step 4: Create a secret password using the Vigenere cipher.
a. Choose a passphrase to be encrypted using the Vigenere cipher and record it here. Answers will
vary. Do not share the passphrase with your partner. This passphrase will be used later to protect the
text file when it is embedded in the graphics file.
b. Choose a cipher keyword to be used when encrypting and decrypting the passphrase and record it
here. Answers will vary
c.
Encrypt the passphrase using the cipher keyword and the procedure described in Part 3, Step 2.
Record the encrypted passphrase here. Answers will vary
Step 5: Embed the message into a graphic image file.
a. Open the S-Tools.exe application.
b. Locate the file named graphic.bmp, which you saved previously. Determine its size by right-clicking
the file and selecting Properties. Record the file size, for example 2,359,350 bytes. Answer will vary
but should be specified in bytes, not MB.
c.
Drag the graphic.bmp file into the S-Tools window.
d. Drag the file secret.txt, which you created in Step 2, and place it inside the graphic.bmp window.
The image should still be displayed. A dialog box is displayed showing the number of bytes being
hidden. You can enter a passphrase and select the encryption algorithm to be used. The default
algorithm is IDEA.
All contents are Copyright © 1992–2009 Cisco Systems, Inc. All rights reserved. This document is Cisco Public Information.
Page 7 of 9
CCNA Security
Step 6: Use the unencrypted passphrase to protect the embedded text file.
a. Enter the unencrypted passphrase from Step 4 in the Passphrase and Verify passphrase fields.
b. Choose Triple DES from the Encryption Algorithm field and click OK. This creates a second image
with the name “hidden data”.
c.
Right-click the hidden data graphic image and choose Save As from the menu. Name the file
graphic2 and save it as a bmp file.
d. Close the S-Tools application.
Step 7: Provide the graphic2.bmp file to your partner.
a. Provide a copy of your graphic2.bmp file to your partner. You can do this by sharing folders (if PCs
were cabled together and IP addresses were assigned in Part 1 of the lab). You can also copy the file
onto a removable drive (flash drive or floppy disk), or send it as an email attachment if you are
performing the lab remotely.
b. Provide your partner with the Vigenere-encrypted passphrase from Step 4 and the cipher keyword
that you used to create it.
All contents are Copyright © 1992–2009 Cisco Systems, Inc. All rights reserved. This document is Cisco Public Information.
Page 8 of 9
CCNA Security
Step 8: Decrypt the Vigenere password from your partner.
Decrypt your partner’s passphrase using the procedure described in Part 1, Step 4. This is done so that
you can use it with S-Tools to reveal the hidden message embedded in your partner’s graphic.
Step 9: Reveal the embedded message from your partner.
a. Open the S-Tools application.
b. Locate the graphic2.bmp file from your partner, and determine how large it is using the same
method as in Step 5. Record the file size here. Answers will vary
c.
Has the file size changed? No
d. Drag the file into the S-Tools window. The image should be displayed. Can you tell that there is a
secret message embedded in the graphic image? No.
e. Right-click the image and choose Reveal from the menu.
f.
Enter the Vigenere passphrase decrypted in Step 8 into the Passphrase field.
g. Choose Triple DES from the Encryption Algorithm field and click OK. This displays a revealed
archive.
h. Right-click the hidden message file and choose Save As from the menu. Name the file secret2.txt.
i.
Close the S-Tools application.
j.
Open the secret2.txt file from your partner to reveal the hidden message and write it here. Answers
will vary
Step 10: Reflection
a. Could the Vigenere cipher be used to decode messages in the field without a computer? Yes. The
recipient needs to only have a copy of the encrypted message, the cipher keyword, and a copy of the
Vigenere square.
b. Do an Internet search for Vigenere cipher cracking tools. Is the Vigenere cipher considered a strong
encryption system that is difficult to crack? No, a number of cracking tools are available.
All contents are Copyright © 1992–2009 Cisco Systems, Inc. All rights reserved. This document is Cisco Public Information.
Page 9 of 9

