Design of Input Gear Shaft Example
advertisement
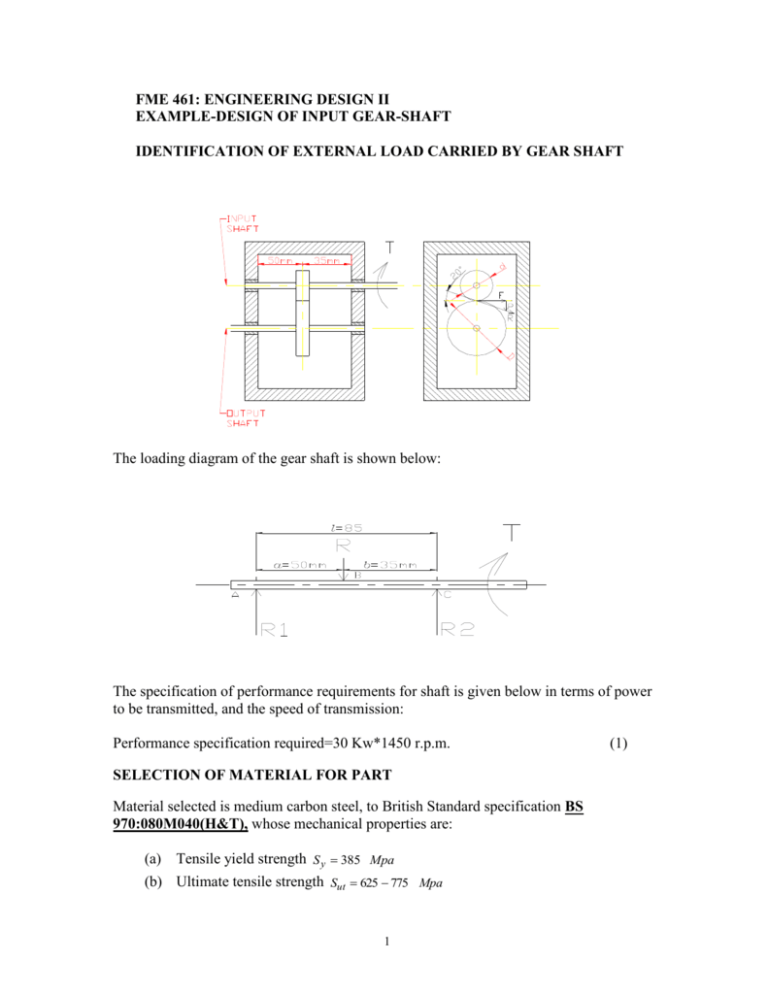
FME 461: ENGINEERING DESIGN II EXAMPLE-DESIGN OF INPUT GEAR-SHAFT IDENTIFICATION OF EXTERNAL LOAD CARRIED BY GEAR SHAFT The loading diagram of the gear shaft is shown below: The specification of performance requirements for shaft is given below in terms of power to be transmitted, and the speed of transmission: Performance specification required=30 Kw*1450 r.p.m. SELECTION OF MATERIAL FOR PART Material selected is medium carbon steel, to British Standard specification BS 970:080M040(H&T), whose mechanical properties are: (a) Tensile yield strength S y 385 Mpa (b) Ultimate tensile strength Sut 625 775 Mpa 1 (1) (c) Elongation %=16% (d) Hardness number=179-229 HB The material is a ductile material, having an elongation % of 16 %>5%. DETERMINATION OF EXTERNAL LOADS CARRIED BY GEAR SHAFT Torque required to transmit power at the speed specified The relationship between power and torque transmitted is given by the equation: Power T * watts Where T Torque transmitted in N-m Angular velocity in radians/sec Consequently Power T * Where 2N 60 watts and T Power * 60 2N N-m (2) N Angular velocity of shaft in revs/min Substituting for performance specification required from (1) into (2) T 30 * 1000 * 60 2 * 1450 N-m (3) Torque to be transmitted becomes T 197.6 N m (4) TRANSVERSE LOAD ON GEAR SHAFT ARISING FROM THE TORQUE TRANSMITTED TANGENTIAL FORCE ON GEAR TEETH F REQUIRED TO TRANSMIT TORQUE SPECIFIED As shown in the gear set diagram, the tangential force on the gear teeth, is the gear tooth force operating at the pitch diameter d of the driving gear on the input shaft. The torque transmitted is then given as function of the tangential tooth force and the pitch diameter of the gear as below: Torque T F * 2 d Therefore F T * Newtons d 2 2 Substituting for the pitch diameter of the input gear d 40 mm. and T=197.6 N-m F 197 .6 * 2 Newtons 0.04 F 9880 Newtons (5) RESULTANT FORCE ON GEAR TOOTH REQUIRED TO TRANSMIT TORQUE SPECIFIED The tangential force F is the component of the resultant gear tooth force that gives rise to the transmitted torque. It acts at the pitch point, along the tangent to the pitch circle diameter of the gear tooth. The resultant gear tooth force is normal to the tooth surface, and therefore inclined to the tangent to pitch circle diameter at an angle equal to the pressure angle of the gear tooth. The resultant force on the gear tooth is given by the equation Re sul tan t R F cos where pressure angle of gear tooth R F * sec Substituting for F =9880 N and =20o R 9880* sec 20 =10154 N R 10154 Newtons (6) DETERMINE BENDING MOMENT LOADS ON THE INPUT SHAFT LOADING DIAGRAM OF THE INPUT SHAFT-CONSIDERED AS A SIMPLY SUPPORTED BEAM SUBJECT TO TRANSVERSE POINT LOADS The loading diagram is shown at Appendix A and reproduced below: Reactions at the simple supports are then given by 3 R1 Rb l R2 and R1 R * 35 85 Ra l R2 R * N , and 50 85 N Substituting for R=10154 Newtons R1 10154 * 35 85 N , and R1 4181 N , and R2 10154 * R2 5972 50 85 N (7) N SHEAR FORCE DIAGRAM The shear force diagram is shown at appendix a. however, the direct shear stress induced by the shear force reaches its maximum value at the centre of the shaft, while the stresses caused by bending and torsion reach their maximum values the surface of the shaft. the effect of the direct shear stress is therefore ignored. BENDING MOMENT DIAGRAM FOR INPUT SHAFT The bending moment diagram for a straight beam with intermediate load and simple supports is then as shown below The maximum bending moment is then given by M AB Rbx l M max M a R * and 35 * 50 85 M BC N mm Ra l x l and occurs at x 50 mm. 4 M max 10154 * M max 209052 35 * 50 85 N mm 209052 N mm N mm (8) EXTERNAL LOAD ON THE GEAR SHAFT The external load on the input gear shaft then reduces to combined torsion and bending, where the torsion and bending loads are: (9) T 197.6 N m 197600 N mm M max 209052 N mm (10) Determination of stresses induced by the external loads STRESSES DUE TO COMBINED TORSION AND BENDING OF SHAFT In this situation, there is a plane stress at the location of maximum bending moment as shown below The stress elements are: x normal stress due to bending y 0 xy shear stress due to torque 32 M d 3 16T d3 Simplifying the loading situation of the input shaft into a static load which remains constant in spite of the rotation of the shaft, determine the significant stress at the location of highest stresses in terms of principal and maximum shear stress arising from the loads on the member Applying maximum shear stress theory of failure 5 The MAXIMUM SHEAR STRESS theory of failure states: When Yielding occurs in any material, the maximum shear stress at the point of failure equals or exceeds the maximum shear stress when yielding occurs in the tension test specimen. STRESS ELEMENTS IN THE PLANE STRESS SITUATION The plane stress situation is the stress situation in which the stress elements are x , y , and xy , and the stresses on the z-axis are zero, MAXIMUM SHEAR STRESS IN TERMS OF PLANE STRESS ELEMENTS The maximum shear stress is the significant stress in this situation and is given by the expression 2 x y xy 2 2 max (11) Maximum shear stress in the case of plane stress situation with y 0 THE GENERAL CASE OF PLANE STRESS SITUATION WITH y 0 Substituting for y 0 into the equation for maximum shear stress yields 2 x 0 2 xy 2 max max x 2 4 xy 2 = 2 2 = x xy 2 = x xy 2 2 4 1 x 2 4 xy 2 2 (12) Stresses induced in gear shaft by the external loads SOLID CIRCULAR SHAFT SUBJECT TO BENDING AND TORSION In the case of combined torsion and bending, the stress elements in the plane stress situation are: x normal stress due to bending y 0 xy shear stress due to torque 32 M d 3 16T d3 MAXIMUM SHEAR STRESS IN ELEMENT IN TERMS EXTERNAL LOADS 6 Substituting for x and xy in equation for maximum shear stress yields the expression for maximum shear stress in terms of load and dimension of element as shown below: max 1 1 x 2 4 xy2 2 2 max 16 d 3 2 32 M 16T 3 4 3 d d 2 M2 T2 (13) SHEAR STRENGTH OF CHOSEN (DUCTILE) MATERIAL The yield strength in shear of ductile materials such steel is predicted to be half the tensile yield strength by the maximum shear stress theory of failure, and the shear yield strength of such materials can therefore be derived from the tensile yield strength Therefore S sy Sy (14) 2 Where S sy Shear strength of the material S y Yield strength of the material in tension COMPARE SIGNIFICANT STRESS WITH STRENGTH: DESIGN EQUATION Design equation then becomes max 16 d 3 M2 T2 = S sy f .s. Sy 2 * f .s. OR d3 16 M2 T2 * 2 * f .s. Sy Where f .s. factor of safety , and ssy f .s Sy 2 * f .s d , the design or allowable shear stress , The design equation then becomes d3 16 M2 T2 * 2 * f .s. Sy (15) SOLVING DESIGN EQUATION Substituting the TORQUE and BENDING MOMENT loads into design equation (16) T 197.6 N m M max 209052 d3 32 N mm 209052 2 197600 2 * (17) f .s. Sy Substituting for yield strength of chosen material and the factor of safety Factor of safety =2.5 and Tensile yield strength S y 385 Mpa 7 d3 32 209052 2 197600 2 * 2.5 385 d 26.7 (18) mm. SELECT SHAFT SIZE FROM PREFERRED METRIC RANGE Select the shaft size to be used form the nearest size in the range of preferred metric sizes1 (1,1.2,1.6,2,2.5,3,4,5,6,8,10,12,16,20,25,30,35,40,45,50,55,60,65,70,75,80,90,100 mm.) Nearest shaft size selected is 30 mm. REVIEW DESIGN Determine the actual factor of safety resulting from the use of the selected standard shaft size Rewriting the design equation in terms of the factor of safety f .s. S sy max But max Sy 2 * max 16 d M2 T2 3 Substituting T 197.6 N m (16) M max 209052 N mm (17) And d 30 mm max 16 209052 2 197600 2 54.3 Mpa 30 3 Substituting S y 385 Mpa and max 54.3 Mpa f .s. Sy 2 * 1 max 385 1 * 3.85 2 54 .3 Factor of safety =3.5 1 Shigley Joseph, Mechanical Engineering Design, First Metric Edition, , McGraw Hill, 1986, page 660 8 APPENDIX A: LOADING, SHEAR FORCE, AND BENDING MOMENT DIAGRAMS LOADING DIAGRAM R1 Rb l and R2 Ra l SHEAR FORCE DIAGRAM VAB R1 VBc R2 and BENDING MOMENT DIAGRAM M AB Rbx l and 9 M BC Ra l x l APPENDIX B2: MECHANICAL PROPERTIES OF SOME STEELS Material British Standard3 Productio n process 0.20C 070M20 HR4 CD5 0.30C 080M30 HR CD Maximum section size, mm. 152 254 13 76 152 254 13 63 63 150 63 63 150 63 150 100 29 150 29 152 102 64 29 64 0.40C 080M40 0.50C 080M50 1Cr 530M40 H&T6 HR CD H&T HR CD H&T H&T 1.5MnMo 605M36 H&T 1.25NiCr 640M40 H&T 3NiCr 653M31 H&T 1CrMo 708M40 H&T 3CrMo 722M24 H&T 150 13 152 2.5NiCrMo 826M40 H&T 150 3NiCrMo 830M31 H&T 1.5MnNiCrMo 945M38 H&T 254 152 64 152 64 29 2 Yield Strength Mpa 215 200 385 340 245 230 470 385 385 280 430 385 310 510 430 525 680 525 755 525 585 680 755 755 680 525 940 680 755 755 850 1020 650 680 940 525 680 850 Tensile Strength, Mpa 430 400 530 430 490 460 600 530 550-700 550 570 625-775 620 650 625-775 700-850 850-1000 700-850 925-1075 700-850 770-930 850-1000 930-1080 930-1080 850-1000 700-850 1075-1225 850-1000 930-1080 925-1075 1000-1150 1150-1300 850-1000 850-1000 1080-1240 690-850 850-1000 1000-1160 Shigley, Joseph E., Mechanical Engineering Design, pp. 664, McGraw-Hill Inc., 1986 British Standards Institution, BS 970: Part 1: 1983 4 HR-Hot rolled and normalised 5 CD-Cold drawn 6 H&T-Hardened and tempered 3 10 Elong ation % 22 20 12 14 20 19 10 12 13 16 10 16 14 10 11 17 13 17 12 17 15 13 12 12 12 17 12 13 12 12 12 10 13 12 11 17 13 12 Hardness Number, HB 126-179 116-170 154 125 143-192 134-183 174 154 152-207 152-207 165 179-229 179-229 188 179-229 202-255 248-302 202-255 269-331 202-255 223-277 248-302 269-331 269-331 248-302 201-255 311-375 269-331 269-331 269-331 293-352 341-401 248-302 248-302 311-375 201-255 248-302 293-352 APPENDIX C: STEEL APPLICATION AND HEAT-TREATING GUIDE7 USE OR PART Arbors Armature shafts Axles Ball races Bolts and studs Bushings Cams Camshaft Cant dogs Chain Links Chain Pins Chuck Jaws Chuck screws Clutches Collets Connecting Rods Crankshafts Drift Pins Engine bolts Gears Guide Pins Mandrels Pinions Pins Pistons Pump Shafts Rollers Rolls Lead Screws Set Screws Spindles Stay Bolts Thrust washers Turbine Shafts Turnbuckles U bolts Universal Joint Pins Universal joint bodies Worm Gears Low-Carbon Plain Alloy Carbon Or Lean Alloy C 1020 A2315-20 C 1117 3115-20 4615-20 5120 8620 C C C C C C C C Medium-Carbon Plain Medium Carbon Alloy Or Lean Alloy C1040-50 A3140-50 4140-50 5145 8640-50 8740-50 6145 N,T T T T N,T,A, S,T, S T T,A T T High-Carbon Rich Alloy A 4340 3250 Oil Hardening Tool Steel Water Hardening Tool Steel T T T T T T T T T T T T T C C C T T N,A T T C C C C C C C C C N,S,A N N,T N,S,T,A N,S,T T S,T T T S,T S,T C C C N C A C C C C C N,T,A T S N,A T S,T,A, S,T T T S,T, N,T,A T T T T T N,T,A, S,T T S,T T T S,T S,T S,T C C C T T T T T T T T T T S,T T T S,T T T T T N=Normalised; C= Case-hardened; S= Surface-hardened; T= Through-hardened; A= As-rolled 7 pp. 10, ASME Handbook, Metals Engineering-Processes, McGraw-Hill Book Company, 1958 11
