Classroom Saline Water Prep for the Diatom Thalassiosira
advertisement
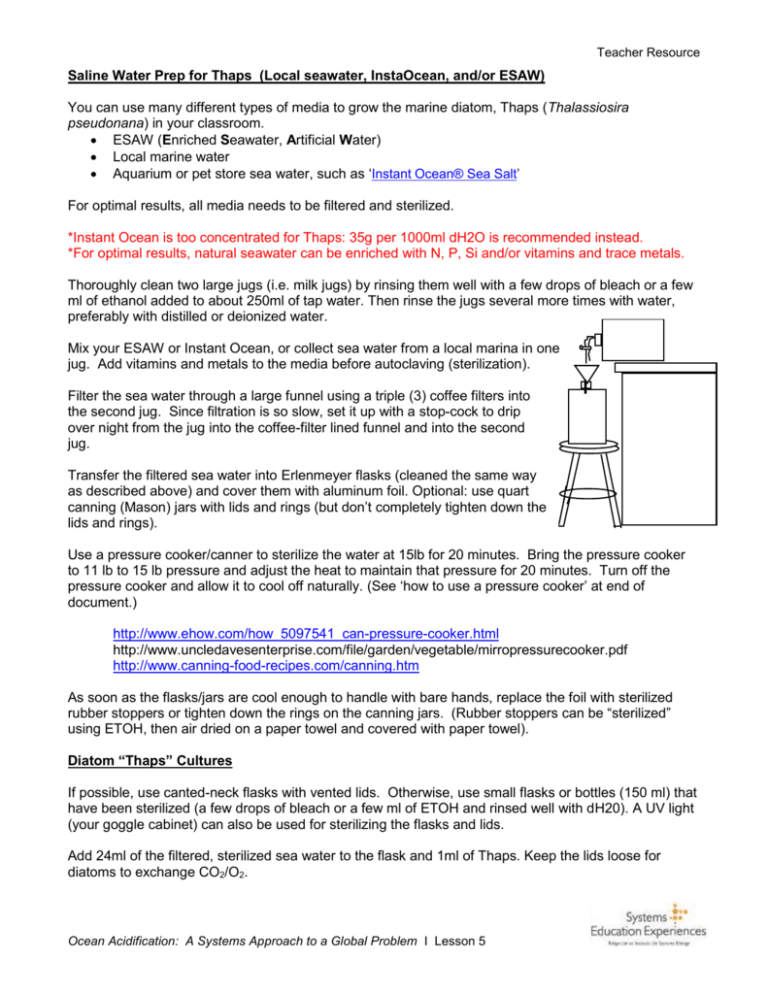
Teacher Resource Saline Water Prep for Thaps (Local seawater, InstaOcean, and/or ESAW) You can use many different types of media to grow the marine diatom, Thaps (Thalassiosira pseudonana) in your classroom. ESAW (Enriched Seawater, Artificial Water) Local marine water Aquarium or pet store sea water, such as ‘Instant Ocean® Sea Salt’ For optimal results, all media needs to be filtered and sterilized. *Instant Ocean is too concentrated for Thaps: 35g per 1000ml dH2O is recommended instead. *For optimal results, natural seawater can be enriched with N, P, Si and/or vitamins and trace metals. Thoroughly clean two large jugs (i.e. milk jugs) by rinsing them well with a few drops of bleach or a few ml of ethanol added to about 250ml of tap water. Then rinse the jugs several more times with water, preferably with distilled or deionized water. Mix your ESAW or Instant Ocean, or collect sea water from a local marina in one jug. Add vitamins and metals to the media before autoclaving (sterilization). Filter the sea water through a large funnel using a triple (3) coffee filters into the second jug. Since filtration is so slow, set it up with a stop-cock to drip over night from the jug into the coffee-filter lined funnel and into the second jug. Transfer the filtered sea water into Erlenmeyer flasks (cleaned the same way as described above) and cover them with aluminum foil. Optional: use quart canning (Mason) jars with lids and rings (but don’t completely tighten down the lids and rings). Use a pressure cooker/canner to sterilize the water at 15lb for 20 minutes. Bring the pressure cooker to 11 lb to 15 lb pressure and adjust the heat to maintain that pressure for 20 minutes. Turn off the pressure cooker and allow it to cool off naturally. (See ‘how to use a pressure cooker’ at end of document.) http://www.ehow.com/how_5097541_can-pressure-cooker.html http://www.uncledavesenterprise.com/file/garden/vegetable/mirropressurecooker.pdf http://www.canning-food-recipes.com/canning.htm As soon as the flasks/jars are cool enough to handle with bare hands, replace the foil with sterilized rubber stoppers or tighten down the rings on the canning jars. (Rubber stoppers can be “sterilized” using ETOH, then air dried on a paper towel and covered with paper towel). Diatom “Thaps” Cultures If possible, use canted-neck flasks with vented lids. Otherwise, use small flasks or bottles (150 ml) that have been sterilized (a few drops of bleach or a few ml of ETOH and rinsed well with dH20). A UV light (your goggle cabinet) can also be used for sterilizing the flasks and lids. Add 24ml of the filtered, sterilized sea water to the flask and 1ml of Thaps. Keep the lids loose for diatoms to exchange CO2/O2. Ocean Acidification: A Systems Approach to a Global Problem І Lesson 5 Teacher Resource ALTERNATIVE IDEAS: Sterilize bottles, flasks, stoppers, lids in the dishwasher on “sterilization” mode. Filter natural seawater through fine mesh and store in refrigerator. Repeat process over three days (at least once per day). Use unfiltered seawater as is. Students may find many things floating and moving about. This may prevent Thaps from growing, or it may not, depending on what is in the water. HOW TO USE A PRESSURE CANNER TO STERILIZE SEA WATER OR MEDIA Always follow the instructions for your specific type/brand of canner. NEVER…. *…Operate a canner without a rack and water inside. Jars must NOT sit directly on the bottom. *…Allow the pressure to go beyond 15lb. *…Leave the canner unattended. *…Remove the pressure regulator before the vent plug goes down. *…Use anything other than a Kerr/Mason canning jar or laboratory media bottles. 1. Check glassware for cracks, nicks and only use glassware that is perfect. 2. Fill bottles/jars ¾ full of media and cover with foil or loosely cover with a canning lid. 3. Make sure rubber gaskets of the canner lid are soft and flexible with no cracking. 4. Put canning rack in the bottom of the canner and add 3 quarts (2.8L) of tap water. 5. Look through the vent pipe in the canner’s lid to be sure it is open with no corrosion. 6. Load bottles/jars into the canner, sitting on the rack in the water. Ocean Acidification: A Systems Approach to a Global Problem І Lesson 5 Teacher Resource 7. Place cover on the canner, aligning the “V” on the cover with the body of the canner and turn the lid to securely lock the lid onto the body of the canner. 8. Turn the heat on “high” and wait for steam to flow through the vent pipe at a constant rate. 9. Reduce heat to “medium” and allow steam to continue to flow out of the vent pipe for 7-10 minutes. 10. Place the pressure regulator on the vent pipe. The vent plug will pop “up” and the needle on the pressure gauge will begin to increase. 11. Watch the pressure gauge to increase the pressure between 11 lb and 14 lb of pressure. *You will have to “babysit” the canner, adjusting the stove top temperature to keep the pressure as constant as possible for 20 minutes. NEVER leave the canner unattended! Ocean Acidification: A Systems Approach to a Global Problem І Lesson 5 Teacher Resource 12. After the 20 minutes of pressurized heating, turn off the heat and carefully remove the canner from the heat. Allow the canner to cool (about 30 minutes) during which the vent plug will drop. 13. When the vent plug has gone back down, wait 10 more minutes before removing the pressure regulator from the vent pipe. Make sure no more steam is coming from the vent pipe. 14. Open the canner and remove the lid by tilting it away to avoid steam in your face. 15. Remove the bottles from the canner, placing them on a towel. 16. Tighten down the lids or replace the foil with sterile caps. Ocean Acidification: A Systems Approach to a Global Problem І Lesson 5
