lower deviation
advertisement
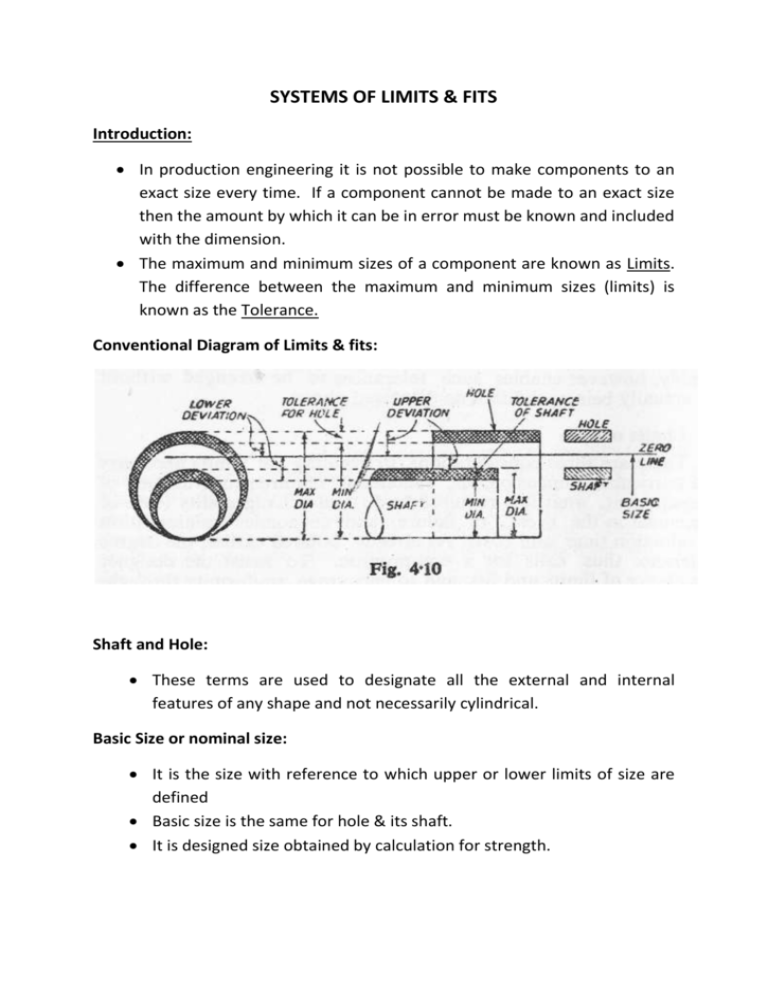
SYSTEMS OF LIMITS & FITS Introduction: In production engineering it is not possible to make components to an exact size every time. If a component cannot be made to an exact size then the amount by which it can be in error must be known and included with the dimension. The maximum and minimum sizes of a component are known as Limits. The difference between the maximum and minimum sizes (limits) is known as the Tolerance. Conventional Diagram of Limits & fits: Shaft and Hole: These terms are used to designate all the external and internal features of any shape and not necessarily cylindrical. Basic Size or nominal size: It is the size with reference to which upper or lower limits of size are defined Basic size is the same for hole & its shaft. It is designed size obtained by calculation for strength. Zero Line: It is a line along which represents the basic size and zero (or initial point) for measurement of upper or lower deviations. Deviation: It is the algebraic difference between the size & corresponding basic size. Upper Deviation: The algebraic difference between the maximum limit of size (of either hole or shaft) and the corresponding basic size, like ES, es. Lower Deviation: The algebraic difference between the minimum limit of size (of either hole or shaft) and the corresponding basic size, like EI, ei. Fundamental Deviation: It is one of the two deviations which is chosen to define the position of the tolerance zone. Tolerance: The algebraic difference between upper and lower deviations. It is an absolute value. Types of tolerances 1. Unilateral system 2. Bilateral system Unilateral system: In this system, the dimension of a part is allowed to vary only on one side of the basic size, i.e. tolerance lies wholly on one side of the basic size either above or below it Examples of unilateral tolerance are : Unilateral system is preferred in interchangeable manufacture, especially when precision fits are required, because (a) it is easy and simple to determine deviations, (b) another advantage of this system is that „Go‟ Gauge ends can be standardized as the holes of different tolerance grades have the same lower limit and all the shafts have same upper limit, and (c) this form of tolerance greatly assists the operator, when machining of mating parts. The operator machines to the upper limit of shaft (lower limit for hole) knowing fully well that he still has some margin left for machining before the parts are rejected. Bilateral Tolerance: In this system, the dimension of the part is allowed to vary on both the sides of the basic size, i.e. the limits of tolerance lie on either side of the basic size, but may not be necessarily equally dispose about it. Examples of bilateral tolerance are : In this system, it is not possible to retain the same fit when tolerance is varied and the basic size of one or both of the mating parts are to be varied. This system is used in mass production when machine setting is done for the basic size. FITS: When two parts are to be assembled, the relation resulting from the difference between their sizes before assembly is called a fit. A fit may be defined as the degree of tightness and looseness between two mating parts. TYPES OF FITS: 1 Clearance fit fit 2 Transition fit 3 Interference Slide fit Push fit Force fit Easy slide fit Wringing fit Tight fit Running fit Shrink fit Slack running fit Loose running fit Clearance fit: In a fit, this is the difference between the sizes of the hole and the shaft, before assembly, when this difference is positive. The clearance may be maximum clearance and minimum clearance. Minimum clearance in the fit is the difference between the maximum size of the hole and the minimum size of the shaft. Clearance fit can be sub-classified as follows : Loose Fit It is used between those mating parts where no precision is required. It provides minimum allowance and is used on loose pulleys, agricultural machineries etc. Running Fit For a running fit, the dimension of shaft should be smaller enough to maintain a film of oil for lubrication. It is used in bearing pair etc. An allowance 0.025 mm per 25 mm of diameter of boaring may be used. Slide Fit or Medium Fit Fit and Tolerances It is used on those mating parts where great precision is required. It provides medium allowance and is used in tool slides, slide valve, automobile parts, etc. 2) Interference Fit: A negative difference between diameter of the hole and the shaft is called interference. In such cases, the diameter of the shaft is always larger than the hole diameter. In Interference fit has a negative allowance, i.e. interference exists between the high limit of hole and low limit of the shaft. In such a fit, the tolerance zone of the hole is always below that of the shaft. The shaft is assembled by pressure or heat expansion. The interference fit can be sub-classified as follows : Shrink Fit or Heavy Force Fit: It refers to maximum negative allowance. In assembly of the hole and the shaft, the hole is expanded by heating and then rapidly cooled in its position. It is used in fitting of rims etc. Medium Force Fit: These fits have medium negative allowance. Considerable pressure is required to assemble the hole and the shaft. It is used in car wheels, armature of dynamos etc. Tight Fit or Press Fit: One part can be assembled into the other with a hand hammer or by light pressure. A slight negative allowance exists between two mating parts (more than wringing fit). It gives a semi-permanent fit and is used on a keyed pulley and shaft, rocker arm, etc. 3) Transition Fit: It may result in either clearance fit or interference fit depending on the actual value of the individual tolerances of the mating components. Transition fits are a compromise between clearance and interference fits. They are used for applications where accurate location is important but either a small amount of clearance or interference is permissible. In below fig there is overlapping of tolerance zones of the hole and shaft. Push Fit: It refers to zero allowance and a light pressure (10 cating dowels, pins, etc.) is required in assembling the hole and the shaft. The moving parts show least vibration with this type of fit. It is also known as snug fit. Wringing Fit: A slight negative allowance exists between two mating parts in wringing fit. It requires pressure to force the shaft into the hole and gives a light assembly. It is used in fixing keys, pins, etc. Allowance: It is an intentional difference between the maximum material limits of mating parts, for shaft the maximum material will be its high limit & for hole it will its low limit. The allowance may be positive or negative. The positive allowance is called clearance & the negative allowance is called interference. SYSTEM OF OBTAINING DIFFERENT TYPES OF FITS: 1 HOLE BASIS SYSTEM 2 SHAFT BASIS SYSTEM HOLE BASIS SYSTEM: In the hole basis system, the size of the hole is kept constant and shaft sizes are varied to obtain various types of fits. In this system, lower deviation of hole is zero, i.e. the low limit of hole is same as basic size. The high limit of the hole and the two limits of size for the shaft are then varied to give desired type of fit. The hole basis system is commonly used because it is more convenient to make correct holes of fixed sizes, since the standard drills, taps, reamers and branches etc. are available for producing holes and their sizes are not adjustable. On the other hand, size of the shaft produced by turning, grinding, etc. can be very easily varied. SHAFT BASIS SYSTEM: In the shaft basis system, the size of the shaft is kept constant and different fits are obtained by varying the size of the hole. Shaft basis system is used when the ground bars or drawn bars are readily available. These bars do not require further machining and fits are obtained by varying the sizes of the hole. In this system, the upper deviation (fundamental deviation) of shaft is zero, i.e. the high limit of the shaft is same as basic size and the various fits are obtained by varying the low limit of shaft and both the limits of the hole. Grades of Tolerance Grade of Tolerance: It is an indication of the level of accuracy. There are 18 grades of tolerances – IT01, IT0, IT1 to IT16 IT01 to IT4 - For production of gauges, plug gauges, measuring instruments IT5 to IT 7 - For fits in precision engineering applications IT8 to IT11 – For General Engineering IT12 to IT14 – For Sheet metal working or press working 14 IT15 to IT16 – For processes like casting, general cutting work Standard Tolerance: Various grades of tolerances are defined using the ‘standard tolerance unit’, (i) in µm, which is a function of basic size[ 3] i D D = + 0.45 0.001 where, D (mm) is the geometric mean of the lower and upper diameters of a particular diameter step within which the chosen the diameter D lies. Interchangeability: It is a system of producing the mating parts in which large numbers of mating parts are produced. In earlier days a single operator wall confined with number of units & assembles it which used to take long time & it was not economical. So to reduce the cost & time mass production system was developed .In most production system the components in one or more batches by different operation on different machines. When this system is applied then any one component selected at random mates with any other components that too selected at random. When this system is used it is called interchangeable system .This system ensure reduced cost & increased output. Advantages of interchangeability: 1 This system reduces the production cost & increases the output. 2 The operator need not to waste time in assembling the parts by trial error method. 3 Worn out parts & defective parts can be easily replaced. 4 By this method it is possible to produce mating parts at different places by different operators. 5 As there is a division of labor the operators performs same operator’s numbers of times & he become specialized in that particular operation thus improving quality & saving the time for operations. 6 Maintenance cost & shut down period is reduced. Selective assembly: In selective assembly, the parts are graded according to the size and only matched grades of mating parts are assembled. This technique is most suitable where close fit of two components assembled is required. Selective assembly provides complete protection against nonconforming assemblies and reduces machining costs as close tolerances can be maintained. Suppose some parts (shafts & holes) are manufactured to a tolerance of 0.01 mm, then an automatic gauge can separate them into ten different groups of 0.001 mm limit for selective assembly of the individual parts. Thus high quality and low cost can be achieved. Selective assembly is used in aircraft, automobile industries where tolerances are very narrow and not possible to manufacture at reasonable costs.

