Biological problem
advertisement
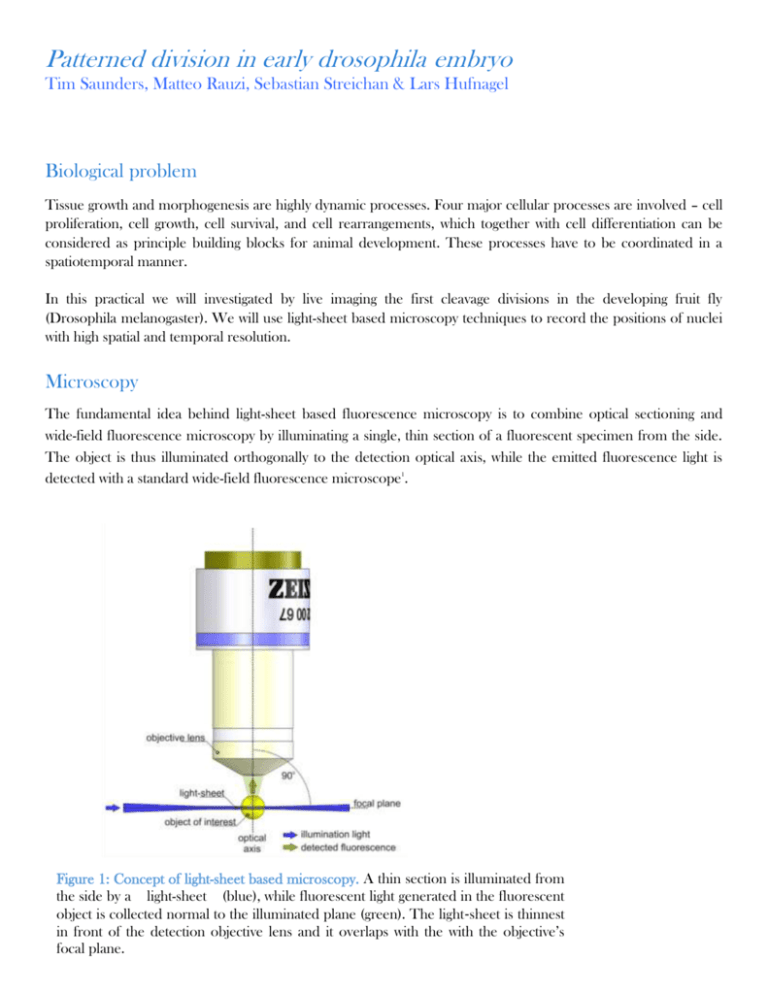
Patterned division in early drosophila embryo Tim Saunders, Matteo Rauzi, Sebastian Streichan & Lars Hufnagel Biological problem Tissue growth and morphogenesis are highly dynamic processes. Four major cellular processes are involved – cell proliferation, cell growth, cell survival, and cell rearrangements, which together with cell differentiation can be considered as principle building blocks for animal development. These processes have to be coordinated in a spatiotemporal manner. In this practical we will investigated by live imaging the first cleavage divisions in the developing fruit fly (Drosophila melanogaster). We will use light-sheet based microscopy techniques to record the positions of nuclei with high spatial and temporal resolution. Microscopy The fundamental idea behind light-sheet based fluorescence microscopy is to combine optical sectioning and wide-field fluorescence microscopy by illuminating a single, thin section of a fluorescent specimen from the side. The object is thus illuminated orthogonally to the detection optical axis, while the emitted fluorescence light is detected with a standard wide-field fluorescence microscope1. 32 | M u l t i p l e - v i e w m i c r o s c o p y w i t h L S F M ! "#$%&'( ( )'*++$, "- . /"0- '. - 1'1&/&2/"0- '"- '34! 5 6'! "#$%&"' ( ) #%*&"%'"%++, - %&. #( / "01*- "#$( "' %/ ( "23". "+%4$#5' $( ( #" Figure 1: Concept of light-sheet based microscopy. A thin section is illuminated from 62+, ( 78"9 $%+( "0+, *1( ' ) ( &#"+%4$#"4( &( 1. #( / "%&"#$( "0+, *1( ' ) ( &#"*2:( ) #"%'") *++( ) #( / "&*1- . +"#*"#$( "%++, - %&. #( / " by"+%4$#5' a $(light-sheet (blue), while fluorescent generated in the fluorescent ; +. &(the "641( side ( &7<"=$( ( #"%'"#$%&&( ' #"%&"0 1*&#"*0"#$( "/ ( #( ) #% *&"*2:( ) #%>( "+( &'light ". &/ "% #"*>( 1+. ; ' "9 %#$"#$( " ' object is collected normal to the illuminated plane (green). The light‐sheet is thinnest in front ofbears thea detection objective over lens other and commonly it overlaps with the with the Such a microscope number of advantages used optical-sectioning focalSince plane. microscopes. no parts of the specimen outside the light-sheet are illuminated, they are not subject to the undesirable effects of high light intensities, i.e. fluorophore photo-bleaching and more general photo-toxic effects (Figure 12). The reduced per-image photo-damage therefore objective’s The main advantages of conventional confocal microscopes are: 1) low phototoxicity and bleaching 2) high speed 3) good signal-to-noise ratio. Together, these inherent properties of light-sheet microcopy techniques will enable us to image the nuclear division patterns and cell membrane changes with high spatial and temporal resolutions without phototoxic effects altering the development. Data Analysis Deconvolution is a mathematical operation used in image restoration to recover an image that is degraded by a physical process, which can be described, by the opposite operation, a convolution. This is the case in image formation by optical systems as used in microscopy. The degree of spreading (blurring) of a single pointlike object is a measure for the quality of an optical system. The 3D blurry image of such a single point light source is usually called the Point Spread Function (PSF). PSFs play an important role in the image formation theory of the fluorescent microscope. We determine the PSF of our light-sheet setup by imaging sub-resolution beads. Furthermore, we will discuss fundamental image analysis and processing algorithms and we will discuss various modeling approaches and concepts. Protocol Preparation of Drosophila embryos for live imaging Time-lapse observation of developing embryos expressing fluorescent proteins targeted to specific tissues and/or subcellular compartments can yield important information about the dynamics of cell rearrangements and/or changes in the spatial distribution of different proteins within single cells in the course of development. Moreover, it enables the investigator to simultaneously track multiple cellular events. This protocol focuses on noninvasive, time-lapse, confocal microscopic observation of fluorescently tagged proteins in living Drosophila embryos. In this practical we will use mainly fly expressing a fluorescent membrane and nuclear marker. The outermost shell of the embryo, the chorion, is a specialized layer secreted by follicle cells during oogenesis. It has two dorsal appendages that facilitate gas exchange in the developing embryo (Fig. 4.18.3B, arrow). The presence of the chorion renders the embryo opaque for trans-illumination and epi-fluorescence. Most protocols for preparing Drosophila embryos for live imaging involve dechorionation2. 2 Figure 2: Preparation of Drosophila embryos for fluorescence microscopy. A) The fly embryo collection cage with an apple juice agar plate. B) Modified funnel with a 100-µm stainless steel mesh for embryo collection and dechorionation is shown on the lhs. The image in the middle shows the embryos after dechorionation, the image on the rhs shows embryos before removal of the chorion with clearly visuable appendages. Materials Embryo collection cages that fit 60-mm petri dishes (Genesee Scientific) Apple or grape juice agar plates Yeast paste: prepared by mixing 1 g dry yeast with 1.8 ml distilled H2O to make a thick paste 50% bleach: bleach (4% to 6% available chlorine) diluted 1:1 with distilled H2O just prior to use Phosphate-buffered saline (PBS; appendix 2A) Dichlorodimethylsilane (Fluka) Egg basket: prepared by removing the stem of a plastic funnel (~60 mm top internal diameter) with a blade, slightly melting the small diameter opening, and attaching to a piece of 100-µm stainless steel wire or 100- or 120µm nylon mesh (Genesee Scientific 57-102 or BD Falcon 352360) Squirt bottle with distilled H2O Dissecting microscope Fine paintbrush (No. 1) for transferring and handling embryos 3 Collect embryos 1. Take a freshly prepared apple juice agar plate and add a dab of thick yeast paste in the center of the plate. 2. Place 50 to 100, 2- to 3-day-old adult flies expressing the fluorescently tagged protein of interest in a cage and cover with a yeasted apple juice agar plate. Maintain flies in an incubator at 25°C. (Collection plates must be at room temperature before use. Females will not lay eggs on cold plates!) 3. Replace with a fresh apple juice agar plate at the same time every day for 2 to 3 days to synchronize egg laying. 4. On the day of the imaging experiment, replace the fresh juice agar plate 1 hr before the actual egg collection. Incubate the cage at 25°C for 1 hr and discard this “prelay” plate. (Females can retain fertilized eggs in the uterus for variable periods of time, so the prelay plate contains embryos at different stages.) 5. Place a fresh apple juice agar plate and incubate for the appropriate time to obtain embryos at the desired stage of development prior to imaging. (The same population of flies may be used for embryo collection in cages for ~10 days if apple juice agar plates are changed daily.) Dechorionate embryos 6. Add some distilled water in the apple juice agar plate and brush the embryos gently into suspension. Pour the water containing the embryos into the egg basket. Wash with copious amounts of distilled water, using a tap or squirt bottle, to get rid of the yeast paste. 7. Place the funnel containing the embryos in freshly prepared 50% bleach and agitate gently so the bleach solution disperses the embryos. Incubate 1 min with periodic gentle agitation. This treatment will remove the chorion, which makes the embryo opaque for imaging. (Always prepare the 50% bleach solution fresh. Bleach loses its potency after dilution and with aging. When embryos are dechorionated, their hydrophobic vitelline membranes tend to stick to the sides of the funnel, and embryos also clump together. If dorsal appendages are still observed under the dissecting microscope just prior to mounting (see Fig. 4.18.3B), place embryos back in bleach solution for 5 to 10 sec, rinse thoroughly with distilled water, and check again. Do not overexpose embryos to bleach, or they will be damaged.) 8. Immediately wash the embryos thoroughly with distilled water, using a tap or squirt bottle, to get rid of any residual bleach. Squirt distilled water on the inner sides of the funnel to bring embryos that stick to the sides onto the mesh. Mounting embryos for light-sheet imaging We will use two distinct methods to mount embryos for imaging: 1. Embryos mounted on glass slides a. Coat the coverglass with dichlorodimethylsilane or with tape glue (Scotch) dissolved in heptane. b. Mount dechorionated embryos on the coverglass on their dorsolateral/ventrolateral sides and add PBS. With the help of the paintbrush slowly move the embryos to an upright position so that they sit on their posterior side 2. Embryos embedded in agaraose a. Make 1% low melting agrarose in PBS. b. With a plunger suck in agarose in blue capillary (5-10mm). c. Use sharp metal tip to molt a thin tube along the center axis of the agarose cylinder. This will create a small funnel inside the gel. 4 d. Under the dissection microscope carefully place one or two embryos inside the agarose funnel. While the first methods allow for mounting of mainly (10-15) embryos on a single slide, the agarose methods will be used for whole embryo imaging. References 1. Huisken, J., Swoger, J., Del Bene, F., Wittbrodt, J. & Stelzer, E.H.K. Optical Sectioning Deep Inside Live Embryos by Selective Plane Illumination Microscopy. Science 305, 1007 -1009 (2004). 2. Mavrakis, M., Rikhy, R., Lilly, M. & Lippincott-Schwartz, J. Fluorescence Imaging Techniques for Studying Drosophila Embryo Development. Current Protocols in Cell Biology (2001). 5
