Lesson 16: Translations
advertisement
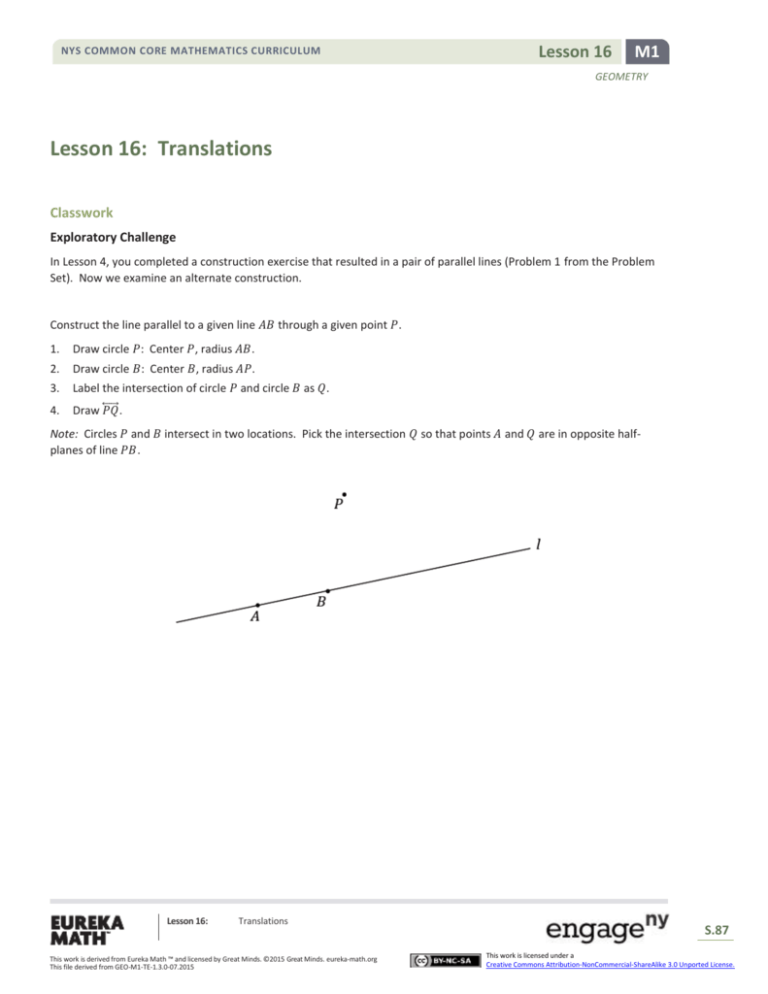
NYS COMMON CORE MATHEMATICS CURRICULUM Lesson 16 M1 GEOMETRY Lesson 16: Translations Classwork Exploratory Challenge In Lesson 4, you completed a construction exercise that resulted in a pair of parallel lines (Problem 1 from the Problem Set). Now we examine an alternate construction. Construct the line parallel to a given line 𝐴𝐵 through a given point 𝑃. 1. Draw circle 𝑃: Center 𝑃, radius 𝐴𝐵. 2. Draw circle 𝐵: Center 𝐵, radius 𝐴𝑃. 3. Label the intersection of circle 𝑃 and circle 𝐵 as 𝑄. 4. Draw ⃡𝑃𝑄 . Note: Circles 𝑃 and 𝐵 intersect in two locations. Pick the intersection 𝑄 so that points 𝐴 and 𝑄 are in opposite halfplanes of line 𝑃𝐵. Lesson 16: Translations This work is derived from Eureka Math ™ and licensed by Great Minds. ©2015 Great Minds. eureka-math.org This file derived from GEO-M1-TE-1.3.0-07.2015 S.87 This work is licensed under a Creative Commons Attribution-NonCommercial-ShareAlike 3.0 Unported License. NYS COMMON CORE MATHEMATICS CURRICULUM Lesson 16 M1 GEOMETRY Discussion To perform a translation, we need to use the previous construction. Let us investigate the definition of translation. For vector 𝐴𝐵 , the translation along 𝐴𝐵 is the transformation 𝑇𝐴𝐵 of the plane defined as follows: 1. For any point 𝑃 on the line 𝐴𝐵, 𝑇𝐴𝐵 (𝑃) is the point 𝑄 on ⃡𝐴𝐵 so that 𝑃𝑄 has the same length and the same direction as 𝐴𝐵 , and 2. For any point 𝑃 not on ⃡𝐴𝐵 , 𝑇𝐴𝐵 (𝑃) is the point 𝑄 obtained as follows. Let 𝑙 be the line passing through 𝑃 and parallel to ⃡𝐴𝐵 . Let 𝑚 be the line passing through 𝐵 and parallel to line 𝐴𝑃. The point 𝑄 is the intersection of 𝑙 and 𝑚. Note: The parallel line construction on the previous page shows a quick way to find the point 𝑄 in part 2 of the definition of translation. In the figure to the right, quadrilateral 𝐴𝐵𝐶𝐷 has been translated the length and direction of vector 𝐶𝐶′. Notice that the distance and direction from each vertex to its corresponding vertex on the image are identical to that of 𝐶𝐶′. Example 1 Draw the vector that defines each translation below. Finding the vector is relatively straightforward. Applying a vector to translate a figure is more challenging. To translate a figure, we must construct parallel lines to the vector through the vertices of the original figure and then find the points on those parallel lines that are the same direction and distance away as given by the vector. Lesson 16: Translations This work is derived from Eureka Math ™ and licensed by Great Minds. ©2015 Great Minds. eureka-math.org This file derived from GEO-M1-TE-1.3.0-07.2015 S.88 This work is licensed under a Creative Commons Attribution-NonCommercial-ShareAlike 3.0 Unported License. Lesson 16 NYS COMMON CORE MATHEMATICS CURRICULUM M1 GEOMETRY Example 2 Use your compass and straightedge to apply 𝑇𝐴𝐵 to segment 𝑃1 𝑃2 . P1 Note: Use the steps from the Exploratory Challenge twice for this question, creating two lines parallel to 𝐴𝐵 : one through 𝑃1 and one through 𝑃2 . A B P2 Example 3 Use your compass and straightedge to apply 𝑇𝐴𝐵 to △ 𝑃1 𝑃2 𝑃3 . P1 P3 P2 A B Relevant Vocabulary PARALLEL: Two lines are parallel if they lie in the same plane and do not intersect. Two segments or rays are parallel if the lines containing them are parallel lines. Lesson 16: Translations This work is derived from Eureka Math ™ and licensed by Great Minds. ©2015 Great Minds. eureka-math.org This file derived from GEO-M1-TE-1.3.0-07.2015 S.89 This work is licensed under a Creative Commons Attribution-NonCommercial-ShareAlike 3.0 Unported License. Lesson 16 NYS COMMON CORE MATHEMATICS CURRICULUM M1 GEOMETRY Lesson Summary A translation carries segments onto segments of equal length. A translation carries angles onto angles of equal measure. Problem Set Translate each figure according to the instructions provided. 1. 2 units down and 3 units left 2. Draw the vector that defines the translation. R S 1 unit up and 2 units right Draw the vector that defines the translation. D F U T E Lesson 16: Translations This work is derived from Eureka Math ™ and licensed by Great Minds. ©2015 Great Minds. eureka-math.org This file derived from GEO-M1-TE-1.3.0-07.2015 S.90 This work is licensed under a Creative Commons Attribution-NonCommercial-ShareAlike 3.0 Unported License. Lesson 16 NYS COMMON CORE MATHEMATICS CURRICULUM M1 GEOMETRY 3. Use your compass and straightedge to apply 𝑇𝐴𝐵 to the circle below (center 𝑃1 , radius ̅̅̅̅̅̅ 𝑃1 𝑃2 ). P2 P1 A 4. B Use your compass and straightedge to apply 𝑇𝐴𝐵 to the circle below. Hint: You need to first find the center of the circle. You can use what you learned in Lesson 4 to do this. A B Two classic toothpick puzzles appear below. Solve each puzzle. 5. Each segment on the fish represents a toothpick. Move (translate) exactly three toothpicks and the eye to make the fish swim in the opposite direction. Show the translation vectors needed to move each of the three toothpicks and the eye. Lesson 16: Translations This work is derived from Eureka Math ™ and licensed by Great Minds. ©2015 Great Minds. eureka-math.org This file derived from GEO-M1-TE-1.3.0-07.2015 S.91 This work is licensed under a Creative Commons Attribution-NonCommercial-ShareAlike 3.0 Unported License. NYS COMMON CORE MATHEMATICS CURRICULUM Lesson 16 M1 GEOMETRY 6. Again, each segment represents a single toothpick. Move (translate) exactly three toothpicks to make the triangle point downward. Show the translation vectors needed to move each of the three toothpicks. 7. Apply 𝑇𝐺𝐻 to translate △ 𝐴𝐵𝐶. Lesson 16: Translations This work is derived from Eureka Math ™ and licensed by Great Minds. ©2015 Great Minds. eureka-math.org This file derived from GEO-M1-TE-1.3.0-07.2015 S.92 This work is licensed under a Creative Commons Attribution-NonCommercial-ShareAlike 3.0 Unported License.
