Formatting an APA Style Paper
advertisement
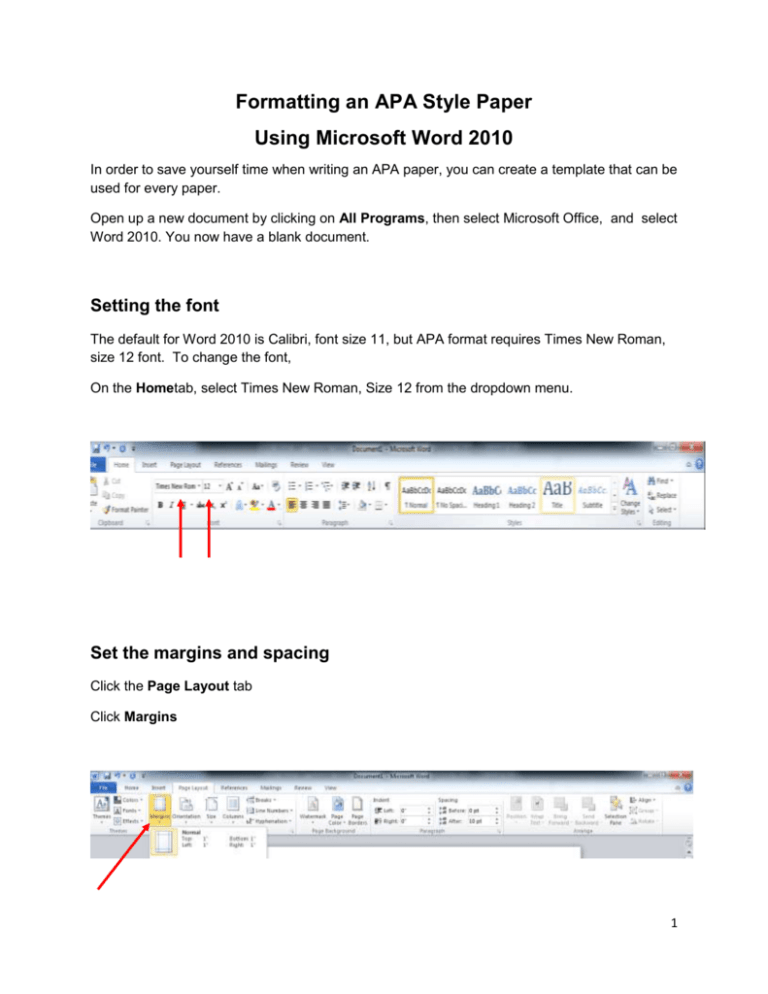
Formatting an APA Style Paper Using Microsoft Word 2010 In order to save yourself time when writing an APA paper, you can create a template that can be used for every paper. Open up a new document by clicking on All Programs, then select Microsoft Office, and select Word 2010. You now have a blank document. Setting the font The default for Word 2010 is Calibri, font size 11, but APA format requires Times New Roman, size 12 font. To change the font, On the Hometab, select Times New Roman, Size 12 from the dropdown menu. Set the margins and spacing Click the Page Layout tab Click Margins 1 Select Normal (1 inch on all sides) Your margins should now be set correctly. In the Paragraph group, click the arrow in the lower right corner. The Paragraph box will appear. Under Spacing, the default setting for “After” is 10. This will cause the spacing after a hard return, such as at the end of a paragraph, to be almost triple-spaced rather than double-spaced. Change the 10 to a 0. Under Line spacing, choose Double from the dropdown menu.Click OK. 2 Running Head APA requires that the header field contain a Running head in the header field. To insert the running head: Click Insert Select Header Click Edit Header The following will appear: 3 The running head has a different format on the title page. In the Options panel, click Different First Page. A check mark should appear in the box next to it. Type: Running head: SHORT TITLE LESS THAN 50 CHARACTERS Tab over to the 1” right margin (should take 1 or 2 tabs) Select Page Number (from the far left pane) Select Current Position Select Plain Number The page number will be placed where the cursor is. Click Home To change the font to Times New Roman, size 12: Click Select (far right), then choose Select All. From the dropdown menu (far left), choose Times New Roman, Size 12. Your page should look like this: Double click in the body to exit the header. Create Page 1: Title Page 4 Go to the Paragraph Panel and click the Center button (second from left) Hit Enter 8 times, type: Title (PressEnter) Your name (Press Enter) The university name (Press Enter) Creating a header for the remaining pages of the paper The words “Running head” should not appear on any page except the title page. Therefore, a different header needs to be created on the second page. Click Insert Tab Click Page Break Click Header Click Edit Header Type your header: SHORT TITLE LESS THAN 50 CHARACTERS Tab over to the 1” right margin Select Page Number (from far left pane) Select Current Position Select Plain Number. The page number will be placed where the cursor is. Click Home To change the font to Times New Roman, size 12: Click Select (far right), then choose Select All. From the dropdown menu (far left), choose Times New Roman, Size 12. Your page should look like this: 5 Exit the header by double clicking in the body of the text or click View and click Print Layout SAVING THE TEMPLATE Click File. Move your cursor over Save As to reveal the menu. Select Template. Choose your drive (use scrollbar on left). Name your file: APA Template Click: Save Note: If you are emailing a document to another source, such as an instructor, you may want to Save As a 1997-2003 document or template. Be sure to check with your instructor. Create Page 2: Abstract 6 Make sure your cursor is in the center. If not, go to the Paragraph Tab and click the Center button (second from left) Type the word: Abstract Press Enter once. To align your text left, go back to the Paragraph Tab and click the Left Align button (to left of Center button) Insert a page break Click Insert Tab Click Page Break Create First Page of Text (Page 3) On your third page, change the type back to Centered (click Home, to the Paragraph Panel and click the Center button--second from left). Your font should remain Times New Roman, size 12. Type in the word “Title” as a place holder. It should be centered on the page. Hit enter. Change the Centered type to Left (go to the Paragraph Panel and click Left Align button—first one on left). Click the Insert tab Click Page Break Create Reference Page 7 On the fourth page, change the type back to Centered (click Home, go to the Paragraph Tab and click the Center button--second from left). Your font should remain Times New Roman, size 12. Type the word: References. It should be centered on the page. Hit Enter. Change the Centered type to Left (go to the Paragraph Tab and click Left Align button—first one on left). Save your template again Using the template You are now ready to begin using your template. The first time you open your template, immediately go to File, Save As. Name the file working title of your paper. Click Save. This will allow you to type your paper into this template without changing the original template. When you are finished writing your paper, you will need to format your references. Formatting your references APA rules require that the second line and subsequent lines of your citation be indented 5 spaces. To create this hanging indent, click the arrow in the lower right corner of the ParagraphPanel. In the Indentation area, select the Hanging option from the Special drop-down list. The “By” box automatically reads 0.5", which means that Word automatically hangs and indents the paragraph a half-inch. 8 Click “Ok” Your citations should now format correctly. 9
