Synopsis of Light Scattering Measurement Book Chapter
advertisement
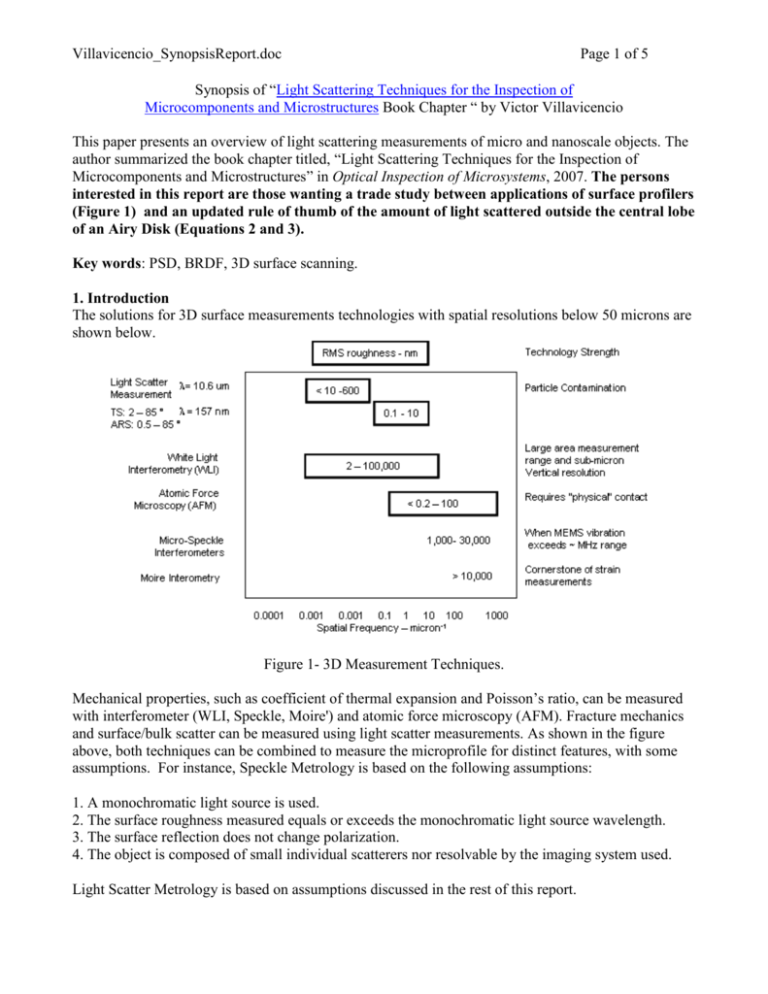
Villavicencio_SynopsisReport.doc Page 1 of 5 Synopsis of “Light Scattering Techniques for the Inspection of Microcomponents and Microstructures Book Chapter “ by Victor Villavicencio This paper presents an overview of light scattering measurements of micro and nanoscale objects. The author summarized the book chapter titled, “Light Scattering Techniques for the Inspection of Microcomponents and Microstructures” in Optical Inspection of Microsystems, 2007. The persons interested in this report are those wanting a trade study between applications of surface profilers (Figure 1) and an updated rule of thumb of the amount of light scattered outside the central lobe of an Airy Disk (Equations 2 and 3). Key words: PSD, BRDF, 3D surface scanning. 1. Introduction The solutions for 3D surface measurements technologies with spatial resolutions below 50 microns are shown below. Figure 1- 3D Measurement Techniques. Mechanical properties, such as coefficient of thermal expansion and Poisson’s ratio, can be measured with interferometer (WLI, Speckle, Moire') and atomic force microscopy (AFM). Fracture mechanics and surface/bulk scatter can be measured using light scatter measurements. As shown in the figure above, both techniques can be combined to measure the microprofile for distinct features, with some assumptions. For instance, Speckle Metrology is based on the following assumptions: 1. A monochromatic light source is used. 2. The surface roughness measured equals or exceeds the monochromatic light source wavelength. 3. The surface reflection does not change polarization. 4. The object is composed of small individual scatterers nor resolvable by the imaging system used. Light Scatter Metrology is based on assumptions discussed in the rest of this report. Villavicencio_SynopsisReport.doc Page 2 of 5 The technique for light scattering measurements of surfaces can be roughly divided into angle resolved scattering (ARS) and total scattering (TS) or total integrated scattering (TIS). As shown in the Figure below, TS or TIS is collected over the backward and forward hemispheres by means of a Coblentz sphere or an integrating sphere. The ARS arrangement has a sample holder and detector, each on a goniometer, which revolves 360 degrees around the sample with 0.01 degree resolution. Figure 2: Set-up for TS measurements in the backward and forward directions [4] A standard procedure for ARS measurements was defined in ASTM standard E 1392 [2]. The 2002 international standard ISO 13696 [3] defines TS as the backscattered or forward scattered radiation divided by incident energy. Thus, light scattering techniques and their definitions are now standardized. Figure 3- ARS measurements Setup [4] 2. Theoretical Background of Light Scattering The surface microroughness can be described as a Fourier series of sinusoidal waves. According to the grating equation, each single grating with spacing g causes scattering at the wavelength into the angle : sin = /g . Thus, f = 1/g represents one single spatial frequency as shown in Figure 1. A Villavicencio_SynopsisReport.doc Page 3 of 5 surface with statistical microroughness contains a large diversity of spatial frequencies, which is described by the power spectral density (PSD(f)). PSD, ARS, and BRDF (bidirectional reflectance) are interrelated by ARS = BRDF cos = K(, n , , ) PSD(f) (1) The K and PSD factor is only for relatively smooth surfaces [1,104]. TS is the ratio of the power P scattered into the forward or backward hemisphere over the incident power Pi: TS = 2 2 BRDF cos sin d 0 (2) When the average lateral extension of the microroughness, becomes much larger than, simple approximations for total backscatter TSb and total forward scatter TSf (for transparent materials) is provided as [1, 105]: 2 4 TSb = Ro (3) 2 n 1 TSf = To 2 (4) Where is laser source wavelength in microns n is the refractive index of the transparent or reflective material under test. is the rms surface roughness in microns Ro, To is the specular reflectance and transmittance. The book [1] that is summarized and most recent SPIE papers by the chapter’s author (Angela Duparre’) do not show the range where is valid to use these equations. At the time of this writing, an email to Dr. Duparre’ has not been received about the range for . The author of this summary paper is interested in this limit for his high power scatter application. Three of the five parameters that are required for vector based BRDF model is RMS roughness , autocorrelation length , and index of refraction n(). A He-Torrance vector based BRDF model fits metal surface BRDFs to within 30 degrees angle of incidence when = 1000 nm +/- 500 nm or the roughness to wavelength ratio is of order one [5]. 3. Relevance to other References For the rule of thumb equation to be useful, a range for h is required. Other publications also imply that h/ greater than or equal to 1 [5] [6]. A similar paper was found describing 3D measurement technologies with spatial resolutions of greater than 50 micron [7]. The 3D paper [7] does not provide theoretical equations nor discusses light scattering measurement for 3D applications with spatial resolution below 50 microns [1] [8]. Villavicencio_SynopsisReport.doc Page 4 of 5 4. Applications Applications can be classified into two groups: The first group is more interested in the visual aspect of the results. This group includes the movie industry, animation, computer games, and virtual reality. For the applications in computer graphics, the data fitting can be relaxed, due to limitations in human vision, cameras, and display devices. This includes angular resolution, polarization insensitivity and limited dynamic range. However, human vision is sensitive to surface glossiness, which affects the lateral shape and angular positions of the reflectance lobe, so thee features should be accurately predicted by the reflectance model. The second group, more interested in the quantitative measurement. This group includes submicronmetrology, anthropometrics, biometry, and medical applications. Future work on scattering based inspection techniques will include shorter wavelengths (for instance to 13.4 nm for inspections in Extreme UV lithography), particle detection down to diameters less than 50 nm, and specific methods for samples with high curvature. Components for DUV and VUV applications can be investigated with scattering levels down to 10 ppm. For either ARS or TIS or TS, scattering measurements below 10 ppm must be done in vacuum since Rayleigh scatter from gas molecules would otherwise enhance the scatter signal. a b Figure 4 – Scatter measurement of particle contamination on Silicon Carbide. b) TS Measurement of Flouride high-reflective mulilayer coating on one half of a Calcium Flouride substrate. 5. Conclusion This paper provided equations for forward or backward surface scattering of transparent and opaque materials and the equipment which measures micron sized structures. Light scattering equipment developed at the Fraunhofer Institute in Jena, Germany enable high-sensitive and flexible scatter measurements from the Deep UltraViolet (DUV) up to the IR spectral ranges. The wide range of application was demonstrated for roughness analysis of smooth surfaces as well as scatter investigations of multilayer coatings and diamond-turned mirrors. Further applications include insidestructure investigation of multilayers, determination of bulk scattering in high-purity optical materials, and particle detection below 50 nanometers. Villavicencio_SynopsisReport.doc Page 5 of 5 References 1. Angela Duparre, Light Scattering Techniques for the Inspection of Microcomponents and Microstructures in Optical Inspection of Microsystems, edited by Wolfgang Osten, CRC Press, New York, 2007. 2. ISO 13696, Optics and optical instruments – Lasers and laser related equipment – Test Methods for radiation scattered by optical components, International Organization for Standardization, Geneva, Switzerland, 2002. 3. ASTM E 1392-90, Standard practice for angle resolved optical scatter measurements on specular or diffuse surfaces, American Society for Testing and Materials, Philadelphia, 1990. 4. Sven Schröder, Stefan Gliech, Angela Duparré, Sensitive and flexible light scatter techniques from the VUV to IR regions, Optical Fabrication, Testing, and Metrology II, edited by Angela Duparré, Roland Geyl, Lingli Wang, Proceedings of SPIE Vol. 5965 (SPIE, Bellingham, WA, 2005) 5. Hongsong Li and Kenneth E. Torrance, “An experimental study of the correlation between surface roughness and light scattering for rough metallic surfaces”, SPIE 5878, Advanced Characterization Techniques for Optics, Semiconductors, and Nanotechnologies II, edited by Angela Duparré, Bhanwar Singh, Zu-Han Gu, Proceedings of SPIE Vol. 5878 (2005). 6. Brian G. Hoover, Victor L. Gamiz, Diffractive Bidirectional Reflectance Distributions of Surfaces with Large Effective Roughness in One Dimension, Laser Radar Techniques for Atmospheric Sensing, edited by Upendra N. Singh, SPIE Vol. 5575, 2004. 7. Nicola D’Apuzzo, Overview of 3D surface digitization technologies in Europe, Three-Dimensional Image Capture and Applications VII, edited by Brian D. Corner, Peng Li, Matthew Tocheri, SPIE Vol. 6056, 2006. 8. Mike Conroy, Joe Armstrong, A Comparison of Surface Metrology Techniques, Optical Micro- and Nanometrology in Microsystems Technology, edited by Christophe Gorecki, Anand K. Asundi, Wolfgang Osten, SPIE Vol. 6188, 61880B, (2006). 9. Opti512 Class Notes, U. of Arizona, Fall, 2006.
