Secto Design Oy Kauppalantie 12 02700 Kauniainen Finland tel. +
advertisement

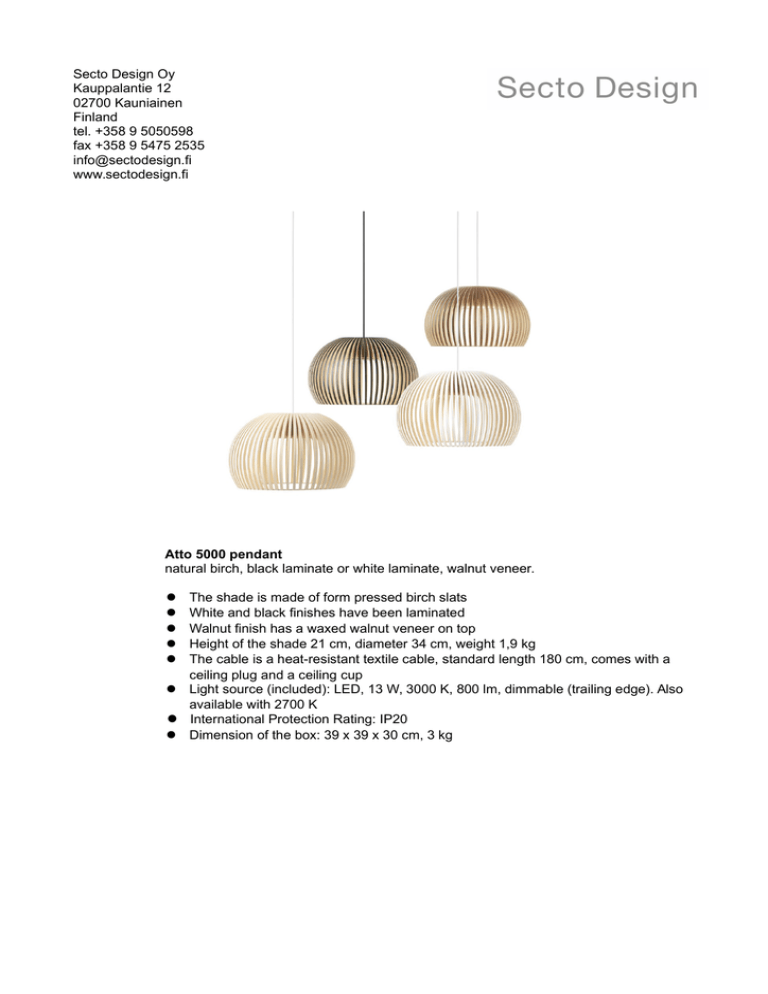
Secto Design Oy Kauppalantie 12 02700 Kauniainen Finland tel. +358 9 5050598 fax +358 9 5475 2535 info@sectodesign.fi www.sectodesign.fi Atto 5000 pendant natural birch, black laminate or white laminate, walnut veneer. The shade is made of form pressed birch slats White and black finishes have been laminated Walnut finish has a waxed walnut veneer on top Height of the shade 21 cm, diameter 34 cm, weight 1,9 kg The cable is a heat-resistant textile cable, standard length 180 cm, comes with a ceiling plug and a ceiling cup Light source (included): LED, 13 W, 3000 K, 800 lm, dimmable (trailing edge). Also available with 2700 K International Protection Rating: IP20 Dimension of the box: 39 x 39 x 30 cm, 3 kg Secto Design recommends the use of the following Trailing edge type of dimmers with the LED ATTO 5000: Manufacturer Dimmer Note Minimum LED-Load Minimum Stability Dim-range BERKER 286710 Sam as Insta 51190 2.5 Watt 20% OK BERKER - Same as Insta 53128R - 25% NOT BUSCH J 6513U-102 7.5 Watt 20% OK ELARI ATD 315 2.5 Watt 20% OK ELARI ADT 600R 7.5 Watt 20% OK EPV PAB 315 2.5 Watt 20% OK GIRA - Same as Insta 51190 2.5 Watt 20% OK GIRA - Same as Insta 53128R - 25% NOT INSTA 51190 2.5 Watt 20% OK INSTA 53128 R - 25% NOT INSTA FUNK 576650 22 10 Watt 30% OK INSTA 51040 2.5 Watt 20% OK JUNG 1254 UDE 25% NOT JUNG 225TDE 2.5 Watt 20% OK LUTRON LPRPM-4A 2.5 Watt 15% OK LUTRON GRAFIK INTEGRAL GXI 2.5 Watt 15% OK OPUS 852395 2.5 Watt 30% OK PEHA 433HAB 2.5 Watt 20% OK SCHNEIDER ATD 315 2.5 Watt 20% OK SCHNEIDER 600R 7.5 Watt 20% OK Same as Insta 53128R - SIEMENS 5 TC8 284 7.5 Watt 15% OK (An overview of the Trailing-edge dimmers that are tested with the L05021 MINIDIM Driver) 20.08.2014 Secto Design Oy Dezall Installation Dezall® Lamptops är ett nytt och enkelt sätt att hänga upp lampor. Lamptoppen monteras på befintlig sladd och kräver inte att sladden kapas. Såhär gör du: Tight fit guaranteed Svenska Lås fast sladden i den övre delen av skruven, börja med mittenhålet. Lägg sedan in sladden inuti gängan. Tryck ned den ordentligt i botten. Finns en gammal kåpa kan denna tas bort från sladden genom att tex. klippa den i två bitar med en sax. Dezall Installation Trä in skruven, kontakt och överbliven sladd genom kåpan underifrån. Trä även genom ringen om denna ska användas. Ringen kan användas för att få en större kåpa, eller då kontakten till taklampan sitter en bit ifrån där lampan ska hänga. Tryck då ut ett av de förberedda hålen, låt sladden löpa därigenom och placera ringen mot taket ovanpå kåpan. De två matchande bottendelarna läggs nu runt sladden, mot varandra, mellan kåpan och lampan. Tryck ihop dem ordentligt. För in botten i kåpan genom att passa in bottendelens ”vingar” i spåren inuti kåpan. Tryck in botten tills dess att ytan undertill blir helt plan. Häng upp skruven på takkroken och sätt i kontakten (alt montera kopplingsplinten). Se först till att takkroken sitter fäst i taket och inte roterar. Häng på kroken, samla ihop den överblivna sladden och vira denna runt den övre delen av skruven/kroken (undvik dock själva gängan). Fäst med bifogad fästtråd. För lamptoppen uppåt mot skruven som hänger på kroken. När skruv och botten-delens ”mutter” har hittat varandra inne i kåpan kan man börja skruva lamptoppen medsols uppåt. Skruva tills toppen når taket. För att hitta rätt kan du försiktigt dra i sladden nedåt, då kommer skruven automatiskt att vinklas rakt nedåt och därmed lätt hitta in i bottendelen. Lamptoppen sitter nu perfekt mot taket. www.dezall.se Dezall® Lamptops is a new and simple way to mount lamps. The lamptop is mounted onto the existing cord and doesn’t require the cord to be cut or to make screwholes in the ceiling. This is how it works: Tight fit guaranteed English Lock the cord in the upper part of the screw, start in the middle. Then insert it into the opening along the thread. Push it down into the bottom of the channel. If there is an old cover, this can be removed from the cord e.g. by cutting it with scissors. Insert the screw, plug and remaining cord through the cover from below. Also insert it through the ring if this is to be used. The ring can be used to make the cover bigger, or if the outlet for the ceiling lamp is located at a distance from where the lamp is to be placed. Push out a perforated tab to make room for the cord and place the ring to the ceiling on top of the cover. Put the two matching bottom parts together, facing each other, around the cord between the cover and the lamp. Insert the assembled bottom part into the cover by fitting the “wings” into the slots inside the cover. Push it into the cover until fully seated. Hang the screw on the ceiling hook and connect the plug. (or terminal block). First ensure that the ceiling hook is fixed to the ceiling and does not rotate. When connected, collect the remaining cord, wind it around the upper part of the screw and hook and tie it up using the enclosed wire-tie (avoid winding it around the thread). Move the lamptop upwards towards the screw hanging on the hook. When the screw and the bottom parts’ “nut” have come in contact inside the cover, start screwing the cover clockwise until it reaches the ceiling. By pulling the cord lightly from below, the screw will automatically be angled downwards and will then easily find the nut. The lamptop is now sitting straight to the ceiling. www.dezall.se SECTO DESIGN ATTO 5000 This luminaire contains built-in LED lamps. A++ A+ A B C D E L E D The LED lamps cant be changed in the luminaire. 874/2012
