TRACEABILITY IN FORCE MEASUREMENT IN
advertisement
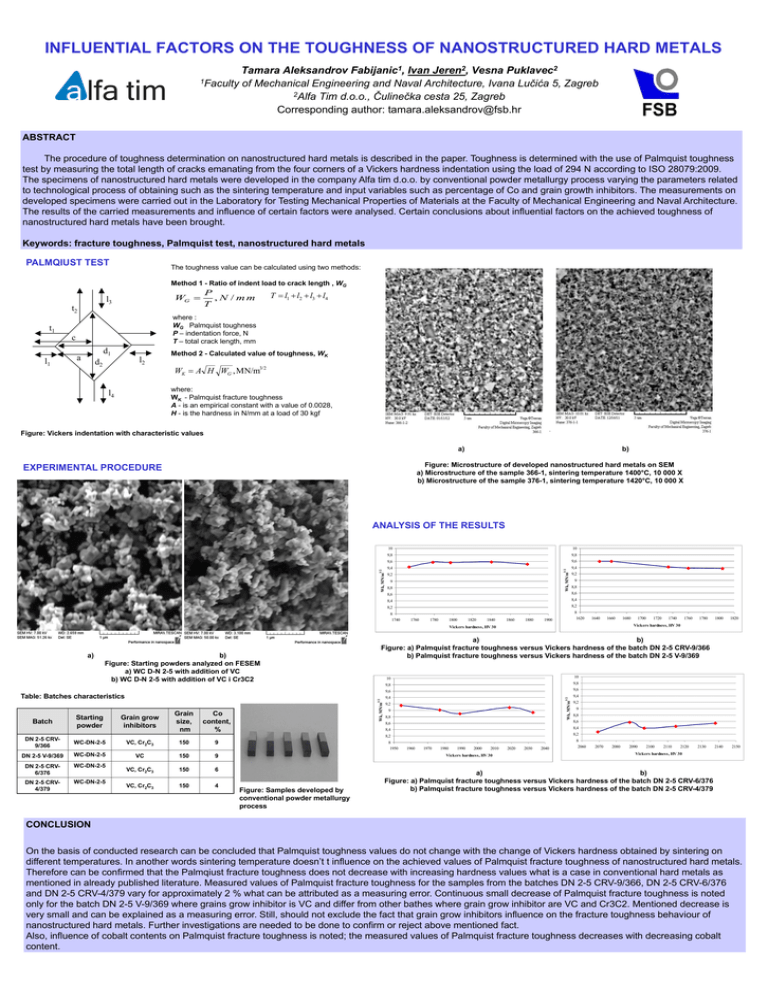
INFLUENTIAL FACTORS ON THE TOUGHNESS OF NANOSTRUCTURED HARD METALS Tamara Aleksandrov Fabijanic1, Ivan Jeren2, Vesna Puklavec2 1Faculty of Mechanical Engineering and Naval Architecture, Ivana Lučića 5, Zagreb 2Alfa Tim d.o.o., Čulinečka cesta 25, Zagreb Corresponding author: tamara.aleksandrov@fsb.hr ABSTRACT The procedure of toughness determination on nanostructured hard metals is described in the paper. Toughness is determined with the use of Palmquist toughness test by measuring the total length of cracks emanating from the four corners of a Vickers hardness indentation using the load of 294 N according to ISO 28079:2009. The specimens of nanostructured hard metals were developed in the company Alfa tim d.o.o. by conventional powder metallurgy process varying the parameters related to technological process of obtaining such as the sintering temperature and input variables such as percentage of Co and grain growth inhibitors. The measurements on developed specimens were carried out in the Laboratory for Testing Mechanical Properties of Materials at the Faculty of Mechanical Engineering and Naval Architecture. The results of the carried measurements and influence of certain factors were analysed. Certain conclusions about influential factors on the achieved toughness of nanostructured hard metals have been brought. Keywords: fracture toughness, Palmquist test, nanostructured hard metals PALMQIUST TEST The toughness value can be calculated using two methods: Method 1 - Ratio of indent load to crack length , WG WG P , N / mm T T l1 l2 l3 l4 where : WG Palmquist toughness P – indentation force, N T – total crack length, mm Method 2 - Calculated value of toughness, WK WK A H WG , MN/m 3/2 where: WK - Palmquist fracture toughness A - is an empirical constant with a value of 0.0028, H - is the hardness in N/mm at a load of 30 kgf Figure: Vickers indentation with characteristic values a) b) Figure: Microstructure of developed nanostructured hard metals on SEM a) Microstructure of the sample 366-1, sintering temperature 1400°C, 10 000 X b) Microstructure of the sample 376-1, sintering temperature 1420°C, 10 000 X EXPERIMENTAL PROCEDURE 10 9,8 9,8 9,6 9,6 9,4 9,4 3/2 10 Wk, MN/m Wk, MN/m 3/2 ANALYSIS OF THE RESULTS 9,2 9 8,8 9,2 9 8,8 8,6 8,6 8,4 8,4 8,2 8,2 8 1740 1760 1780 1800 1820 1840 1860 1880 8 1620 1900 1640 1660 DN 2-5 CRV9/366 WC-DN-2-5 DN 2-5 V-9/369 WC-DN-2-5 DN 2-5 CRV6/376 WC-DN-2-5 DN 2-5 CRV4/379 WC-DN-2-5 VC, Cr2C3 Grain size, nm 150 Co content, % 9 VC 150 9 VC, Cr2C3 150 6 VC, Cr2C3 150 4 10 9,8 9,8 9,6 9,6 9,4 9,4 3/2 10 Wk, MN/m 3/2 Grain grow inhibitors Wk, MN/m Batch Starting powder 9,2 9 8,8 1740 1760 1780 1800 1820 9,2 9 8,8 8,6 8,6 8,4 8,4 8,2 8,2 8 1950 1960 1970 1980 1990 2000 2010 Vickers hardness, HV 30 Figure: Samples developed by conventional powder metallurgy process 1720 a) b) Figure: a) Palmquist fracture toughness versus Vickers hardness of the batch DN 2-5 CRV-9/366 b) Palmquist fracture toughness versus Vickers hardness of the batch DN 2-5 V-9/369 b) Figure: Starting powders analyzed on FESEM a) WC D-N 2-5 with addition of VC b) WC D-N 2-5 with addition of VC i Cr3C2 Table: Batches characteristics 1700 Vickers hardness, HV 30 Vickers hardness, HV 30 a) 1680 2020 2030 2040 8 2060 2070 2080 2090 2100 2110 2120 2130 2140 2150 Vickers hardness, HV 30 a) b) Figure: a) Palmquist fracture toughness versus Vickers hardness of the batch DN 2-5 CRV-6/376 b) Palmquist fracture toughness versus Vickers hardness of the batch DN 2-5 CRV-4/379 CONCLUSION On the basis of conducted research can be concluded that Palmquist toughness values do not change with the change of Vickers hardness obtained by sintering on different temperatures. In another words sintering temperature doesn’t t influence on the achieved values of Palmquist fracture toughness of nanostructured hard metals. Therefore can be confirmed that the Palmqiust fracture toughness does not decrease with increasing hardness values what is a case in conventional hard metals as mentioned in already published literature. Measured values of Palmquist fracture toughness for the samples from the batches DN 2-5 CRV-9/366, DN 2-5 CRV-6/376 and DN 2-5 CRV-4/379 vary for approximately 2 % what can be attributed as a measuring error. Continuous small decrease of Palmquist fracture toughness is noted only for the batch DN 2-5 V-9/369 where grains grow inhibitor is VC and differ from other bathes where grain grow inhibitor are VC and Cr3C2. Mentioned decrease is very small and can be explained as a measuring error. Still, should not exclude the fact that grain grow inhibitors influence on the fracture toughness behaviour of nanostructured hard metals. Further investigations are needed to be done to confirm or reject above mentioned fact. Also, influence of cobalt contents on Palmquist fracture toughness is noted; the measured values of Palmquist fracture toughness decreases with decreasing cobalt content.
