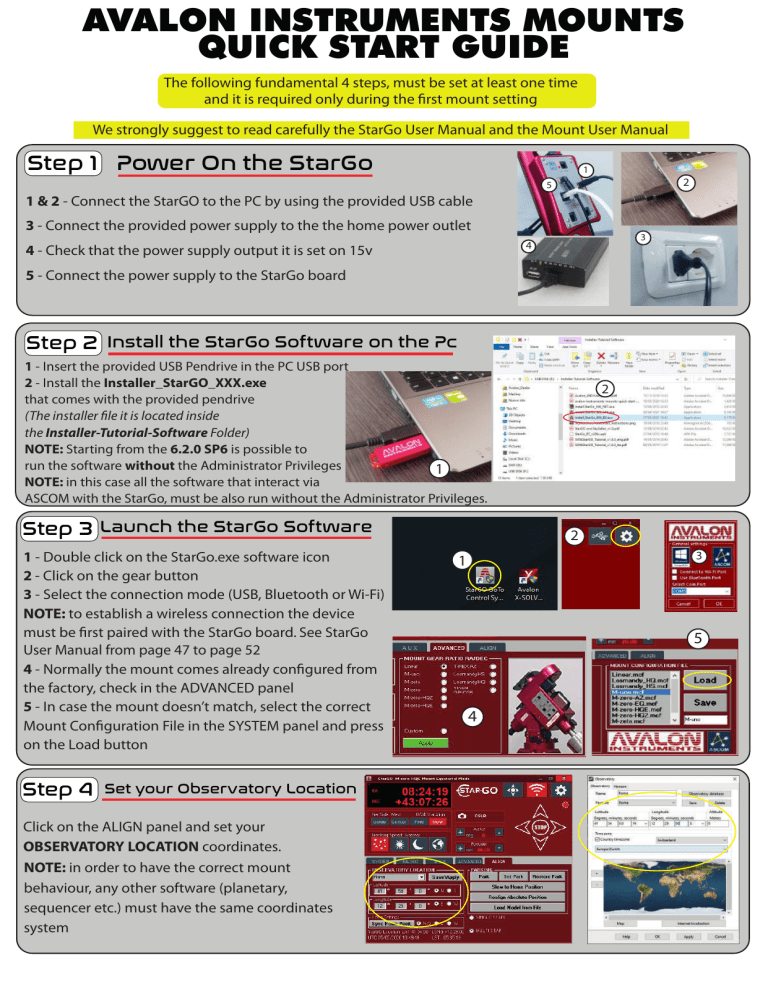
AVALON INSTRUMENTS MOUNTS QUICK START GUIDE The following fundamental 4 steps, must be set at least one time and it is required only during the first mount setting We strongly suggest to read carefully the StarGo User Manual and the Mount User Manual Step 1 Power On the StarGo 1 2 5 1 & 2 - Connect the StarGO to the PC by using the provided USB cable 3 - Connect the provided power supply to the the home power outlet 3 4 4 - Check that the power supply output it is set on 15v 5 - Connect the power supply to the StarGo board Step 2 Install the StarGo Software on the Pc 1 - Insert the provided USB Pendrive in the PC USB port 2 - Install the Installer_StarGO_XXX.exe that comes with the provided pendrive (The installer file it is located inside the Installer-Tutorial-Software Folder) NOTE: Starting from the 6.2.0 SP6 is possible to run the software without the Administrator Privileges 1 NOTE: in this case all the software that interact via ASCOM with the StarGo, must be also run without the Administrator Privileges. Step 3 Launch the StarGo Software 1 - Double click on the StarGo.exe software icon 2 - Click on the gear button 3 - Select the connection mode (USB, Bluetooth or Wi-Fi) NOTE: to establish a wireless connection the device must be first paired with the StarGo board. See StarGo User Manual from page 47 to page 52 4 - Normally the mount comes already configured from the factory, check in the ADVANCED panel 5 - In case the mount doesn’t match, select the correct Mount Configuration File in the SYSTEM panel and press on the Load button Step 4 Set your Observatory Location Click on the ALIGN panel and set your OBSERVATORY LOCATION coordinates. NOTE: in order to have the correct mount behaviour, any other software (planetary, sequencer etc.) must have the same coordinates system 2 2 3 1 5 4 QUICK SETUP FOR MOUNT USAGE 4 1 - Install the tripod, the mount and the setup 2 - Perform the telescope balancing and the polar alignment 3 - Put the telescope in HOME position, CWD and telescope pointing to the NORTH (SOUTH in case of Southern emisphere) 4 - Connect the power cable to the StarGO 2 3 1 IN CASE OF USE WITH STARGO AND PC 5a - Launch the StarGo and perform a Sync 7a Home Position 6a - Launch your planetary software and connect the Telescope with the 5a AvalonStarGo.NET.Telescope driver 7a - Now the mount is roughly aligned with the sky and the pointer will show the Celestial Pole. In order to have a more accurate pointing, further Sync are required. 6a IN CASE OF USE WITH MOBILE DEVICES Default Bluetooth pincode: 1234 5b - Connect the device (tablet/smartphone) via Wi-Fi/Bluetooth to the StarGo. Default Wi-Fi password: avalon1234 The pairing operation must be already done and it is only required one time, see StarGo User Manual starting from page 53 to page 56 6b - Launch SkySafari and connect to the mount. Since the mount alignment procedure (Sync Home Position) is not available on SkySafary and on other planetary app, Avalon Instruments developed a solution to solve this missing important function. Simply perform the following steps. 7b - Choose a star close to the Southern Meridian and to the Horizon, then perform a Sync on it, without move the mount from his Celestial Pole pointing. In this way the StarGo use the Star position as a Sync Home Position and not as an Align. 8b - Now the mount is roughly aligned with the Sky. The pointer will show the telescope position on the Celestial Pole, where the mount is effectively pointed. In order to have a more accurate pointing, further Sync are required. It is possible to find more detailed information about this important function on the StarGo User Manual, starting from page 57 to page 67. The below images show the function performed with SkySafari but it also works with any other planetary app and PC softwares. 6b 7b 8b For any other information or suggestion follow us on our website, our social media profile: twitter.com/avalon_instr, facebook.com/avalon.instruments01or contact us at: info@avalon-instruments.com ENJOUR MOUNT! www.avalon-instruments.com


