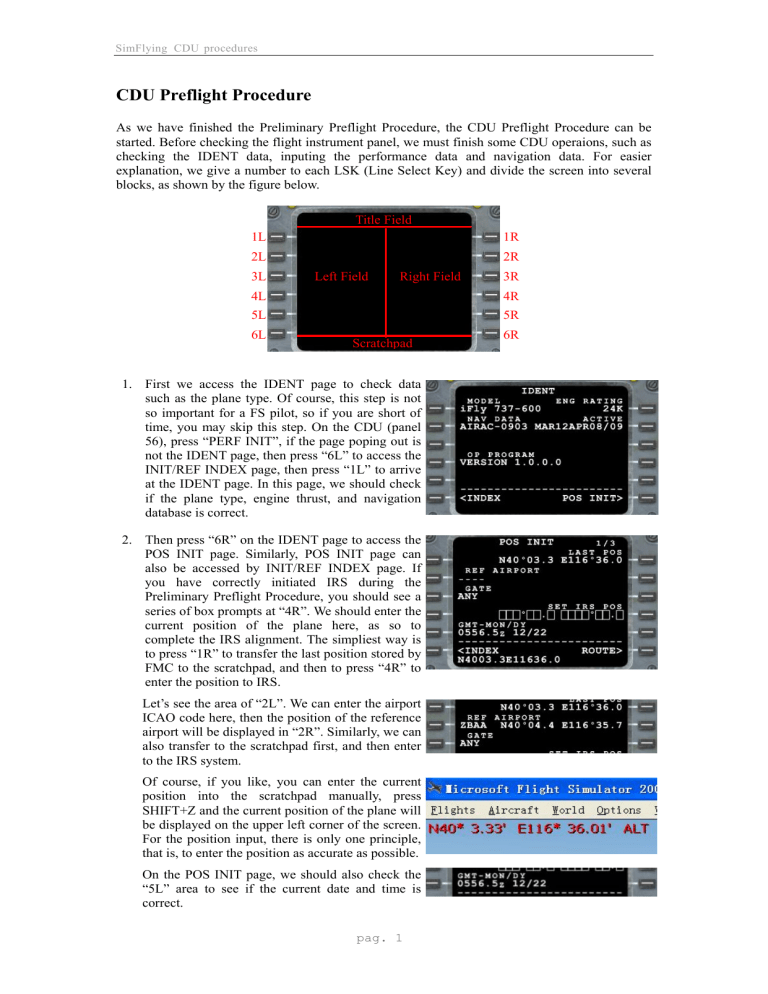
SimFlying CDU procedures CDU Preflight Procedure As we have finished the Preliminary Preflight Procedure, the CDU Preflight Procedure can be started. Before checking the flight instrument panel, we must finish some CDU operaions, such as checking the IDENT data, inputing the performance data and navigation data. For easier explanation, we give a number to each LSK (Line Select Key) and divide the screen into several blocks, as shown by the figure below. Title Field 1L 1R 2L 2R 3L Left Field Right Field 4R 5R 4L 5L 6L 3R Scratchpad 1. First we access the IDENT page to check data such as the plane type. Of course, this step is not so important for a FS pilot, so if you are short of time, you may skip this step. On the CDU (panel 56), press “PERF INIT”, if the page poping out is not the IDENT page, then press “6L” to access the INIT/REF INDEX page, then press “1L” to arrive at the IDENT page. In this page, we should check if the plane type, engine thrust, and navigation database is correct. 2. Then press “6R” on the IDENT page to access the POS INIT page. Similarly, POS INIT page can also be accessed by INIT/REF INDEX page. If you have correctly initiated IRS during the Preliminary Preflight Procedure, you should see a series of box prompts at “4R”. We should enter the current position of the plane here, as so to complete the IRS alignment. The simpliest way is to press “1R” to transfer the last position stored by FMC to the scratchpad, and then to press “4R” to enter the position to IRS. Let’s see the area of “2L”. We can enter the airport ICAO code here, then the position of the reference airport will be displayed in “2R”. Similarly, we can also transfer to the scratchpad first, and then enter to the IRS system. Of course, if you like, you can enter the current position into the scratchpad manually, press SHIFT+Z and the current position of the plane will be displayed on the upper left corner of the screen. For the position input, there is only one principle, that is, to enter the position as accurate as possible. On the POS INIT page, we should also check the “5L” area to see if the current date and time is correct. pag. 1 6R SomFlying CDU procedures 3. Now it is ready to enter the route data. Press “6R” on the POS INIT page of the last step to access the RTE page. In the first page of RTE, we should enter the ICAO codes of both the origin airport and destination airport, as well as the takeoff runway and flight number. Among these, the takeoff runway can be entered from the DEPARTURES page, and it is OK if you do not enter the flight number. In “2L”, we can enter an archived route. The route used in this tutorial has been saved as “ZBAAVHHH01”, so enter ZBAAVHHH01 to the scratchpad and press “2L” to complete the process of reading the route. Then press “6R” to activate the route when we can see the white light above the “EXEC” button of CDU illuminates. Press the “EXEC” button to execute the route. Though it is possible to enter the route as described above, we will explain how to enter the route step by step. First enter “ZBAA” into “1L” and “VHHH” into “1R”. If necessary, enter the flight number into “2R”. The maximum length of a flight number is 8. Press “NEXT PAGE” to go to the second page of RTE, where the route should be entered. Each line represents a segment of the route. The left side stands for the route name; and the right side, the last position we should arrive for completing this segment. In other words, we fly from the position on the right side of the upper line, along the route on the left side of the current line, to the position on the right side of the current line. The route enter can also be carried out by entering each waypoint on the LEGS page, which, however, will take a lot of efforts. The route date used in this tutorial is as follows. ZBAA-RENOB is SID, and SIERA-VHHH is STAR. Many people may ask, how can I find a route? Well, there are many softwares and websites capable of searching routes online, for example, http://rfinder.asalink.net/free/. ID FREQ TRK DIST VIA ZBAA 0 RENOB Coords 0 SID N040.04.12 E116.35.29 250 56 G212 N039.45.00 E115.26.48 KR 314.00 228 54 B458 N039.08.35 E114.35.53 SJW 117.70 175 52 B458 N038.16.54 E114.42.00 WXI 115.70 175 115 A461 N036.21.47 E114.55.00 185 100 A461 N034.41.35 E114.44.42 185 62 A461 N033.39.36 E114.38.24 184 80 A461 N032.19.48 E114.31.23 AKOMA ZHO 115.50 OBLIK ZF 369.00 184 60 A461 N031.19.23 E114.26.06 LKO 115.80 205 93 A461 N029.54.54 E113.41.42 pag. 2 SimFlying CDU procedures DAPRO 184 40 A461 N029.15.11 E113.38.48 AKUBA 184 30 A461 N028.45.11 E113.36.36 LUMKO 184 16 A461 N028.29.12 E113.35.24 184 51 R473 N027.37.41 E113.31.41 P117 165 55 R473 N026.44.30 E113.47.24 P157 165 15 R473 N026.30.00 E113.51.42 BEMAG 165 30 R473 N026.01.05 E114.00.06 LIG 112.40 NNX 115.60 165 57 R473 N025.05.48 E114.16.12 WYN 113.90 191 46 W18 N024.20.53 E114.06.47 SANIP 196 20 W18 N024.01.36 E114.00.54 NOMAR 196 32 W18 N023.30.29 E113.51.24 UBLIM 196 38 W18 N022.53.18 E113.40.12 NLG 117.70 195 22 W23 N022.31.54 E113.33.47 ZUH 116.70 196 19 R473 N022.13.23 E113.27.54 SIERA 161 15 STAR N021.59.06 E113.33.11 VHHH 46 28 4. Before entering a waypoint, we shall first introduce the Select Desired Waypoint page. When the name of an entered waypoint is not unique in the navigation database, the Select Desired Waypoint page will display automatically. Choose the waypoint by pressing its left corresponding LSK. In this page, the waypoints with the same names will be sorted according to their distances from the current location of the plane or from a waypoint along the route, to which special attention should be paid. 5. Remember what I said at the last step? The starting point of a route is the one on the right side of the upper line, the name of a route is on the left side of the current line, and the last point of the route is on the right side of the current line. In our example, if you ignore SID/STAR, then the first waypoint is KR, so we input “KR” on the right side of the first line, then input “B458” on the left side of the second line, and “WXI” on the right side of the second line. In this way, after entering all segments, the final route is like the figure given below. pag. 3 N022.18.37 E113.55.16 SimFlying CDU procedures Finally, press “6R” to activate the route, after which the white light above the “EXEC” button illuminates, when you should press the “EXEC” button to execute the route. 6. Now we choose the departure procedure of ZBAA. Press “DEP/ARR” button to display the DEP/ARR INDEX page. If the DEP/ARR INDEX page does not display, press “6L” to access the DEP/ARR INDEX page. Then press “1L” to access the ZBAA departure procedure page. In this tutorial, 36R is used to be the takeoff runway, which uses the RENOB-32D procedure. Use “PREV PAGE” and “NEXT PAGE” buttons to find the 36R runway from the right side of the screen. Press the LSK corresponding to the 36R runway to select it. <SEL> means that the item is selected. After selecting the runway, only the SID procedures that are related to 36R runway will be displayed on the left side of the screen. Use “PREV PAGE” and “NEXT PAGE” buttons to find the RENOB-32D departure procedure on the left side of the screen. Press the LSK to select the procedure. 7. Next we select the VHHH arrival procedure. Press the “DEP ARR” button to display the DEP/ARR INDEX page. If the DEP/ARR INDEX page does not appear, press “6L” to access the DEP/ARR INDEX page. Then press “2R” to access the VHHH arrival procedure page. In this tutorial, we use SIERA 4B arrival procedure and ILS25R approach procedure. Use “PREV PAGE” and “NEXT PAGE” buttons to find the SIERA 4B approach procedure on the left side of the screen. Press the LSK of SIERA 4B arrival procedure to select it. <SEL> means that the item is selected. pag. 4 SimFlying CDU procedures Use “PREV PAGE” and “NEXT PAGE” buttons to find the ILS25R approach procedure. Press its LSK to select it. Finally, press the “EXEC” button to execute this modification. 8. Now the route is finished, next we should check if the entered route is correct. Press the “LEGS” button to enter LEGS page. Use “PREV PAGE” and “NEXT PAGE” buttons to browse page by page if all routes are connected. Usually, after entering or modifying SIR and STAR, some routes will be discontinuious with others. It is very easy to remove the discontinuious points, just select the first waypoint after the broken route, i.e., “3L” in the right-hand example, it will transfer this waypoint to the scratchpad. Then select the discontinuious points of the route, i.e., “2L” in the right-hand example. Then the discontinuious point is removed. Repeat this step untill all discontinuious route points are removed. Finally, press “EXEC” to execute this modification. 9. Now the route is completed, next before the FMC (flight management computer) starts running, we should enter the performance data, which, if missing, will results in the FMC unable to calculate many necessary data. Press “PERF INIT”, then press “6L” to access the INIT/REF INDEX page, then press “3L” to access the PERF INIT page. All box prompts here must be filled in, and the dashes are optional. “1L” is the gross weight of the plane; “2L”, fuel weight; and “3L”, net weight of the plane. In other words, 1L = 2L + 3L. Remember that in the initial part of this tutorial, we have obtained the net weight of the plane by using the configuration software? Input that data into “3L”. Before the input, please confirm the weight unit again. In the FS menu bar choose iFly →iFly Jets: The 737NG→Styles, set the “Unit” to be “Metric System”. The fuel data should be entered into “2L”. The fuel data can be automatically obtained by sensor, or be entered manually. pag. 5 SimFlying CDU procedures Then enter fuel reserves to “4L”. If the remaining fuel quantity when reaching the destination airport predicted by FMC is less than this value, CDU will display the “USING RSV FUEL” warning. Cost Index at “4L” is used to calculate the economic speed of climbing, cruising, and descending. Valid entries are 0 to 500. The bigger Example: the value, the higher the ECON speed; and the 800 dollars per hour for flying time smaller the value, the lower the ECON speed. 10 cents per pound, cost of fuel Equals = a CI of 80 CI is defined as a ratio of the flying time to the cost of fuel. It is determined by divided the dollar If the cost of fuel increased to 20 cents per cost per hour to operate the aircraft excluding fuel, pound the CI is 40.The aircraft would fly by the cost of fuel in cents per pound. Here we use slower to save fuel. CI=80. 10. Then we set the data on the right side. “1R” should be entered the cruise altitude for the route. The unit can be feet or flight level. In our example, we use 32000 feet, so we can enter to the scratchpad either “32000” or “FL320”. 11. This step is not mandatory, so you may skip to the next if you like. “2R”~ “4R” holds the wind speed, wind direction and temperature deviation during the cruise, and the outside air temperature when reaching T/C(top of climb). Wind speed and wind direction must both be entered. And the wind direction data must be 3-digit, which should be added 0 from the left if less than 3-digit. The air temperature data at “3R” and “4R” is necessary for only one of them, because the other data will be calculated automatically. The default unit is degrees Celsius. If you would like to input degrees Fahrenheit, you should add the suffix F after the entered temperature. Generally speaking, there is no weather forcast in FS, so you may just leave these lines blank. If there is no data here, FMC will calculate by using no wind during the cruise and the standard air temperature. In this tutorial, we do not input any data here. In the right-hand example, we input “090/50” in the scratchpad, and then press “2R” to complete the data input. “090/50” means that the wind direction is 090 degrees and the wind speed is 50 knots. In the scratchpad, input “5” and then press “3R” to complete the data input. “5” means that the temperature deviation is +5 degrees Celsius. Now, delete CRZ WIND and ISA DEV data by press DEL key and the corresponding LSK. pag. 6 SimFlying CDU procedures 12. “5R” is the Transition Altitude, above which the system will use Flight Levels (FLs); and below which, feet. The default altitude is 18000. Here we use the default altitude. 13. At the PERF INIT page, press “6R” to access the N1 LIMIT page. “1L” is the data of Selected Temperature and the outside temperate. The maximum temperature of SEL input is 70 degrees Celsius (about 158 degrees Fahrenheit). The higher the temperature input at SEL, the less the FMC calculated takeoff thrust will be. FMC allows a maximum reduction of about 25% in takeoff thrust. If you would like to input the OAT instead of SEL, then add the “/” character before your input, otherwise CDU will consider it as the SEL tempeture. “2L” ~ “4L” are TO, TO-1, and TO-2 takeoff, among which TO-1 means a thrust decrease of about 10%; and TO-2, of about 20%. The selection of a takeoff thrust mode will automatically arm the “2R” ~ “4R” climb thrust modes. In the right-hand example, we press “3L” to select the TO-1 mode, the CLB-1 mode will automatically arm. The final calculated takeoff N1 data will be displayed in “1R”, whose title will change as the takeoff mode or SEL data input changes. In this tutorial, we use the TO mode without SEL temperature. If you have already entered data, then press DEL and then 1L to delete the SEL data. Press 2L to select the TO mode. 14. Press “6R” at the N1 LIMIT page, then press “NEXT PAGE” to access the second page of TAKEOFF REF. The data in this page should be set as required by actual needs. Input the runway wind data into 1L; the runway slope data, 2L; temperature data, 4L; and thrust reduction altitude, 5L. When climbing above the 5L altitude, the plane will switch from takeoff mode to climb mode. Select the runway status at 1R. 4R displays the takeoff N1 value. 3R, 5R, and 6R should be explained with emphasis. From 6R, we choose if to use the quiet climb, which, if started, will display quiet climb N1 at 3R. When the plane goes into climb mode and its altitude is less than specified by 5R, the plane uses quiet climb N1 as its command thrust, and after climbing above the 5R altitude, returns to normal climb thrust. pag. 7 SimFlying CDU procedures 15. Press “6R” at the N1 LIMIT page to enter TAKEOFF REF 1/2 page. The takeoff reference page allows the crew to manage takeoff performance. At this page, the “1L” is takeoff flaps setting. The allowed input value is 1, 5, 10, 15, or 25. Here we use FLAP 5. Input 5 into the scratchpad and then press “1L” to complete the input. Now, V1, VR, and V2 will display on the right side of the screen. Press “1R” ~ “3R” and the three speed data will turn to large font, which means that the data is entered into the system. If any of the data is still in small font, then a “NO V SPEED” warning will appear on the PFD. After the input, the warning will disappear. Besides using the V speed automatically calculated by FMC, you can also input the V speed manually. Input the speed into the scratchpad and then press its corresponding LSK to complete the input. 16. This step is not a must so you may skip to the next. In the configuration software, we obtained the CG data (30.9%) of the plane. Now input this data into the “3L” of TAKEOFF REF 1/2 page. After inputting the CG data, “3.88” will appear on its right, which is the TRIM data indicating that for the current CG, the takeoff TRIM is 3.88 units. Record this data, which will be needed when configuring TRIM later. 17. Then we continue looking at the TAKEOFF REF 1/2 page. If all previously entered data are correct, then “4L”, “5L”, “4R”, and “5R” should all be blank, and “PRE-FLT COMPLETE” appears in the title between “4L” and “4R”. If some required input data is missing or incorrect, then “4L”, “5L”, “4R”, and “5R” will display the page where the required data should be entered. In the right-hand example, we can see that “5L” displays “PERF INIT”, which means that there exists data error at the PERF INIT page. Press “5L” to access the PERF INIT page to re-examine the data. pag. 8


