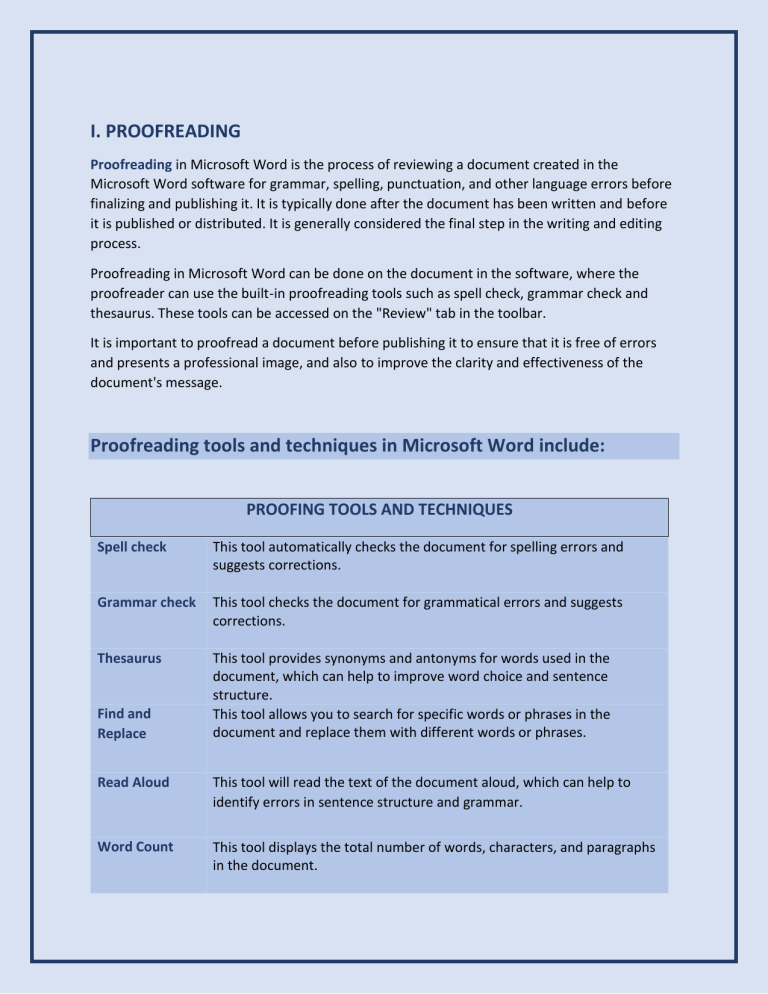
I. PROOFREADING Proofreading in Microsoft Word is the process of reviewing a document created in the Microsoft Word software for grammar, spelling, punctuation, and other language errors before finalizing and publishing it. It is typically done after the document has been written and before it is published or distributed. It is generally considered the final step in the writing and editing process. Proofreading in Microsoft Word can be done on the document in the software, where the proofreader can use the built-in proofreading tools such as spell check, grammar check and thesaurus. These tools can be accessed on the "Review" tab in the toolbar. It is important to proofread a document before publishing it to ensure that it is free of errors and presents a professional image, and also to improve the clarity and effectiveness of the document's message. Proofreading tools and techniques in Microsoft Word include: PROOFING TOOLS AND TECHNIQUES Spell check This tool automatically checks the document for spelling errors and suggests corrections. Grammar check This tool checks the document for grammatical errors and suggests corrections. Thesaurus This tool provides synonyms and antonyms for words used in the document, which can help to improve word choice and sentence structure. This tool allows you to search for specific words or phrases in the document and replace them with different words or phrases. Find and Replace Read Aloud This tool will read the text of the document aloud, which can help to identify errors in sentence structure and grammar. Word Count This tool displays the total number of words, characters, and paragraphs in the document. Track Changes This tool allows multiple users to make suggestions and edits to a document, and it keeps a record of all changes made. Custom Dictionaries This tool allows users to create their own custom dictionaries to avoid being flagged as incorrect by the spell checker. Style Checker This tool can be used to check the document for consistency in formatting, punctuation, and style. Online Grammar Checker Some external websites like Grammarly can be integrated into Microsoft word to check the grammar of the document. NOTE: These tools and techniques can help to improve the accuracy and professionalism of a document and make the proofreading process more efficient. Steps of Proofreading in Microsoft word To proofread a document in Microsoft Word, you can use the built-in proofreading tools and techniques. Here are the steps you can follow: 1. Open your document in Microsoft Word. 2. Click on the "Review" tab in the toolbar. 3. Click on the "Spelling & Grammar" button to run a spell check and grammar check on the document. The software will flag any errors it finds and provide suggestions for corrections. 4. Review the flagged errors and make any necessary corrections. 5. Click on the "Thesaurus" button to access a list of synonyms and antonyms for words used in the document. This can help to improve word choice and sentence structure. 6. Use the "Find and Replace" function to search for specific words or phrases in the document and replace them with different words or phrases. 7. Use the "Read Aloud" function to have the software read the text of the document aloud, which can help to identify errors in sentence structure and grammar. 8. Use the "Word Count" function to check the total number of words, characters, and paragraphs in the document. 9. Use the "Track Changes" function to record any suggestions and edits made by multiple users. 10. Use Custom Dictionaries to avoid being flagged as incorrect by the spell checker. 11. Use the "Style Checker" function to check the document for consistency in formatting, punctuation, and style. 12. If you want to use an external grammar checker, you can integrate it into your Microsoft word NOTE: By following these steps, you can review your document for errors and make any necessary corrections, to present a polished and professional document. II. FORMATTING TEXT Formatting text in Microsoft Word is the process of adjusting the appearance of text in a document, such as changing the font, size, color, and style. Formatting can be used to make text more visually appealing and to help organize and structure a document. Formatting text can be done at any time while working on a document. It is typically done after the text has been written and before the document is finalized and published. Why Formatting Text is important? Formatting text can make a document more visually appealing and easy to read, and it can also help to organize and structure a document. Formatting can be used to highlight important information, create headings and subheadings, and to distinguish different types of content. Different Options for Formatting Text in MSWord Different formatting options in Microsoft word include: font size, color style of text options for creating headings and subheadings applying bold italic underline formatting Additionally, Microsoft word provides the ability to format text using styles, templates, and themes. You can also use the paragraph formatting options to adjust the spacing, alignment, and indentation of text. How Formatting text in Microsoft Word can be done? Formatting text in Microsoft Word can be done using the formatting tools in the toolbar, such as the "Home" tab. The tools include options for changing the font, size, color, and style of text, as well as options for creating headings and subheadings, and for applying bold, italic, and underline formatting. Additionally, you can format text using styles, templates, and themes. You can also use the paragraph formatting options to adjust the spacing, alignment, and indentation of text. NOTE: By following these steps, you can format your document to make it more visually appealing and easy to read, and also to help organize and structure the content . III. FORMATTING PARAGRAPHS Formatting paragraphs in Microsoft Word refers to the process of adjusting the layout and appearance of a block of text, such as changing the alignment, spacing, and indentation. Formatting paragraphs can be done at any time while working on a document. It is typically done after the text has been written and before the document is finalized and published. Why Formatting Paragraphs is important? Formatting paragraphs can make a document more visually appealing and easy to read, and it can also help to organize and structure a document. Formatting can be used to distinguish different types of content, such as headings and subheadings, and to improve the overall layout of the document. Different Options for Formatting Paragraphs in MSWord Different formatting options available in Microsoft word for paragraphs include: alignment (left, center, right, justified) line spacing paragraph spacing indentation. You can also use the paragraph formatting options to create bullet and numbered lists. How Formatting Paragraphs in Microsoft Word can be done? Formatting paragraphs in Microsoft Word can be done using the formatting tools in the toolbar, such as the "Home" tab. The tools include options for alignment, line spacing, paragraph spacing, and indentation. You can also use the paragraph formatting options to create bullet and numbered lists. Additionally, you can format paragraphs using styles, templates, and themes. To format a specific paragraph, select it and use the formatting options available in the toolbar. To format multiple paragraphs, select them and use the formatting options. NOTE: By following these steps, you can format your document paragraphs to make it more visually appealing and easy to read, and also to help organize and structure the content. VI. FORMATTING PAGES Formatting pages in Microsoft Word refers to the process of adjusting the layout and appearance of an entire page or multiple pages in a document, such as changing the page margins, adding page borders, and adjusting the page background. Formatting pages can be done at any time while working on a document. It is typically done after the text has been written and before the document is finalized and published. Why Formatting Pages is important? Formatting pages can make a document more visually appealing and help to create a professional look. Additionally, formatting pages can be used to add visual interest to the document, such as by adding page borders or adjusting the page background. It also can be used to organize the document's content, by adding page numbers, headers, and footers. Different Options for Formatting Pages in MSWord Different formatting options available in Microsoft word for pages include: Page margins page borders page background page numbers headers footers How Formatting Pages in Microsoft Word can be done? Formatting pages in Microsoft Word can be done using the formatting tools in the toolbar, such as the "Page Layout" tab. The tools include options for adjusting page margins, adding page borders, and adjusting the page background. Additionally, you can use the "Insert" tab to add page numbers, headers, and footers. You can format a specific page by selecting it and using the formatting options available in the toolbar. To format multiple pages, you can use the "Section Break" function to create sections, and then use the formatting options on each section. NOTE: By following these steps, you can format your document pages to make it more visually appealing and professional looking, and also to help organize and structure the content. V. PRINTING DOCUMENTS Printing documents in Microsoft Word refers to the process of producing a physical copy of a document that has been created and saved in the Microsoft Word software. Printing documents can be done at any time after the document has been created and saved. It is typically done when the document is ready to be distributed or archived. Printing documents can be done from a computer or device with the Microsoft Word software installed, as well as from cloud-based versions of the software. The document can be printed to a local printer or a network printer. Why Formatting Pages is important? Printing documents is typically done to produce a physical copy of the document for distribution or archiving. It allows users to share or keep the information in a tangible format. Different Options for Formatting Pages in MSWord Different options are available for printing documents in Microsoft Word, such as: The number of copies The page range to be printed The paper size and orientation The print quality. How Printing Documents in Microsoft Word can be done? To print a document in Microsoft Word, follow these steps: 1. 2. 3. 4. 5. 6. 7. Open the document in Microsoft Word. Click on the "File" menu and select "Print" or press "ctrl+P" Select the printer you want to use from the "Printer" drop-down menu. Select the number of copies you want to print. Select the page range you want to print, or choose to print the entire document. Select the paper size, orientation, and print quality. Click on the "Print" button to start the printing process. NOTE: By following these steps, you can print a physical copy of your document for distribution or archiving. VI. WORKING WITH TABLES AND CHARTS Working with tables and charts in Microsoft Word refers to the process of creating, editing, and formatting tables and charts within a document. Working with tables and charts can be done at any time while working on a document. It is typically done after the text has been written, and before the document is finalized and published. Why Working with tables and charts are important? Working with tables and charts can be used to organize and present data in a clear and easy-tounderstand format. Tables can be used to display data in rows and columns, while charts can be used to visualize data in a graphical format. Different Types of Tables and Charts in MSWord Different types of tables and charts that can be created in Microsoft Word include: Table: simple tables, table styles, and table templates Chart: Bar charts, Pie charts, Line charts, Column charts and Scatter charts. How working with tables and charts in Microsoft Word can be done? To work with tables and charts in Microsoft Word: 1. To create a table, select the "Insert" tab, then select "Table" and choose the number of rows and columns you want. 2. To format a table, select it and use the formatting options available on the "Layout" tab, such as table styles, borders, and shading. 3. To create a chart, select the "Insert" tab, then select "Chart" and choose the type of chart you want to create. You can then select the data to be plotted and customize the chart by editing the chart elements, such as the axis labels, data labels and colors. NOTE: By following these steps, you can create and format tables and charts in Microsoft Word that effectively organize and present data to your audience. VII. WORKING WITH GRAPHICS Working with graphics in Microsoft Word refers to the process of inserting, editing, and formatting images, shapes, and other graphical elements within a document. Working with graphics can be done at any time while working on a document. It is typically done after the text has been written, and before the document is finalized and published. Why Working with Graphics is important? Working with graphics can be used to enhance the visual appeal of a document and to convey information in a more engaging and effective way. Graphics can be used to add visual interest, to illustrate concepts, and to organize information. Different Types of Graphics in MSWord Different types of graphics that can be inserted in Microsoft Word include: Images Shapes SmartArt Charts Screenshots How working with Graphics in Microsoft Word can be done? To work with graphics in Microsoft Word: 1. To insert an image, select the "Insert" tab, then select "Picture" or "Online Pictures" to insert an image from a file or from the internet. 2. To format an image, select it and use the formatting options available on the "Format" tab, such as cropping, resizing, and adjusting the brightness and contrast. 3. To insert a shape, select the "Insert" tab, then select "Shapes" to choose from a variety of basic shapes, such as rectangles, circles, and arrows. 4. To format a shape, select it and use the formatting options available on the "Format" tab, such as filling, outlining, and changing the shape style. 5. To insert SmartArt, select the "Insert" tab, then select "SmartArt" to choose from a variety of pre-designed diagrams, such as flowcharts, organizational charts, and lists. 6. To insert a chart, select the "Insert" tab, then select "Chart" and choose the type of chart you want to create. VIII. CUSTOMIZING WORD Customizing Word in Microsoft Word refers to the process of adjusting the settings and preferences of the software to suit your needs and preferences. Customizing Word can be done at any time while working on a document. It is typically done before you start working on a document, or when you first start using the software. Why Working with Graphics is important? Customizing Word can make the software more user-friendly and efficient, by adjusting settings and preferences to suit your work habits and needs. Different Options for Customizing word in MSWord Different options that can be customized in Microsoft Word include: General options: such as default font, font size, and language. Proofing options: such as spelling and grammar check settings. Save options: such as default file format and location. Advanced options: such as editing options, display options, and compatibility options. How Customizing Word in Microsoft Word can be done? To customize Word in Microsoft Word: 1. Click on the "File" menu and select "Options" 2. Select the category of options you want to customize, such as "General," "Proofing," or "Advanced." 3. Make the desired changes to the options within the category. 4. Click on the "OK" button to save the changes. NOTE: By following these steps, you can customize the settings and preferences of Microsoft Word to suit your needs and preferences, making the software more user-friendly and efficient. VIX. WORKING WITH MASS MAILING TOOLS Working with mass mailing tools in Microsoft Word involves using the "Mail Merge" feature to create and send personalized documents, such as letters or email messages, to a large number of recipients. You can use the mass mailing tools in Microsoft Word at any time when you need to send personalized documents to a large number of recipients. Why working with mass mailing tools is important? The mass mailing tools in Microsoft Word are useful for automating the process of sending personalized documents to a large number of recipients. This can save time and effort compared to manually creating and sending each document individually. “Mail Merge” as Mass mailing tool The "Mail Merge" feature in Microsoft Word is the main tool used for mass mailing. Other features that can be used in conjunction with the Mail Merge include: "Merge to New Document" and "Merge to Email" How mass mailing tool in Microsoft Word can be use? To use the mass mailing tools in Microsoft Word, you can follow these general steps: 1. Create a new document or open an existing one in Word. 2. Select the "Mailings" tab on the ribbon. 3. Select "Start Mail Merge" and choose the type of document you want to create (e.g. letters, email messages). 4. Select "Select Recipients" and choose how you want to import your recipient list (e.g. from an existing list or a new one). 5. Insert merge fields into your document where you want personalized information to appear. 6. Preview and make any necessary adjustments to your document. 7. Select "Finish & Merge" and choose how you want to send the merged documents (e.g. print, email). NOTE: The steps might vary depending on the version of Microsoft Word you are using. X. WORD AND THE WORLD BEYOND YOUR DESKTOP Word and the World Beyond Your Desktop refers to the ability of Microsoft Word to collaborate and work with other apps, services and devices outside the traditional desktop environment. This feature can be used at any time when you need to collaborate or work with others on a document or when you want to access your documents from different devices or locations. Why word and the World Beyond Your Desktop are important? Word and the World Beyond Your Desktop is useful because it allows you to collaborate and work on documents with others in real-time, share documents with others easily and access your documents from anywhere. Collaboration and sharing features in Microsoft Word The collaboration and sharing features in Microsoft Word include: Microsoft Office 365: Allows you to share and collaborate on documents in real-time with Office Online. OneDrive: Online storage service that allows you to store, access, and share documents from anywhere. SharePoint: A collaboration platform that allows you to share and work on documents with others. Microsoft Teams: A chat-based collaboration platform that allows you to share and work on documents with others. How Word and the World Beyond Your Desktop in Microsoft Word can be use? To use Word and the World Beyond Your Desktop, you can follow these general steps: 1. Save your document to a cloud-based storage service like OneDrive or SharePoint. 2. Share the document with others by providing them with a link or inviting them to collaborate. 3. Use the Microsoft Teams or SharePoint to collaborate with others in real-time. 4. Download the Word app on your mobile device and sign in with your Microsoft account to access your documents from anywhere. NOTE: The steps might vary depending on the version of Microsoft Word you are using.


