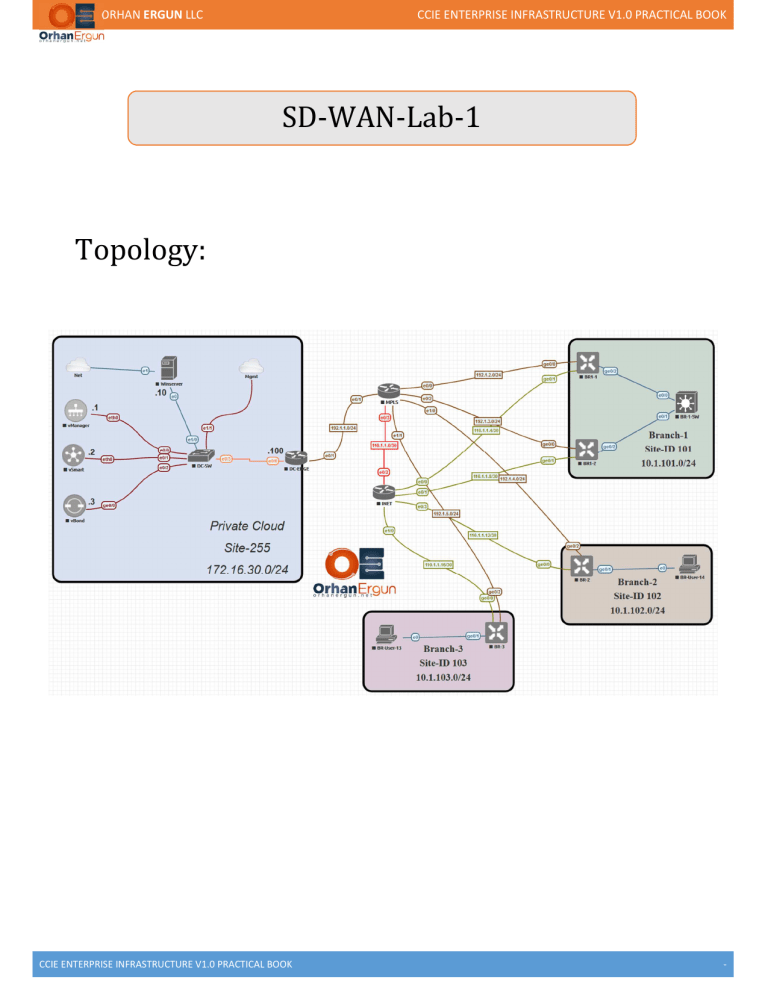
ORHAN ERGUN LLC CCIE ENTERPRISE INFRASTRUCTURE V1.0 PRACTICAL BOOK SD-WAN-Lab-1 Topology: CCIE ENTERPRISE INFRASTRUCTURE V1.0 PRACTICAL BOOK - ORHAN ERGUN LLC CCIE ENTERPRISE INFRASTRUCTURE V1.0 PRACTICAL BOOK Control Plane Bring up: Here we are building lab on Cisco (former Viptela) SD WAN Lab. Cisco SD-WAN Components are broken into 4 planes and dedicated components are added into that, lets discuss about that: Cisco SDWAN solutions have below controller in the solution: 1. vManage 2. vSmart 3. vBond Edge device in cisco SD WAN are knows as WAN Edges Cisco ISR 4K / ASR 1K can be deployed as WAN edge device along with native viptela hardware. The cluster of controllers are formed with the help of 3 controllers: vManage, vSmart and vBond, in which the have their own different roles, let’s talk about that: 1. vManage: This is the main component of SDWAN Management, this will give the GUI for managing complete sdwan solution, all the other components are part of it and will get integrated to it but all will be managed by it only. 2. vSmart: This is the main component for the complete control plane operations of SDWAN, this will be responsible to taking decisions for all the control plane and policy plane for sdwan, all WAN edges will form OMP tunnels with vSmart which will be used to exchange the routing updates between the WAN edges as well as the policy exchange between them. 3. vBond: This playa role in SDWAN orchestration plane, which is responsible for performing automation features like PnP (Plug n Play) or ZTP (Zero Touch Provisioning) along with that vBond is also responsible for device onboarding. All these controller will integrate with each other using Secure Channel of DTLS/SSL. SD-WAN Lab setup: Step-1: Initializing HDD for vManage: Available storage devices: hdb 100GB hdc 3GB 1) hdb 2) hdc Select storage device to use: 1 Would you like to format hdb? (y/n): y Here we are defining which hard drive will be used for configuration and policy data base, once we select that, it will format that drive and reload the vmanage. CCIE ENTERPRISE INFRASTRUCTURE V1.0 PRACTICAL BOOK - ORHAN ERGUN LLC CCIE ENTERPRISE INFRASTRUCTURE V1.0 PRACTICAL BOOK Step-2: vManage System level configuration system host-name vManage system-ip 10.1.1.1 site-id 255 organization-name "Orhan LLC" clock timezone Asia/Kolkata vbond 172.16.30.103 ntp server 172.16.30.105 version 4 prefer exit ! We need to configure all the SDWAN component system level configuration in which we will configure the below configurations: 1. Organisation Name : Should be same as per the license file. 2. System-IP – it’s a kind of loopback address which needs to be configured uniquely one each device. 3. Site-ID: This used to define the site domain, and it should be same on all the components of the same site. 4. vBond: IP Address of vBond, as WAN edge firstly communicate vBond address, and this address should be reachable. 5. NTP Server: this is required to synchronize the time across all the components of the SDWAN. Step-3: vManage Interface Configuration: vpn 0 interface eth0 ip address 172.16.30.101/24 ipv6 dhcp-client no shutdown ! ip route 0.0.0.0/0 172.16.30.254 ! VPN in SDWAN components are the other name of VRF, unlike VRF they cannot be configured with name. VPN 0 is reserved for all the control connection as well as the management traffic, whereas they also have VPN 512, which is just responsible for handling management traffic. CCIE ENTERPRISE INFRASTRUCTURE V1.0 PRACTICAL BOOK - ORHAN ERGUN LLC CCIE ENTERPRISE INFRASTRUCTURE V1.0 PRACTICAL BOOK Here we are using VPN 0 for both Management as well as Control Connection traffic. To enforce the inherent separation between services (such as prefixes that belong to the enterprise) and transport (the network that connects the vEdge routers), all the transport interfaces (that is, all the TLOCs) are kept in the transport VPN, which is internally maintained as VPN 0. This ensures that the transport network cannot reach the service network by default. Multiple transport interfaces can belong to the same transport VPN, and packets can be forwarded to and from transport interfaces. Management ports are kept separate as well and maintain a separate VPN, which is internally maintained as VPN 512 VPN 0 is the transport VPN. It carries control traffic over secure DTLS or TLS connections between vSmart controllers and vEdge routers, and between vSmart controllers and vBond orchestrators. Initially, VPN 0 contains all a device's interfaces except for the management interface, and all the interfaces are disabled. For the control plane to establish itself so that the overlay network can function, you must configure WAN transport interfaces in VPN 0. VPN 512 is the management VPN. It carries out-of-band network management traffic among the Viptela devices in the overlay network. By default, VPN 512 is configured and enabled. You can modify this configuration if desired. On vEdge routers, the interfaces in VPN 0 connect to some type of transport network or cloud, such as the Internet, MPLS, or Metro Ethernet. For each interface in VPN 0, you must set an IP address, and you create a tunnel connection that sets the color and encapsulation for the WAN transport connection. CCIE ENTERPRISE INFRASTRUCTURE V1.0 PRACTICAL BOOK - ORHAN ERGUN LLC CCIE ENTERPRISE INFRASTRUCTURE V1.0 PRACTICAL BOOK Step-4: vSmart System Configuration system host-name vSmart system-ip 10.1.1.2 site-id 255 organization-name "Orhan LLC" clock timezone Asia/Kolkata vbond 172.16.30.103 ntp server 172.16.30.105 version 4 prefer exit ! ! Step-5: vSmart Interface Configuration: vpn 0 interface eth0 ip address 172.16.30.102/24 ipv6 dhcp-client no shutdown ! ip route 0.0.0.0/0 172.16.30.254 ! Step-6: vBond System Configuration: system host-name vBond system-ip 10.1.1.3 site-id 255 organization-name "Orhan LLC" clock timezone Asia/Kolkata vbond 172.16.30.103 local ntp server 172.16.30.105 version 4 prefer exit ! ! When we configure vBond IP address on vBond itself we need use its local address and specify local keyword there. Step-7: vBond Interface Configuration: vpn 0 interface ge0/0 ip address 172.16.30.103/24 ipv6 dhcp-client tunnel-interface encapsulation ipsec no allow-service bgp allow-service dhcp allow-service dns allow-service icmp no allow-service sshd no allow-service netconf no allow-service ntp no allow-service ospf no allow-service stun allow-service https ! no shutdown ! ip route 0.0.0.0/0 172.16.30.254 ! CCIE ENTERPRISE INFRASTRUCTURE V1.0 PRACTICAL BOOK - ORHAN ERGUN LLC CCIE ENTERPRISE INFRASTRUCTURE V1.0 PRACTICAL BOOK If you can see here, we are using ge0/0 instead of eth0, this is because vBond is the same image as vEdge, the only difference is we enable vBond features in it. vBond interface is configured default as tunnel-interface just like all the WAN edges, so that it can accept all the type of traffic and able to terminate and initiate the IPSEC as well as Control connections on it. vManage GUI Initialization & Component Integration: Step-1: Login to vManage Step-2: Dashboard Screen CCIE ENTERPRISE INFRASTRUCTURE V1.0 PRACTICAL BOOK - ORHAN ERGUN LLC CCIE ENTERPRISE INFRASTRUCTURE V1.0 PRACTICAL BOOK Step-3: Configure Organisation Name in vManage: Dashboard > Administration > Settings: Step-4: Configure vBond IP Address: Dashboard > Administration > Settings: Step-5: Configure Controller Certificate Authorization: Dashboard > Administration > Settings > Controller Certificate Authorization > Select Enterprise Root Certificate (In Lab Enviroment): Here we found multiple ways to configure root CA in vmanage, lets talk about them: 1. Cisco – In this case Cisco will automatically PUSH the root CA certificate to the controllers once they are able to communicate with Cisco ROOT CA server. 2. Symantic (Manual) – Here you need to download Root CA certitificate from Symantic portal and upload on vManage Manually. 3. Symantic (Automatically) – In this mode same Symantic ROOT ca will be uploaded to vManage automatically once its able to reach symantic Portal 4. Enterprise CA – this is the way in which you can use your internal enterprise CA server to provide Root Cert and authenticate between the components. (this is the way we are using in our LAB). Step-6: Configure CSR Properties: Dashboard > Administration > Settings > Controller Certificate Authorization > Select CSR Properties: CCIE ENTERPRISE INFRASTRUCTURE V1.0 PRACTICAL BOOK - ORHAN ERGUN LLC CCIE ENTERPRISE INFRASTRUCTURE V1.0 PRACTICAL BOOK Step-7: Download the Root CA Certificate from CA Server: Login into CA Server (Microsoft CA Server in Lab): Download Root CA Certificate: CCIE ENTERPRISE INFRASTRUCTURE V1.0 PRACTICAL BOOK - ORHAN ERGUN LLC CCIE ENTERPRISE INFRASTRUCTURE V1.0 PRACTICAL BOOK Step-8: Upload Root CA Certificate to vManage: Step-9: Call API for Auto Sync the Root CA Cert. between all the components: API: https://172.16.30.101/dataservice/system/device/sync/rootcertchain With the help of this vManage API, we can sync the Root CA from vManage to other controllers (vSmart and vBond), otherwise we have to upload the Root CA to all other controller manually. Other than root CA Certificate, we also need individual device certificates as well which will be used for authenticating between the controllers as well as authenticating the new onboarding WAN Edge devices. Login into CA Server > Request a Certificate > Advance Certificate Request CCIE ENTERPRISE INFRASTRUCTURE V1.0 PRACTICAL BOOK - ORHAN ERGUN LLC CCIE ENTERPRISE INFRASTRUCTURE V1.0 PRACTICAL BOOK Download the device Certificate: Install the Certificate: Status should come as Success: CCIE ENTERPRISE INFRASTRUCTURE V1.0 PRACTICAL BOOK - ORHAN ERGUN LLC CCIE ENTERPRISE INFRASTRUCTURE V1.0 PRACTICAL BOOK Main Dashboard View: Step-11: Adding vBond and vSmart Controllers: Once vManage is configured, we have to change the interface types of all the controller to tunnel mode so that they can terminate/initiate the control connection with each other’s. Along with changing the interface type we are also allowing all the services in here so that we can communicate with all other components without any service limitations. Change the interface mode of vManage, vSmart and vBond to Tunnel Mode: vManage# config terminal Entering configuration mode terminal vManage(config)# vpn 0 vManage(config-vpn-0)# interface eth0 vManage(config-interface-eth0)# tunnel-interface vManage(config-tunnel-interface)# allow-service all vManage(config-tunnel-interface)# commit Commit complete. vSmart# config terminal Entering configuration mode terminal vSmart(config)# vpn 0 vSmart(config-vpn-0)# interface eth0 vSmart(config-interface-eth0)# tunnel-interface vSmart(config-tunnel-interface)# allow-service all vSmart(config-tunnel-interface)# commit Commit complete. vBond(config)# vpn 0 vBond(config-vpn-0)# interface ge0/0 vBond(config-interface-ge0/0)# tunnel-interface vBond(config-tunnel-interface)# encapsulation ipsec vBond(config-tunnel-interface)# allow-service all vBond(config-tunnel-interface)# commit Commit complete. In vBond we also need to configure encapsulation type as its vEdge image only and it needs encapsulation type for the tunnel termination/Initialization. Add vSmart Controller in vManage: Configuration > Devices > Controller > Add Controller CCIE ENTERPRISE INFRASTRUCTURE V1.0 PRACTICAL BOOK - ORHAN ERGUN LLC CCIE ENTERPRISE INFRASTRUCTURE V1.0 PRACTICAL BOOK Add vBond Controller in vManage: Configuration > Devices > Controller > Add Controller CCIE ENTERPRISE INFRASTRUCTURE V1.0 PRACTICAL BOOK - ORHAN ERGUN LLC CCIE ENTERPRISE INFRASTRUCTURE V1.0 PRACTICAL BOOK We can see both the controllers are added but showing certificate installed, here its device certificate because Root CA Cert. will be sync automatically as we have called API for Auto Sync. Generate and Install Device Certificates for vBond and vSmart: Generate CSR for vBond: Configuration > Certificates > Controller > vBond > Generate CSR: Login into CA Server and generate Certificate by vBond CSR Same way you did for vManage: CCIE ENTERPRISE INFRASTRUCTURE V1.0 PRACTICAL BOOK - ORHAN ERGUN LLC CCIE ENTERPRISE INFRASTRUCTURE V1.0 PRACTICAL BOOK Install Certificate for vBond: Generate Certificate for vSmart and Install in same way: You can see all the three controllers are added with device certificate installed Main Dashboard view: CCIE ENTERPRISE INFRASTRUCTURE V1.0 PRACTICAL BOOK - ORHAN ERGUN LLC CCIE ENTERPRISE INFRASTRUCTURE V1.0 PRACTICAL BOOK Verification: vManage# show control connections PEER PEER PEER PEER PEER PEER CONFIGURED SITE DOMAIN PEER PRIV PEER PUB INDEX TYPE PROT SYSTEM IP SYSTEM IP ID ID PRIVATE IP PORT PUBLIC IP PORT ORGANIZATION REMOTE COLOR STATE UPTIME ------------------------------------------------------------------------------------------------------------------------------------------------------------------------------------------------------------------------0 vsmart dtls 10.1.1.2 10.1.1.2 255 1 172.16.30.102 12346 172.16.30.102 12346 Orhan LLC default up 0:00:02:36 0 vbond dtls 10.1.1.3 10.1.1.3 0 0 172.16.30.103 12346 172.16.30.103 12346 Orhan LLC default up 0:00:04:30 1 vbond dtls 0.0.0.0 0 0 172.16.30.103 12346 172.16.30.103 12346 Orhan LLC default up 0:00:04:30 2 vbond dtls 0.0.0.0 0 0 172.16.30.103 12346 172.16.30.103 12346 Orhan LLC default up 0:00:04:30 3 vbond dtls 0.0.0.0 0 0 172.16.30.103 12346 172.16.30.103 12346 Orhan LLC default up 0:00:04:31 vSmart# show control connections PEER PEER PEER PEER PEER SITE DOMAIN PEER PRIV PEER PUB INDEX TYPE PROT SYSTEM IP ID ID PRIVATE IP PORT PUBLIC IP PORT REMOTE COLOR STATE UPTIME -------------------------------------------------------------------------------------------------------------------------------------------------------------------------------------0 vbond dtls 0.0.0.0 0 0 172.16.30.103 12346 172.16.30.103 12346 default up 0:00:03:29 0 vmanage dtls 10.1.1.1 255 0 172.16.30.101 12346 172.16.30.101 12346 default up 0:00:03:22 1 vbond dtls 0.0.0.0 0 0 172.16.30.103 12346 172.16.30.103 12346 default up 0:00:03:29 vBond# show orchestrator connections PEER PEER PEER PEER PEER SITE DOMAIN PEER PRIVATE PEER PUBLIC ORGANIZATION INSTANCE TYPE PROTOCOL SYSTEM IP ID ID PRIVATE IP PORT PUBLIC IP PORT REMOTE COLOR STATE NAME UPTIME ---------------------------------------------------------------------------------------------------------------------------------------------------------------------------------------------0 vsmart dtls 10.1.1.2 255 1 172.16.30.102 12346 172.16.30.102 12346 default up Orhan LLC 0:00:04:44 0 vsmart dtls 10.1.1.2 255 1 172.16.30.102 12446 172.16.30.102 12446 default up Orhan LLC 0:00:04:44 0 vmanage dtls 10.1.1.1 255 0 172.16.30.101 12346 172.16.30.101 12346 default up Orhan LLC 0:00:06:32 0 vmanage dtls 10.1.1.1 255 0 172.16.30.101 12446 172.16.30.101 12446 default up Orhan LLC 0:00:06:32 0 vmanage dtls 10.1.1.1 255 0 172.16.30.101 12546 172.16.30.101 12546 default up Orhan LLC 0:00:06:33 0 vmanage dtls 10.1.1.1 255 0 172.16.30.101 12646 172.16.30.101 12646 default up Orhan LLC 0:00:06:33 vManage# show control local-properties personality vmanage sp-organization-name Orhan LLC organization-name Orhan LLC root-ca-chain-status Installed certificate-status certificate-validity certificate-not-valid-before certificate-not-valid-after Installed Valid Apr 22 05:52:59 2020 GMT Apr 22 05:52:59 2022 GMT dns-name site-id domain-id protocol tls-port system-ip chassis-num/unique-id serial-num cloud-hosted token retry-interval no-activity-exp-interval dns-cache-ttl port-hopped time-since-last-port-hop number-vbond-peers 172.16.30.103 255 0 dtls 23456 10.1.1.1 592f61ae-d65a-4cd4-8f31-9d4ffe9d1e48 3F00000007A2A30292D3A8192E000000000007 no -NA0:00:00:19 0:00:00:20 0:00:02:00 FALSE 0:00:00:00 1 CCIE ENTERPRISE INFRASTRUCTURE V1.0 PRACTICAL BOOK - ORHAN ERGUN LLC CCIE ENTERPRISE INFRASTRUCTURE V1.0 PRACTICAL BOOK INDEX IP PORT ----------------------------------------------------0 172.16.30.103 12346 number-active-wan-interfaces 4 PUBLIC PUBLIC PRIVATE PRIVATE PRIVATE LAST INSTANCE INTERFACE IPv4 PORT IPv4 IPv6 PORT VS/VM COLOR STATE CONNECTION -------------------------------------------------------------------------------------------------------------------------------------------------------------0 eth0 172.16.30.101 12346 172.16.30.101 :: 12346 1/0 default up 0:00:00:05 1 eth0 172.16.30.101 12446 172.16.30.101 :: 12446 0/0 default up 0:00:00:06 2 eth0 172.16.30.101 12546 172.16.30.101 :: 12546 0/0 default up 0:00:00:06 3 eth0 172.16.30.101 12646 172.16.30.101 :: 12646 0/0 default up 0:00:00:06 WAN Edge Bring Up: In this lab we are going to onboard the new WAN edge to SDWAN. WAN Edge on boarding process is pretty straight forward: WAN edge should be able to communicate with vBond with IP reachability and then it should send the joining request to vBond and vBond should validate the serial and chassis no. of WAN edge against the serial number file uploaded to vManage and Sync with vBonds and then WAN edge will be authenticating to vBond using the device certificate uploaded to WAN edge (by default) and Root CA certificate (Uploaded Manually) After WAN edge is considerd as valid WAN edge device then vBond will provided vmange and vSmart ip addresses to WAN edge and then WAN edge will be authenticating with them respectively and forming control connections with it. Step-1: Configure WAN Edge (BR1) System Configuration: system host-name BR1 system-ip 10.10.10.1 site-id 101 clock timezone Asia/Kolkata vbond 172.16.30.103 ntp server 172.16.30.105 version 4 prefer exit ! WAN Edge system configuration is pretty same as other Viptela devices. Step-2: Configure WAN Edge (BR1) Interface (Internet) and Routing (BGP) Configuration: CCIE ENTERPRISE INFRASTRUCTURE V1.0 PRACTICAL BOOK - ORHAN ERGUN LLC CCIE ENTERPRISE INFRASTRUCTURE V1.0 PRACTICAL BOOK vpn 0 router bgp 101 address-family ipv4-unicast network 101.1.1.0/30 ! neighbor 101.1.1.1 no shutdown remote-as 1001 address-family ipv4-unicast ! ! interface ge0/0 ip address 101.1.1.2/30 ipv6 dhcp-client tunnel-interface encapsulation ipsec allow-service all no allow-service bgp allow-service dhcp allow-service dns allow-service icmp no allow-service sshd no allow-service netconf no allow-service ntp no allow-service ospf no allow-service stun allow-service https ! no shutdown Verification: BR1# show bgp summary vpn bgp-router-identifier local-as rib-entries rib-memory total-peers peer-memory Local-soo ignore-soo 0 10.10.10.1 101 13 1456 1 4816 SoO:0:101 MSG MSG OUT PREFIX PREFIX PREFIX NEIGHBOR AS RCVD SENT Q UPTIME RCVD VALID INSTALLED STATE --------------------------------------------------------------------------------------------------------101.1.1.1 1001 4 5 0 0:00:01:34 7 7 6 established BR1# ping 172.16.30.103 Ping in VPN 0 PING 172.16.30.103 (172.16.30.103) 56(84) bytes of data. 64 bytes from 172.16.30.103: icmp_seq=1 ttl=62 time=48.0 ms 64 bytes from 172.16.30.103: icmp_seq=2 ttl=62 time=48.0 ms 64 bytes from 172.16.30.103: icmp_seq=13 ttl=62 time=40.8 ms 64 bytes from 172.16.30.103: icmp_seq=14 ttl=62 time=40.9 ms 64 bytes from 172.16.30.103: icmp_seq=15 ttl=62 time=46.0 ms 64 bytes from 172.16.30.103: icmp_seq=16 ttl=62 time=45.2 ms Step-2: Upload Root CA Certificate on WAN Edge (BR1): Upload Certificate using SFTP Protocol into /home/admin directory. After Uploading you can see the cer file in /home/admin/: BR1# vshell BR1:~$ dir archive_id_rsa.pub root-cert.cer Install Root CA Certificate in BR1: BR1# request root-cert-chain install /home/admin/root-cert.cer Uploading root-ca-cert-chain via VPN 0 Copying ... /home/admin/root-cert.cer via VPN 0 Updating the root certificate chain.. Successfully installed the root certificate chain Step-3: Upload WAN Edge List to vManage: Configuration > Device > Upload WAN Edge List CCIE ENTERPRISE INFRASTRUCTURE V1.0 PRACTICAL BOOK - ORHAN ERGUN LLC CCIE ENTERPRISE INFRASTRUCTURE V1.0 PRACTICAL BOOK There are two ways two upload serial number file on vManage: 1. Sync Smart Account – You should have valid credentials for using this feature of your smartnet account, this way requires direct internet access. 2. Upload WAN Edge list – this way can be done offline in which file can be download from cisco plug-n-play portal and uploaded to vmanage. Step-4: Activate WAN Edge with Chassis Number and Serial Number: BR1# request vedge-cloud activate chassis-number <Chassis Number from vManage> token <Serial Number from vManage> We can see above the WAN edge registered with vManage. Verification: CCIE ENTERPRISE INFRASTRUCTURE V1.0 PRACTICAL BOOK - ORHAN ERGUN LLC CCIE ENTERPRISE INFRASTRUCTURE V1.0 PRACTICAL BOOK BR1-1# show control connections PEER PEER CONTROLLER PEER PEER PEER SITE DOMAIN PEER PRIV PEER PUB GROUP TYPE PROT SYSTEM IP ID ID PRIVATE IP PORT PUBLIC IP PORT LOCAL COLOR PROXY STATE UPTIME ID --------------------------------------------------------------------------------------------------------------------------------------------------------------------------------------12346 172.16.30.102 vsmart dtls 10.1.1.2 255 1 172.16.30.102 12346 default No connect 0 vbond dtls 0.0.0.0 0 0 172.16.30.103 12346 172.16.30.103 12346 default up 0:00:01:09 0 vmanage dtls 10.1.1.1 255 0 172.16.30.101 12546 172.16.30.101 12546 default No connect 0 Follow the same approach and register the Other WAN Edges: We are using just MPLS links to connect with WAN Edges, INET link will be configured later with help of Templates. After registration, all nodes should be up and running Monitoring Devices through vManage: All devices should be up and running and shown here: Device Interface Status: CCIE ENTERPRISE INFRASTRUCTURE V1.0 PRACTICAL BOOK - ORHAN ERGUN LLC CCIE ENTERPRISE INFRASTRUCTURE V1.0 PRACTICAL BOOK Device Control Connections: Event Status: Real time device data: Device Status based on the geographic Location: CCIE ENTERPRISE INFRASTRUCTURE V1.0 PRACTICAL BOOK - ORHAN ERGUN LLC CCIE ENTERPRISE INFRASTRUCTURE V1.0 PRACTICAL BOOK Alarm Status of SDWAN events: Event Status: CCIE ENTERPRISE INFRASTRUCTURE V1.0 PRACTICAL BOOK - ORHAN ERGUN LLC CCIE ENTERPRISE INFRASTRUCTURE V1.0 PRACTICAL BOOK Audit Logs: Device Templates: Step-1: Configure Feature Template: What is Device template? Device templates define a device's complete operational configuration. A device template consists of a number of feature templates. Each feature template defines the configuration for a particular Cisco SD-WAN software feature. Some feature templates are mandatory, indicated with an asterisk (*), and some are optional. Each mandatory feature template, and some of the optional ones too, have a factory-default template. For software features that have a factory-default template, you can use either the factory-default template (named Factory_Default_feature-name_Template) or you can create a custom feature template. Use a device-specific value for the parameter. For device-specific parameters, you cannot enter a value in the feature template. You enter the value when you attach a Viptela device to a device template. CCIE ENTERPRISE INFRASTRUCTURE V1.0 PRACTICAL BOOK - ORHAN ERGUN LLC CCIE ENTERPRISE INFRASTRUCTURE V1.0 PRACTICAL BOOK When you click Device Specific, the Enter Key box opens. This box displays a key, which is a unique string that identifies the parameter in a CSV file that you create. This file is an Excel spreadsheet that contains one column for each key. The header row contains the key names (one key per column), and each row after that corresponds to a device and defines the values of the keys for that device. You upload the CSV file when you attach a Viptela device to a device template. For more information, see Use Variable Values in Configuration Templates. Configuration > Template > Feature > Create Template: Select device from list and Select type of Template: CCIE ENTERPRISE INFRASTRUCTURE V1.0 PRACTICAL BOOK - ORHAN ERGUN LLC CCIE ENTERPRISE INFRASTRUCTURE V1.0 PRACTICAL BOOK We have to create templates for both the interfaces MPLS & INTE, I know MPLS is configured already but when we push template, we have to configure that again from template. Select VPN: Configure VPN 0 Parameters: Create Another template VPN Interface Ethernet: Configure MPLS Interface and keep IP Address device specific: CCIE ENTERPRISE INFRASTRUCTURE V1.0 PRACTICAL BOOK - ORHAN ERGUN LLC CCIE ENTERPRISE INFRASTRUCTURE V1.0 PRACTICAL BOOK Tunnel Interface: All service: CCIE ENTERPRISE INFRASTRUCTURE V1.0 PRACTICAL BOOK - ORHAN ERGUN LLC CCIE ENTERPRISE INFRASTRUCTURE V1.0 PRACTICAL BOOK Configure INET interface and Keep IP Address device Specific: Confiure same tunnel and service parameters for INET interface as well. Configure System Parameters: CCIE ENTERPRISE INFRASTRUCTURE V1.0 PRACTICAL BOOK - ORHAN ERGUN LLC CCIE ENTERPRISE INFRASTRUCTURE V1.0 PRACTICAL BOOK Keep the device specific parameters. Configure OSPF parameters: Add Interface in OSPF Area 0: CCIE ENTERPRISE INFRASTRUCTURE V1.0 PRACTICAL BOOK - ORHAN ERGUN LLC CCIE ENTERPRISE INFRASTRUCTURE V1.0 PRACTICAL BOOK Combine all feature template and create device template: Select all the created feature templates, previously created: Attach the device template to BR1-1 and BR1-2. CCIE ENTERPRISE INFRASTRUCTURE V1.0 PRACTICAL BOOK - ORHAN ERGUN LLC CCIE ENTERPRISE INFRASTRUCTURE V1.0 PRACTICAL BOOK Edit the template of BR1-1 and add device specific parameters: BR1-2: CCIE ENTERPRISE INFRASTRUCTURE V1.0 PRACTICAL BOOK - ORHAN ERGUN LLC CCIE ENTERPRISE INFRASTRUCTURE V1.0 PRACTICAL BOOK Verify the Configuration through CLI output: After Verification of both the devices click on configure-devices: Status should be success. CCIE ENTERPRISE INFRASTRUCTURE V1.0 PRACTICAL BOOK - ORHAN ERGUN LLC CCIE ENTERPRISE INFRASTRUCTURE V1.0 PRACTICAL BOOK Service VPN Configuration: Configure Service VPN in Branch-1 for LAN Side using same template: Create interface feature template for Service VPN Interface: VRRP Configuration: CCIE ENTERPRISE INFRASTRUCTURE V1.0 PRACTICAL BOOK - ORHAN ERGUN LLC CCIE ENTERPRISE INFRASTRUCTURE V1.0 PRACTICAL BOOK Service VPN Feature Template: Configure Service VPN Configuration in Device Template: Configure Service VPN Interface IP Address: CCIE ENTERPRISE INFRASTRUCTURE V1.0 PRACTICAL BOOK - ORHAN ERGUN LLC CCIE ENTERPRISE INFRASTRUCTURE V1.0 PRACTICAL BOOK CLI Configuration Verification: Same way configure Service VPN for Branch-2 and Branch-3. CCIE ENTERPRISE INFRASTRUCTURE V1.0 PRACTICAL BOOK -


