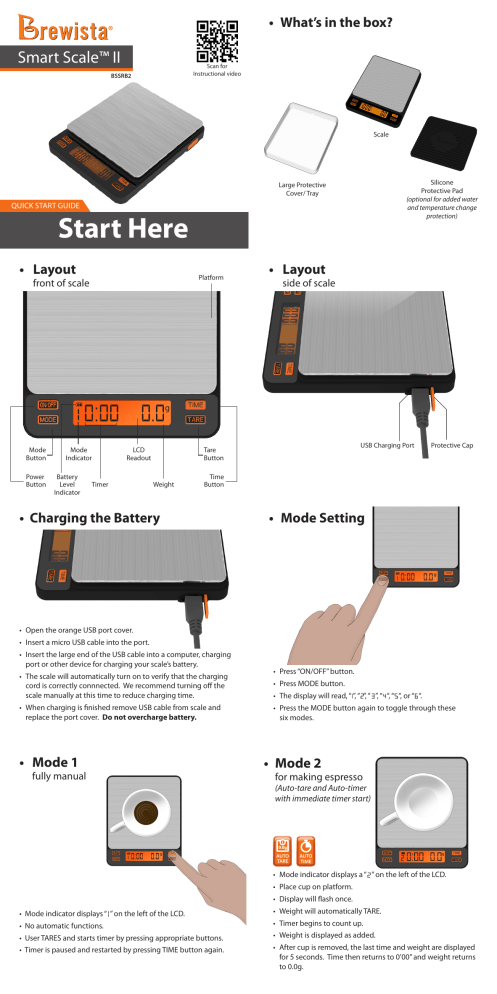
• What’s in the box? Smart Scale™ II Scan for Instructional video BSSRB2 Scale Silicone Protective Pad (optional for added water and temperature change protection) Large Protective Cover/ Tray QUICK START GUIDE Start Here • Layout • Layout Platform front of scale side of scale g Mode Button Power Button Mode Indicator Battery Level Indicator LCD Readout Timer USB Charging Port Tare Button Weight Protective Cap Time Button • Charging the Battery • Mode Setting • Open the orange USB port cover. • Insert a micro USB cable into the port. • Insert the large end of the USB cable into a computer, charging port or other device for charging your scale’s battery. • Press “ON/OFF” button. • The scale will automatically turn on to verify that the charging cord is correctly connnected. We recommend turning off the scale manually at this time to reduce charging time. • Press MODE button. • The display will read, “ ”, “ ”, “ ”, “ “, “ “, or “ “. • When charging is finished remove USB cable from scale and replace the port cover. Do not overcharge battery. • P ress the MODE button again to toggle through these six modes. • Mode 1 • Mode 2 fully manual for making espresso (Auto-tare and Auto-timer with immediate timer start) g REPELS WATER AUTO TIME REPELS AUTO WATER TARE AUTO AUTO OFF TIME AUTO TARE AUTO OFF g • Mode indicator displays a “ ” on the left of the LCD. • Place cup on platform. • Display will flash once. • Mode indicator displays “ ” on the left of the LCD. • Weight will automatically TARE. • No automatic functions. • Timer begins to count up. • User TARES and starts timer by pressing appropriate buttons. • Weight is displayed as added. • Timer is paused and restarted by pressing TIME button again. • After cup is removed, the last time and weight are displayed for 5 seconds. Time then returns to 0’00” and weight returns to 0.0g. • Mode 4 • Mode 3 for making espresso for making espresso (Auto-tare only; timer is not active) (Auto-tare and manual timer start) AUTO TIME AUTO OFF AUTO TARE • Mode indicator displays “ ” on the left of the LCD. REPELS WATER • Place cup on platform. AUTO TIME • Mode indicator displays “ ” on the left of the LCD. • Press start button on espresso machine and TIME button on scale simultaneously. • Place cup on platform. • Weight will automatically TARE. • Weight is displayed as added. • Weight is displayed as added. • After cup is removed, last weight is displayed for 5 seconds. Weight then returns to 0.0g. • A fter cup is removed, last time and weight are displayed for 5 seconds. Time then returns to 0’00” and weight returns to 0.0g. • Auto-off Function • Mode 5 for making espresso set to 180 seconds by default (Auto-tare and Auto-timer with timer starting when liquid hits the cup) REPELS WATER AUTO TIME g AUTO OFF • Weight will automatically TARE. • Timer begins to count up. AUTO TIME AUTO TARE REPELS AUTO WATER TARE AUTO AUTO OFF TIME AUTO TARE AUTO TIME AUTO OFF • Mode indicator displays “ “ on the left of the LCD. • Place cup on platform. • Weight will automatically TARE. • When liquid hits the cup, the timer automatically starts to count up. • Weight is displayed as added. • After cup is removed, last time and weight are displayed for 5 seconds. Time then returns to 0’00” and weight returns to 0.0g. AUTO TARE AUTO OFF • Turn off the scale. • Press and hold ON/OFF button. • While holding the ON/OFF button, press the TARE button 4-5 times quickly until “180” is displayed. • Release both buttons. • Press the MODE button to switch between “0/60/120/180” seconds. (If “0” is selected, the Auto-off function will be disabled.) • After choosing desired time, press the ON/OFF button again. • The display will show “PASS” to confirm this setting. • The scale will turn off automatically. • Please note: To keep a longer battery life, please turn off the scale by pressing ON/OFF button after each use. • Mode 6 pour over brewing 1 2 3 REPELS WATER AUTO TARE • Add water. AUTO OFF • Mode indicator displays “ ” on the left of the LCD. • P lace brewing vessel on platform. • Weight will automatically TARE. AUTO TIME • Display will flash once. • Add coffee grounds. • Timer begins to count up. • A djust amount of coffee grounds. • Weight is displayed as added. • A fter cup is removed, last time and weight are displayed for 5 seconds. Time then returns to 0’00” and weight returns to 0.0g. • O nce platform is stable press the TARE button. • Silicone Pad Use of the silicone pad is optional. It is included to provide additional water resistance. It also prevents slight weight variations caused by abrupt temperature changes on the platform. • Washing Instructions REPELS WATER AUTO TIME AUTO OFF AUTO TARE • Wipe scale clean with soft, damp cloth. • Do not submerse the scale in water. Doing so may require excessive drying time and damage the scale. • Do not press hard on the platform. • Dry the exterior of the scale with a soft cloth or leave to dry on a dish rack with the LCD and buttons pointing up. • Place the silicone pad onto the platform with the Brewista logo oriented to be read left to right. • Ensure that the pad covers the platform completely without interfering with platform travel. • The silicone pad is dishwasher safe (top rack). Smart Scale™ II BSSRB2 1133 W. 27th Street, Cheyenne, WY 82001, USA | www.mybrewista.com Toll Free in North America: 888-538-8683 | Local: 307-222-6086 AU TA
