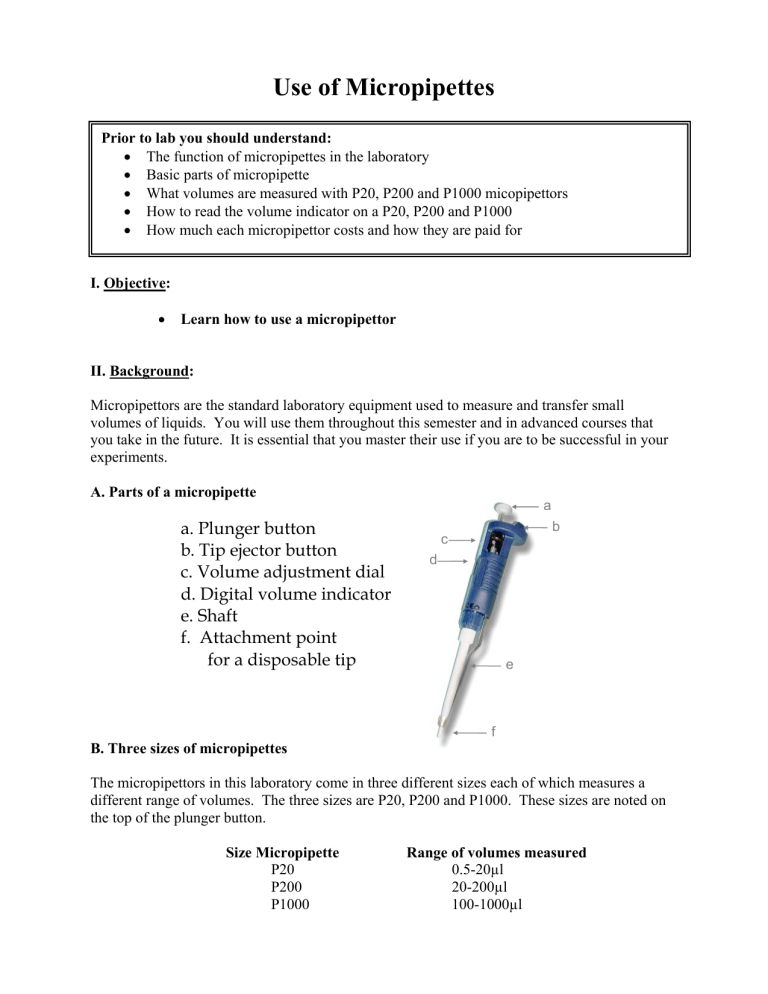
Use of Micropipettes Prior to lab you should understand: • The function of micropipettes in the laboratory • Basic parts of micropipette • What volumes are measured with P20, P200 and P1000 micopipettors • How to read the volume indicator on a P20, P200 and P1000 • How much each micropipettor costs and how they are paid for I. Objective: • Learn how to use a micropipettor II. Background: Micropipettors are the standard laboratory equipment used to measure and transfer small volumes of liquids. You will use them throughout this semester and in advanced courses that you take in the future. It is essential that you master their use if you are to be successful in your experiments. A. Parts of a micropipette a a. Plunger button b. Tip ejector button c. Volume adjustment dial d. Digital volume indicator e. Shaft f. Attachment point for a disposable tip b c d e f B. Three sizes of micropipettes The micropipettors in this laboratory come in three different sizes each of which measures a different range of volumes. The three sizes are P20, P200 and P1000. These sizes are noted on the top of the plunger button. Size Micropipette P20 P200 P1000 Range of volumes measured 0.5-20µl 20-200µl 100-1000µl C. Adjusting Volume on micropipettes The black volume adjustment dial near the top of the micropipette allows you to adjust the volume that is measured. It can be dialed to the left or right to increase or decrease the volume. The digital readout shows the volume that will be measured. As you turn the volume adjustment dial, the numbers in the digital readout will change. On each of the three sizes of micropipettes (P20, P200, P1000) the digital readout has three numbers. These three numbers correspond to different volumes on the different size pipettes. See the figure below for instructions on interpreting digital readout. Volume adjustment dial Digital readout shows the volume you have set. 0 2 2 Micropipettor: Reading the Volume p 200 p 1000 1000x 100x 10x 0 2 2 Volume set: 220 µl 100x 10x 1x 0 2 2 Volume set: 22 µl p 20 10x 1x 0.1x 0 2 2 Volume set: 2.2 µl In a P100, the top number refers to 1000’s of µl, the middle number refers to 100’sµl and the bottom number refers to 10’s of µl’s. In a P200, the top number refers to 100’s of µl, the middle number refers to 10’s µl and the bottom number refers to µ’ls. In a P20, the top number refers to 10’s of µl, the middle number refers to µl’s and the bottom number refers to 1/10ths of µl. Practice In the boxes below, write how many µls the following digital readout correspond to in each of the pipetters? 0 P20 7 0 Digital Readout P200 Write volume in µl P1000 Which micropipettor would be appropriate to measure 250µl? ________ Fill in the numbers that should appear in the digital display if that pipettor were to measure 250µl. D. Pipette Tips Liquids are never drawn directly into the shaft of the pipette. Instead, disposable plastic tips are are attached to the shaft. There are two sizes of tips. The larger blue tips are used for the P1000. The smaller clear tips are used for the P20 and P200. The tips are racked in plastic boxes with covers. When you receive a box, it will be sterile. Please be careful when touching box or tips not to contaminate them. The box should be closed when not in use to prevent airborn contamination. Inserting the Tip 1. Select the correct size tips. 2. Open the box without touching the tips with your hands. 3. Insert the micropipette shaft into the tip and press down firmly. This will attach the tip to the shaft. 4. Remove the micropipettor with the tip attached. 5. Close the box without touching the tips with your hands. E. Punger Settings The plunger will stop at two different positions when it is depressed. The first of these stopping points is the point of initial resistance and is the level of depression that will result in the desired volume of solution being transferred. The second stopping point is when the plunger is depressed beyond the initial resistance until it is in contact with the body of the pipettor. At this point, the plunger cannot be depressed further. This second stopping point is only used for the complete discharging of solutions from the plastic tip. F. Measuring and transferring a volume of liquid Before measuring and transferring liquid: • • • Choose the appropriate size micropipettor Adjust to the correct volume Insert tip on the shaft. Measuring and transferring liquid The figure below shows the correct operation of the pipetteman. Important: note the first plunger stop is used in steps 1 through 4. The second plunger stop is only used in step 5. • • • • • • • • Depress the thumb knob to the first stop. Immerse the tip approximately 3 mm into the sample solution (step 1). Slowly release the thumb knob to the initial position (step 2). Watch as the solution is drawn up slowly into the tip. Do not release the plunger too quickly. Rapid release might draw bubbles in the solution and might splash solution on the non-sterile shaft. Withdraw the tip from the sample solution. Place the tip against the side wall of the receiving container (step 3). Smoothly depress the thumb knob to the first stop (step 4), pause, then depress the knob to the second stop (step 5). Remove the tip from the receiving container, and return knob to the initial position. Do not let the knob snap back. Remove the disposable tip by firmly depressing the tip ejector knob (step 6). Add as new tip and continue. F. Micropipette Rules Each micropipette cost $200 and is paid for by your technology fee. To keep these pipettors functioning properly it is important that they be handled with care. Please follow these rules to keep from breaking the micropipetters 1. Never adjust the volume beyond the range of the micropipettor. No micropipette should be adjusted below zero µl. The P20 should never be adjusted above 20µ, the P200 over 200 ul and the P1000 over 1ml. 2. Never force the volume adjustor dial. If the knob becomes difficult to adjust it probably means that you are exceeding the limits for the pipette or the pipette is damaged. Please report the problem to the instructor or TA. 3. Do not drop pipetters. 4. Always use a smooth motion when using the pipetters. This will help give you accurate measurements and also prevent breakage of pipettes. There should be not “snapping” noises. 5. Always keep pipettes upright. Store the micropipettes on the mounted rack on your bench when not in use. Never lay a pipette on the benchtop. 6. Always choose to appropriate size pipette for the volume you are measuring. 7. Always dispose of tips in appropriate waste containing. Never leave tips in glassware. III. Materials: Each Station should have: P20, P200, and P1000 Small and Large tips Microcentrifuge tubes Disposable Cuvettes Calibrated Spectrophotometer Bottle of blue dye Beaker of water Liquid waste beaker Container for discarded pipette tips Water rinse bottle Kimwipes Note: We will be using a spectrophotometer to measure the amount of blue dye in each sample. We will discuss the how spectrophotometers work in future laboratory exercises. In brief they measure how much light a sample absorbs. The spectrophotometer passes a beam of light through a special sample holder called a cuvette. It then measures how much of this light is absorbed by the sample. The absorbance of light is displayed on the spectrophotometer. The more dye in a sample, the greater the absorbance. IV. Procedure: A. Preparing a dilution of Blue dye 1. 2. 3. 4. Choose appropriate micropipettor to measure 75µl. Transfer 75 µl of blue dye to empty microfuge tube. Use a P1000 to transfer 1ml of water to microfuge tube. Mix tube vigorously B. Spectrophotometer reading 1. Pour the blue dye you diluted in the microfuge tube into a cuvette 2. Insert cuvette into spectrophotometer 3. Observe absorbance reading from digital display on spectrophotometer 4. Record measurement in data sheet below C. Comparison to instructor value 1. Obtain correct absorbance value for 75 µl dilution from instructor 2. Divide your value by the instructor’s value to determine whether you were within 10% of the instructor’s value. If you are outside the 10% range you are making an error in your pipetting. D. Independent trials 1. 2. 3. 4. 5. Repeat 75µl dilution two more times as outline in boxes A-C. Rinse and tap dry cuvette between each measurement. Use a new microfuge tube for each dilution Record values in data collection sheet. Compare with instructors value for same dilution Repeating with other dilutions 1. Repeat procedures as outlined in boxes A-D except as outlined below. 2. Prepare new dilutions using the following quantities of blue dye a. 30µl b. 15µl c. 5µl 3. Record your data on the table collection sheet attached. 4. Conduct three trials for each dilution V. Short Report Name: ___________________________ Due at end of class session Data Collection Sheet Dilutions 75µl 30µl 15µl 5µl Trials 1 2 3 1 2 3 1 2 3 1 2 3 Student Absorbance Instructor Absorbance Ratio (S/I)
