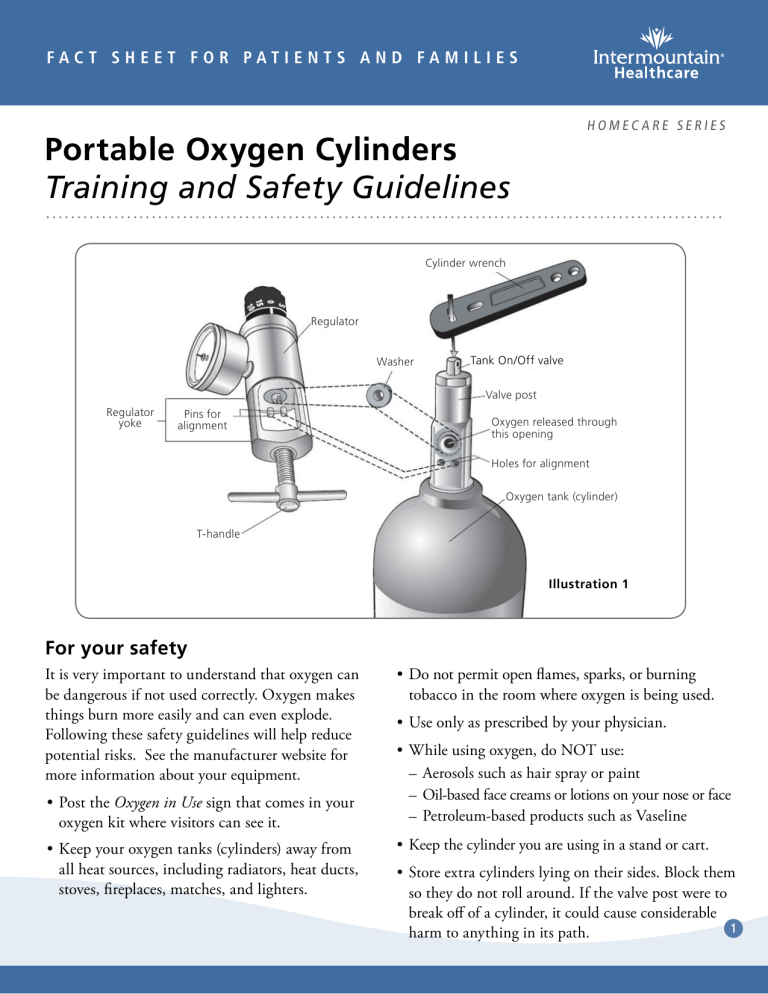
FACT SHEET FOR PATIENTS AND FAMILIES HOMECARE SERIES Portable Oxygen Cylinders Training and Safety Guidelines Cylinder wrench Regulator Washer Tank On/Off valve Valve post Regulator yoke Pins for alignment Oxygen released through this opening Holes for alignment Oxygen tank (cylinder) T-handle Illustration 1 For your safety It is very important to understand that oxygen can be dangerous if not used correctly. Oxygen makes things burn more easily and can even explode. Following these safety guidelines will help reduce potential risks. See the manufacturer website for more information about your equipment. •• Post the Oxygen in Use sign that comes in your oxygen kit where visitors can see it. •• Keep your oxygen tanks (cylinders) away from all heat sources, including radiators, heat ducts, stoves, fireplaces, matches, and lighters. •• Do not permit open flames, sparks, or burning tobacco in the room where oxygen is being used. •• Use only as prescribed by your physician. •• While using oxygen, do NOT use: –– Aerosols such as hair spray or paint –– Oil-based face creams or lotions on your nose or face –– Petroleum-based products such as Vaseline •• Keep the cylinder you are using in a stand or cart. •• Store extra cylinders lying on their sides. Block them so they do not roll around. If the valve post were to break off of a cylinder, it could cause considerable 1 harm to anything in its path. –– Always keep oxygen cylinders in a wellventilated area because it is normal for small amounts of oxygen to leak. Do not store cylinders in a closet unless there is a vent in the closet door. If you keep cylinders under the bed, make sure the covers do not interfere with the air circulating. Tank on/off valve Pressure gauge T-handle Flow regulator knob Tube Nipple adaptor You will receive an oxygen kit that has two lengths of tubing, a connector, and nasal cannulas. You’ll use a nasal cannula to breathe the oxygen. The cannula is a narrow tube with soft prongs that are placed in the nostrils. Be sure to place the prongs in your nostrils with the curve facing down. •• Change your cannula every 2–4 weeks to avoid infection. Also change it after you’ve been sick. •• Change your oxygen tubing every 3–6 months. If it’s damaged, change it right away. When to change your oxygen cylinder Alignment peg Oxygen tank (cylinder) How to use the nasal cannula Check your pressure gauge often to make sure you don’t run out of oxygen (see the Cylinder Use Timeline on page 4). Always check the gauge when the valve is turned on. When the needle gets to the lower part of the red section on the gauge, it is time to change the cylinder. Be sure to change the cylinder before the needle gets below 200 psi. Illustration 2 How to use oxygen cylinders 1 Be sure the flow regulator knob is set at zero (see illustration 2). 2 Make sure the T-handle is tight. 3 Place the cylinder wrench on the cylinder’s on/off valve, located at the top of the cylinder. 4 Open the valve by turning it counter- clockwise one full turn. As the valve opens, the gauge on the regulator will show the amount of pressure in the cylinder. A full cylinder will read about 2000 psi (pounds per square inch). 5 Adjust the flow regulator knob to the flow rate your doctor prescribed. 6 Attach tubing to the nipple adaptor on the It is important to keep a sufficient supply of full cylinders in your home in case of an emergency. Intermountain Homecare & Hospice will supply you with enough oxygen cylinders to last 1 month. Call to order more cylinders when your supply gets down to two cylinders or about 20% of the amount you received at your first delivery. How to change your oxygen cylinder Turn off the oxygen flow 1 Using the small cylinder wrench, turn the cylinder on/off valve clockwise to close it. 2 Bleed off the pressure in the valve by opening the flow regulator knob. 3 When the gauge reads zero, turn the flow regulator knob to zero. regulator. 2 Change the cylinder 1 Remove the regulator by loosening the T-handle. 2 Slide the pegs out of the holes on the valve post and remove the regulator. How to travel with your oxygen cylinders •• Secure oxygen cylinders in your vehicle so they do not roll or bump against other cylinders or objects. 3 Remove the tab from the valve post on the •• Crack a window in the vehicle to increase ventilation. 4 Make certain there is a washer on the large •• Keep cylinders out of direct sunlight. new cylinder (see illustration 1). post on the regulator. 5 Attach the regulator to the cylinder by •• Do not store cylinders in the trunk of a vehicle. 6 Align the pegs located on the inside of the •• If you will be traveling outside of our service area for an extended amount of time, please call us. We will help you coordinate appropriate oxygen services while you travel. 7 Slide the regulator forward so the pegs go into Call your doctor if... slipping the regulator over the valve post of the cylinder. regulator yolk with the holes in the valve post. the holes (see illustration 1). 8 Turn the T-handle on the regulator until it is tight. If the handle is not tight enough or if the washer is not in place, the cylinder will leak when the valve is opened (see illustration 2 for proper placement). Turn on the oxygen flow Be sure that the flow regulator knob is set to zero. 1 Make sure the T-handle is tight. 2 Place the cylinder wrench on the cylinder’s on/off valve, located at the top of the cylinder. 3 Open the valve by turning it counter- •• You think the amount of oxygen you are receiving should be changed. Call Intermountain Homecare & Hospice if... •• You experience any problems with your oxygen equipment. If you are observed in violation of any of these oxygen safe use guidelines, Intermountain Homecare & Hospice reserves the right to discontinue your oxygen services for your safety and the safety of those around you. clockwise one full turn. As the valve opens, the gauge on the regulator will show the amount of pressure in the cylinder. A full cylinder will read about 2000 psi (pounds per square inch). 4 Adjust the flow knob on the regulator until the gauge reaches the flow rate your doctor prescribed. 5 Attach tubing to the nipple adaptor on the regulator. 3 M - Cylinder Oxygen Cylinder Use Timeline E - Cylinder 1/4 Tank 1500 PSI 1000 PSI 500 PSI 1⁄32 76 days 38 days 24 days 19 days 9.5 days 4.5 days 2.4 days 56 days 28 days 18 days 14 days 7 days 3.5 days 43 hours 38 days 19 days 12 days 9.5 days 4.5 days 2 days 28.75 hours 18 days 9 days 6 days 4.5 days 2 days 1 day 14 hours 100 hours 83 hours 41 hours 20 hours 13 hours 5 hours 3.4 hours 2.5 hours 75 hours 62 hours 30 hours 15 hours 9 hours 3.5 hours 2.3 hours 1.75 hours 50 hours 41 hours 20 hours 10 hours 6 hours 2.5 hours 1.5 hours 1.1 hours 25 hours 20 hours 10 hours 5 hours 3 hours 1.1 hours 0.7 hours 0.5 hours 160 hours 80 hours 50 hours 40 hours 23 hours 11 hours 8 hours 5 hours 2.5 hours 96 hours 48 hours 30 hours 24 hours 17 hours 9 hours 6 hours 3 hours 1.5 hours 64 hours 32 hours 20 hours 16 hours 12 hours 6 hours 4 hours 2 hours 1 hour 48 hours 24 hours 15 hours 12 hours 6 hours 3 hours 2 hours 1.5 hours 0.75 hours 80 hours 40 hours 20 hours 11.5 hours 5.5 hours 2.5 hours 1.25 hours 0.75 hours 60 hours 30 hours 15 hours 8.6 hours 4.1 hours 1.9 hours 0.95 hours 0.56 hours 40 hours 20 hours 10 hours 5.6 hours 2.75 hours 1.25 hours 0.75 hours 0.38 hours 20 hours 10 hours 5 hours 2.8 hours 1.4 hours 0.63 hours 0.31 hours 0.2 hours 1⁄16 1⁄10 1⁄ 8 1/4 1/2 1 ⁄10 ⁄8 1/4 1/2 1 1 2 3 4 ⁄ ⁄ 1⁄10 1⁄ 8 1/4 1/2 3/4 1 32 1 16 D - Cylinder 1/2 Tank Full Tank 2000 PSI 1 1 2 ⁄32 1 ⁄16 1 ⁄8 1/4 1/2 1 C - Cylinder 3/4 Tank Flow Rate 1 2 3 This chart shows about how long a cylinder will last if you use your oxygen all the time. Use this chart to help you plan when to order more cylinders. Content created and approved by Intermountain Homecare & Hospice © 2011-2016 Intermountain Healthcare. All rights reserved. The content presented here is for your information only. It is not a substitute for professional medical advice, and it should not be used to diagnose or treat a health problem or disease. Please consult your healthcare provider if you have any questions of concerns. More health information is available at intermountainhealthcare.org. Patient and Provider Publications 801-442-2963 FSHC002 -03/16. 4

