International Journal of Trend in Scientific
Research and Development (IJTSRD)
International Open Access Journal
ISSN No: 2456 - 6470 | www.ijtsrd.com | Volume - 2 | Issue – 4
Study of Machining on
n High Carbon High Chromium Die Steel Using
Wire Cut E
EDM under
nder Various Conditions
1
G. Nallaiya1, K. S. Sekar2
Department of Tool and Die Making
Making, 2Department of Mechanical Engineering
1,2
Murugappa Polytechnic College
College, Chennai, India
ABSTRACT
Tool steel are high quality steels made to close
compositional and physical tolerances, they are used
to make tools for cuttings, forming or shaping
material into a part or component adapted to define
use. There are various types tool steels are available in
this we decided to select D2 material (i.e.) high
carbon High chromium die steel. Using wire cut EDM
machine we did machining on D2 steel under various
condition - ordinary conditions,
ons, After Hardening
Conditions and after Hardening and tempering
Conditions The process parameters viz. Wire
diameter, Wire feed rate and Current will be kept
constant the wire consumption and machining time
measured.
Keywords:
Tool
Carbon, Chromium Wire, WEDM and
Chapter- I
exits excellent resistances to wear. Especially
Especial type
D7, which has the highest carbon and vanadium
contents. All group D steels particularly the higher
carbon types D3,D4 AND D7 – Contain massive
carbides that make them susceptible to edge
brittleness.
Typically application for group D steels includes
includ long
run dies for blanking, forming, threading rolling, and
deep drawing, dies for cutting laminations, brick
moulds, gages, burnishing tools, rolls, and shear and
slitter knives.
1.2. Heat-Treating
Treating the Specimen
Heat treatment was done on the specimens as per the
instructions and details from the heat treater’s guide.
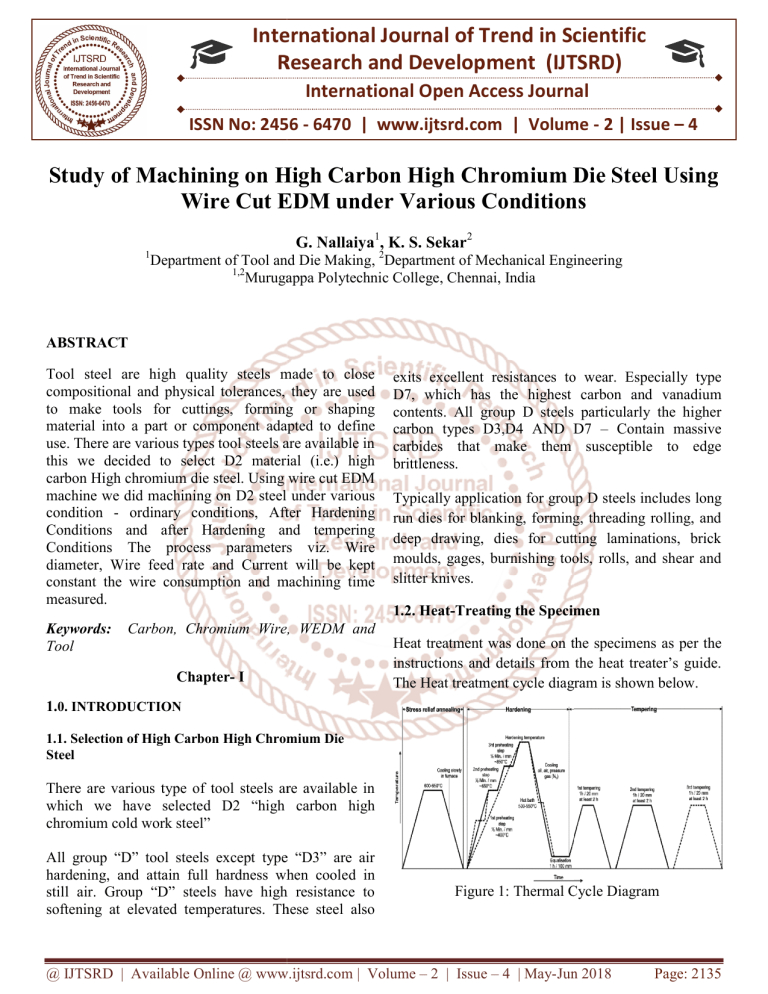
The Heat treatment cycle diagram is shown below.
1.0. INTRODUCTION
1.1. Selection of High Carbon High Chromium Die
Steel
There are various type of tool steels are available in
which we have selectedd D2 “high carbon high
chromium cold work steel”
All group “D” tool steels except type “D3” are air
hardening, and attain full hardness when cooled in
still air. Group “D” steels have high resistance to
softening at elevated temperatures. These steel also
Figure 1: Thermal Cycle Diagram
@ IJTSRD | Available Online @ www.ijtsrd.com | Volume – 2 | Issue – 4 | May-Jun
Jun 2018
Page: 2135
International Journal of Trend in Scientific Research and Development (IJTSRD) ISSN: 2456-6470
1.3. Selection of Machine
ELEKTRA MAXICUT CNC Wire cut Machine
manufactured by Electronic Machine Tools was used
for the Experiment.
1.4. Part programming
The geometry of the profile and the motion of the
wire electrode tool along the profile is fed to the part
programming system using keyboard. The profile
geometry is defined in terms of various geometrical
definitions of point, line and circle as the wire tool
path elements on graphical screen, by using a totally
menu driven software. After the profile is fed to the
computer, all the numerical information about the
path is calculated automatically and its print out is
generated,
between upper and lower wire guides. More the
thickness of the job more the tension is required.
1.5.4 Wire Feed
Due to spark erosion, the travelling wire electrode
becomes thin and brittle. Wire feed is the rate at
which the wire-electrode travels along the wire guide
path. It is always desirable to set the wire feed to a
higher value. This will result in less wire breakage,
better machining stability, and slightly more cutting
speed. For example .25mm dia brass wire spool of 5
Kg will last for 24 hours.
1.5.5 Overcut
It is the lateral distance between the wire and work
piece during the sparking.
1.5. Work Preparation
1.5.6 Wire Compensation (Offset)
For better machining, the work piece material should
be, electrically conductive (at least 0.1 microohm/cm), Suitable for clamping, on-combustible, onviolent chemical reactions with water, oxygen,
hydrogen.
Wire compensation = (0.5 * wire diameter) + over
cut.
1.5.1 Wire Electrode
1.5.7 Dielectric strength
The wire electrode is required to have a sufficient
tensile strength and should be of uniform diameter
and free from kink and twist
During machining, the conductivity of di electric
water changes due to generation of metallic ions and
dissolution of ambient gases. The conductivity can be
reduced by passing the water through deionizer resin.
This is done automatically by the machine.
The Electrode wire material should be Brass/super
Alloy, Diameter variation within Plus or minus0.001
mm, Tensile Strength more than 45 Kgf/mm2 Even
winding, free from breaks/kinks.
1.5.2 Current Carrying Capacity of the Wire
As a thumb rule, a brass wire of 0.25 mm in diameter
can easily pass 9 A in water. While machining, wire
should always be surrounded by the water column to
avoid wire breakage.
1.5.3 Wire Tension
A brass wire of 0.25 mm in diameter can be applied
with a maximum tension of 1600 gm. Wire tension
determines how much the wire is to be stretched
Wire compensation can be positive or negative
depending upon the direction of motion and wire
being inside or outside.
1.5.8 Flushing
Flushing is important to achieve a stable machining
condition and plays an important role as far as cutting
speed is concerned.
1.6 Setting Up and Operation
1.6.1 Job Mounting: Mount the job and clamp it by
maximum possible clamps.
1.6.2 Job Reference Point: It is always desirable to
have a reference point on the work piece as a start
point. The programming should be done with the
reference to the starting point.
@ IJTSRD | Available Online @ www.ijtsrd.com | Volume – 2 | Issue – 4 | May-Jun 2018
Page: 2136
International Journal of Trend in Scientific Research and Development (IJTSRD) ISSN: 2456-6470
1.6.3 Edge Finding
2.2 Preparation for Machining
This function is used to find the edge for setting work
co-ordinate system
1.6.4 Centre Finding
This function is used to find the centre of the
reference hole. Centre finding should be repeated at
least twice to verify consistency.
Work piece surface should be free from moisture,
rust, dust and grease etc., upper flushing assembly
should not be wet, Wire feed should be at 3mt/min.
Chapter -II
Experimental Work
2.1 NC Programming for the Profile to be cut
* NC Program listing of C: NALLU.NCP *
------------------------------------------------------------Date of Creation: 7/2/2018
------------------------------------------------------------Start Point... X = 0 Y = 0
LIN
1 >>X = 4.835 , Y = 0.000
**** Wire Comp = 0.165
LIN
2 >>X = 4.835 , Y = 4.835
LIN
3 >>X = -4.835 , Y = 4.835
LIN
4 >>X = -4.835 , Y = -4.835
LIN
5 >>X = 4.835 , Y = -4.835
LIN
6 >>X = 4.835 , Y = 0.000
**** Wire Comp = 0
LIN
7 >>X = 0.000 , Y = 0.000
Selection of Wire
Wire Treading
Wire Tension and Wire Feed Rate
Work Piece Mounting
Wire Positioning Method
Machining Procedure
2.3 Parameters to be set for Machining
After the preparation for machining is over, the
flushing and machining parameters were set for
programmed profile.
2.3.1 Machining Parameters
Machining parameters were set based on the
Technology Guidelines provided by the Machine Tool
Manufacturer. The following parameters were set
during the experiments.
Pulse ON Time - T ON
Pulse OFF TIME -T OFF
Pulse Peak Current(Ip)
Machining Gap Voltage (Vg)
Servo Sensitivity
Capacitor (C1-C4)
2.3.2 Fluid Flushing Parameters
Confirm that conductivity of dielectric fluid is within
the specified range. Press the flush switch on the
MCP. Adjust dielectric fluid flow valve by watching
the flushing pressure fluid flowing from upper and
lower flush ports. The flushing pressure should be
approx...12kg/sq.m.
2.3.2 Servo Parameters
The following servo adjustments are made:
AUTO mode Selected
Machining started by SPARK ON switch.
Sensitivity knob gradually rotated from position1
in clock wise direction.
Now the machine tool coordinate table will have a
control signals from RACK I.
******** Machine Stop ******
******** PATH LENGTH ... 48.35
@ IJTSRD | Available Online @ www.ijtsrd.com | Volume – 2 | Issue – 4 | May-Jun 2018
Page: 2137
International Journal of Trend in Scientific Research and Development (IJTSRD) ISSN: 2456-6470
2.4 Technology Guidelines and Observation for Work piece
2.4.1 Ordinary Conditions
The following parameters were kept constant during machining and the time taken and wire consumption were
noted,
S. no Water
T on
T off
I
CA
V
A
Time
Wire
P
P
consumption
P1
P2
1
36
80
4
4
3
3
8
3
6 40
7.5
2
40
84
3
35
78
Table 1: Technology Guidelines and Observation for Ordinary Condition Work Piece
2.4.2 After Hardening
S. no
Water
T on
T off
I
CA
V
A
Time
Wire
P
P
consumption
P1
P2
1
42
80
4
4
3
3
8
3
6 40
7.5
2
46
90
3
44
84
Table 2: Technology Guidelines and Observation for Hardened Condition Work Piece
2.4.3 After Hardening- Tempering
S .no
Water
T on
T off
I
CA
V
A
Time
Wire
P
P
consumption
P1
P2
1
25
67
4
4
3
3
8
3
6 40
7.5
2
29
79
3
27
72
Table 3: Technology Guidelines and Observation for After Hardened and Tempered Condition Work Piece
Chapter –III
42
40
38
36
34
32
After Hardening
Machining Time (Minutes)
Ordinary Condition
Machining Time (Minutes)
40
36
35
Time in
Minutes
Time in
Minutes
Results
48
46
44
42
40
46
44
42
1
1
2
Sample Number
2
3
Machining Time (Minutes)
Machining Time (Minutes)
Figure 2: Machining time- Ordinary Condition
Figure 4: Machining Time- After Hardening
After Hardening
Wire Consumption in Grams
84
80
80
78
75
1
2
3
Sample Number
Wire Consumption in Grams
Figure 3: Wire Consumption- Ordinary Condition
Weight in
Grams
Weight in
Grams
Ordinary Condition
Wire Consumption in Grams
85
3
Sample Number
95
90
85
80
75
90
84
80
1
2
3
Sample Number
Wire Consumption in Grams
Figure 5: Wire Consumption- After Hardening
@ IJTSRD | Available Online @ www.ijtsrd.com | Volume – 2 | Issue – 4 | May-Jun 2018
Page: 2138
International Journal of Trend in Scientific Research and Development (IJTSRD) ISSN: 2456-6470
Chapter –IV
W e ig h t in
G ra m s
After Hardening & Tempering
Wire Consumption in Grams
80
79
70
72
67
60
1
2
3
Sample Number
Wire Consumption in Grams
Figure 6: Wire Consumption – After Hardening &
Tempering
Wire Consumption Comparison
Weight in Grams
95
90
90
85
84
80
78
80
75
84
80
79
72
70
67
65
60
1
2
3
Sample Number
Ordinary condition
After Hardening
After Hardening & Tempering
Figure 7: Wire Consumption Comparison
Time in Minutes
Machining Time Comparison
50
45
40
35
30
25
20
1
2
3
Sample Number
Ordinary Condition
After Hardening
After Hardening & Tempering
Figure 8: Machining Time Comparison
Time in Minutes
Average Machining Time Comparison
50
40
30
20
10
0
CONCLUSION
The Machining time for the hardening and
Tempering condition is 27.02% and 38.64% lesser
than that of ordinary and Hardening condition
respectively
Average wire consumption for the Hardening and
Tempering condition is 9.91% and 14.16% lesser
than that of ordinary and Hardening condition
respectively
From the study it is observed that the Hardening
and Tempering the specimen has the advantage of
average machining time as well as average wire
consumption for the machining process
37
44
27
Ordinary
Hardening
Hardening +
Tempering
Average Machining Time
Figure 9: Average Machining Time Comparison
Chapter – V
References
1. Rajurkar K. P and Wang W. M “Thermal
modeling and on – line Monitoring of Wire EDM”
Journal of Material Processing Technology, 38
(1993) pp417-430
2. Kanlayasiri K and Boonmung S “Effects of wireEDM machining variable son surface roughness of
newly developed DC 53 die steel: Design of
experiments and regression model”- Journal of
Materials Processing Technology 192–193 (2007)
pp 459–464
3. Kanlayasiri K and Boonmung S “An investigation
on effects of wire-EDM machining parameters on
surface roughness of newly developed DC53
diesteel” Journal of Materials Processing
Technology 187–188 (2007) pp26–29
4. Aminollah Mohammadi, Alireza Fadaei Tehrani,
Ehsan Emanian and Davoud Karimi “Statistical
analysis of wire electrical discharge turning on
material removal rate” Journal of Materials
Processing Technology (2008)pages 7 .pp 171177
5. Haddad, M. J and Fadaei Tehrani A “Material
removal rate (MRR) study in the cylindrical wire
electrical discharge turning (CWEDT) process”
Journal of Materials Processing Technology 199
(2008) pp 369–378
6. Tarng Y. S., Ma S. C and Chung L. K
“Determination of optimal cutting parameters in
Wire
Electrical
Discharge
Machining”
International Journal of Machine Tools and
Manufacture Vol.35 , No.12 (1995) pp 1693-1701
@ IJTSRD | Available Online @ www.ijtsrd.com | Volume – 2 | Issue – 4 | May-Jun 2018
Page: 2139
International Journal of Trend in Scientific Research and Development (IJTSRD) ISSN: 2456-6470
7. Jesudas T., Arunachalam R. M., Jayakumar K. S.
and Thiraviam R. “Parametric optimization of
wire EDM- A Taguchi approach” Manufacturing
Technology Today, Vol.9 August 2007, pp 9-12
8. Rajurkar K. P. and Wang W. M. “WEDM
Identification and Adaptive Control for VariableHeight Components” (1994) Annals of the ClRP
Vol.43/1/1994 pp 199-204
9. Lok Y. K., and Lee T. C. “Processing of
Advanced Ceramics using Wire-cut EDM
Process” Journal of Materials Processing
Technology 63 (1997) pp839-843
10. Shajan Kuriakose “Characteristics of wire-electro
discharge machinedTi6Al4V surface” Journal of
Materials Letters 58 (2004) pp 2231-2237
11. Ahmet Hascalyk and Ulas Cayda¸ “Experimental
study of wire electrical discharge machining of
AISI D5 tool steel” Journal of Materials
Processing Technology 148 (2004) pp 362–367
12. Kadam MS, Basu SK “Optimization of the
machining parameters in Wire Electrical
Discharge Machining Process using Genetic
Algorithm” Manufacturing Technology Today,
June 2007 pp 10-15
13. Rao Ch. V. S. P. and Sarcar M. M. M.
“Experimental Evaluation of Mathematical
correlations for machining Tungsten carbide with
CNCWEDM” International Journal of Emerging
Technologies and Applications in Engineering,
Technology and Sciences in July-Dec (2008) IJETA-ETS(ISSN: 0974-3588) pp 139-145
14. Rao Ch. V. S. P. and Sarcar M .M. M.
“Experimental Study and Development of
Mathematical Relations for Machining Copper
using CNC WEDM” Material Science Research
India
Vol.
5(2),
pp
417-422
(2008)
ISSN:09733469 Dec -08
@ IJTSRD | Available Online @ www.ijtsrd.com | Volume – 2 | Issue – 4 | May-Jun 2018
Page: 2140
