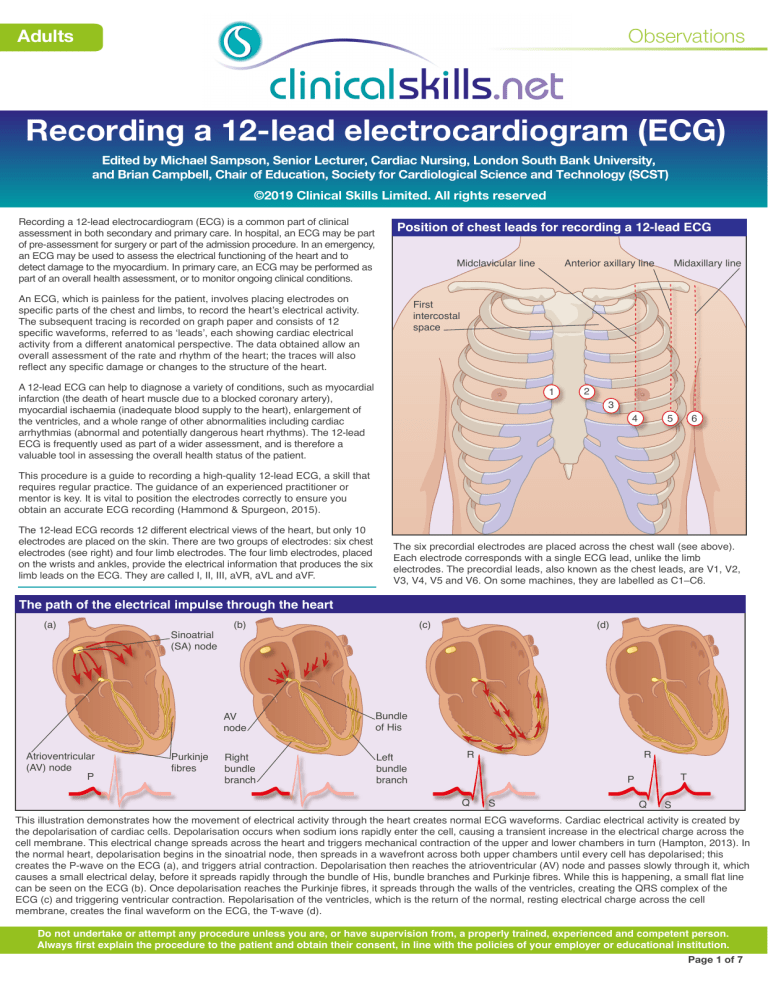
Observations Adults Recording a 12-lead electrocardiogram (ECG) Edited by Michael Sampson, Senior Lecturer, Cardiac Nursing, London South Bank University, and Brian Campbell, Chair of Education, Society for Cardiological Science and Technology (SCST) ©2019 Clinical Skills Limited. All rights reserved Recording a 12-lead electrocardiogram (ECG) is a common part of clinical assessment in both secondary and primary care. In hospital, an ECG may be part of pre-assessment for surgery or part of the admission procedure. In an emergency, an ECG may be used to assess the electrical functioning of the heart and to detect damage to the myocardium. In primary care, an ECG may be performed as part of an overall health assessment, or to monitor ongoing clinical conditions. Position of chest leads for recording a 12-lead ECG Midclavicular line An ECG, which is painless for the patient, involves placing electrodes on specific parts of the chest and limbs, to record the heart’s electrical activity. The subsequent tracing is recorded on graph paper and consists of 12 specific waveforms, referred to as ‘leads’, each showing cardiac electrical activity from a different anatomical perspective. The data obtained allow an overall assessment of the rate and rhythm of the heart; the traces will also reflect any specific damage or changes to the structure of the heart. Anterior axillary line Midaxillary line First intercostal space A 12-lead ECG can help to diagnose a variety of conditions, such as myocardial infarction (the death of heart muscle due to a blocked coronary artery), myocardial ischaemia (inadequate blood supply to the heart), enlargement of the ventricles, and a whole range of other abnormalities including cardiac arrhythmias (abnormal and potentially dangerous heart rhythms). The 12-lead ECG is frequently used as part of a wider assessment, and is therefore a valuable tool in assessing the overall health status of the patient. 1 2 3 4 5 6 This procedure is a guide to recording a high-quality 12-lead ECG, a skill that requires regular practice. The guidance of an experienced practitioner or mentor is key. It is vital to position the electrodes correctly to ensure you obtain an accurate ECG recording (Hammond & Spurgeon, 2015). The 12-lead ECG records 12 different electrical views of the heart, but only 10 electrodes are placed on the skin. There are two groups of electrodes: six chest electrodes (see right) and four limb electrodes. The four limb electrodes, placed on the wrists and ankles, provide the electrical information that produces the six limb leads on the ECG. They are called I, II, III, aVR, aVL and aVF. The six precordial electrodes are placed across the chest wall (see above). Each electrode corresponds with a single ECG lead, unlike the limb electrodes. The precordial leads, also known as the chest leads, are V1, V2, V3, V4, V5 and V6. On some machines, they are labelled as C1–C6. The path of the electrical impulse through the heart (a) Atrioventricular (AV) node P Sinoatrial (SA) node Purkinje fibres (b) (c) AV node Bundle of His Right bundle branch Left bundle branch (d) R R T P Q S Q S This illustration demonstrates how the movement of electrical activity through the heart creates normal ECG waveforms. Cardiac electrical activity is created by the depolarisation of cardiac cells. Depolarisation occurs when sodium ions rapidly enter the cell, causing a transient increase in the electrical charge across the cell membrane. This electrical change spreads across the heart and triggers mechanical contraction of the upper and lower chambers in turn (Hampton, 2013). In the normal heart, depolarisation begins in the sinoatrial node, then spreads in a wavefront across both upper chambers until every cell has depolarised; this creates the P-wave on the ECG (a), and triggers atrial contraction. Depolarisation then reaches the atrioventricular (AV) node and passes slowly through it, which causes a small electrical delay, before it spreads rapidly through the bundle of His, bundle branches and Purkinje fibres. While this is happening, a small flat line can be seen on the ECG (b). Once depolarisation reaches the Purkinje fibres, it spreads through the walls of the ventricles, creating the QRS complex of the ECG (c) and triggering ventricular contraction. Repolarisation of the ventricles, which is the return of the normal, resting electrical charge across the cell membrane, creates the final waveform on the ECG, the T-wave (d). Do not undertake or attempt any procedure unless you are, or have supervision from, a properly trained, experienced and competent person. Always first explain the procedure to the patient and obtain their consent, in line with the policies of your employer or educational institution. Page 1 of 7 Observations Adults Recording a 12-lead electrocardiogram (ECG) Page 2 Assemble the equipment ECG machine 1 2 Q\ A 3 W@ ! S Z ; 4 E# ? X D : R$ = C T - F_ / 5 G , V” 6 Y& + U * 7 I % H~ . BØ 8 O ( JÆ 6 9 P 9 KÅ LÜ 0 X Config mm/s Non-alcohol wipes Auto Filter Man mm/mV Ergo Arrhy 7 NÖ MÄ Alt Pat Tissues N R R 1 2 L 3 4 5 6 C1 C2 C3 C1 N F C2 C3 L F 10 disposable pregelled electrodes Clipper Gather all the equipment you will need to record the 12-lead ECG. These items are usually kept together with the recording machine for convenience and in case it is necessary to carry out a 12-lead ECG urgently. You may need to ask the patient to remove a watch or other jewellery; in this case, make sure they are stored safely. Explain the procedure and gain consent Explain to the patient what you are going to do, and obtain consent. Even though the patient may have had an ECG before, explain that it is painless and why you need to take the recording. The ECG will be useful to aid diagnosis (Hammond & Spurgeon, 2015). Provide reassurance. Wash and dry your hands Decontaminate your hands with alcohol-based sanitiser or with soap and water, drying well, before the procedure. Position the patient Pull the curtains or close the door to ensure privacy. The evidence on how position affects the ECG recording is incomplete, so for consistency and practicality, help the patient into a semi-recumbent position of approximately 45° to the horizontal (Campbell et al., 2017). Clean the patient’s skin Prepare the patient’s skin in line with your hospital or practice area’s policy. You may need to cleanse the skin with soap and water, or a non-alcohol wipe. If the skin is dry, exfoliate very lightly using a paper towel, gauze swab or proprietary abrasive tape (Campbell et al., 2017). The aim is to ensure good contact between the skin and electrodes. Do not undertake or attempt any procedure unless you are, or have supervision from, a properly trained, experienced and competent person. Always first explain the procedure to the patient and obtain their consent, in line with the policies of your employer or educational institution. Page 2 of 7 Observations Adults Recording a 12-lead electrocardiogram (ECG) Page 3 Apply electrode to right wrist In all the electrode placements, try to avoid bony prominences in order to gain a clear tracing. Peel an electrode off the sheet and place it on the right wrist. An exact anatomical placement of the limb leads is not necessary. Apply electrode to left ankle Place an electrode at ankle level on the left foot. Skin preparation Apply electrode to left wrist Place another electrode on the left wrist. Apply electrode to right ankle Place an electrode at ankle level on the right foot. Lead V1 Angle of Louis First intercostal space 2 Sternum For some patients who have a hairy chest, you will need to shave the area where the electrodes are to be attached, using clippers. Try to avoid shaving if possible, because of the risk of infection if the skin is grazed (Hammond & Spurgeon, 2015). You must obtain the patient’s consent for shaving. It is not necessary to shave the whole chest. Once again, prepare the skin if it is particularly oily or very dry. 3 4 Place the first chest electrode (V1) in the fourth intercostal space, at the right sternal margin (Campbell et al., 2017). To identify this correctly, first locate the manubriosternal joint (the angle of Louis, see inset), by running your finger down the sternum from the top until you encounter a bony ridge. From here, if you feel to the patient’s right side, you will locate the second intercostal space (the space between the second and third ribs). Now count down to the third and fourth intercostal spaces. Slide your finger towards the sternum until you feel the edge. Place the electrode for V1 here (Campbell et al., 2017). Do not undertake or attempt any procedure unless you are, or have supervision from, a properly trained, experienced and competent person. Always first explain the procedure to the patient and obtain their consent, in line with the policies of your employer or educational institution. Page 3 of 7 Observations Adults Recording a 12-lead electrocardiogram (ECG) Page 4 Lead V2 Lead V4 Midclavicular line 1 2 4 Repeat this procedure on the patient’s left side to correctly place the V2 electrode in the fourth intercostal space, at the left sternal margin (Campbell et al., 2017). Lead V3 Place the V4 electrode next. Move down to the fifth intercostal space, and place the electrode in the midclavicular line (Campbell et al., 2017). In women, V4 is usually not placed on the breast, although there is some debate. Crawford & Doherty (2010) recommend placing the V4 electrode under the left breast in women. V4 is usually not in line with the nipple—this is a common myth. Lead V5 Midclavicular line Midclavicular line 1 2 Anterior axillary line 3 4 The electrode for V3 is placed next, midway between V2 and V4 (Campbell et al., 2017). Place the V5 electrode at the same level as V4, but in the left anterior axillary line, as shown here (Campbell et al., 2017). Position of chest electrodes Lead V6 Midclavicular line Anterior axillary line Sternal notch Clavicle Manubrium First rib Angle of Louis First intercostal space Sternum Fourth intercostal space Midaxillary line Place the V6 electrode at the same level as V4 and V5, but in the left midaxillary line (Campbell et al., 2017). This illustration offers an overview of where the chest electrodes should lie. Do not undertake or attempt any procedure unless you are, or have supervision from, a properly trained, experienced and competent person. Always first explain the procedure to the patient and obtain their consent, in line with the policies of your employer or educational institution. Page 4 of 7 Observations Adults Recording a 12-lead electrocardiogram (ECG) Page 5 Lead box F L C3 C2 R 1 N 2 34 5 6 F C1 C3 C2 C1 R L N Attach limb leads The leads from the recording machine usually converge in a plastic box. If you put this box on the patient’s lower chest, it makes it easier to join the correct leads to the electrodes. The leads are usually labelled to indicate which electrode they should be connected to. Untangle the leads and lay them out against the corresponding electrodes, using the labels on the leads as a guide. First, using the crocodile clips on the leads, attach each of the limb leads. C1 C2 C3 L F N R C1 C2 L N R 1 F 2 3 45 6 C3 Position of leads Chest leads Take time to review all the leads. Ensure that each one is attached to the correct electrode. One by one, attach each of the six chest leads. Obtaining a calibration trace 1 2 Q\ A 3 W@ ! S Z ; 4 E# ? X D : R$ = C T - F_ / 5 G , V” 6 Y& + U * . BØ 7 I % H~ 6 NÖ 8 O ( JÆ KÅ 9 P 9 LÜ 0 X Config mm/s Auto Filter Man mm/mV Ergo Arrhy 7 MÄ Alt 10 mm Pat 5 mm 5 small squares = 0.20 seconds Most machines will automatically provide a calibration trace, but you may have to do this manually. Here, the clinician is pressing the 10-mm calibration button. The calibration trace provides a standard 10-mm box at one or both ends of the ECG. This ensures that 1 mV of sensed electrical activity causes the stylus to move up 10 mm on the paper (a standard calibration). The amplitude of the ECG waveforms (for example the height or depth of the QRS complex) can have diagnostic significance, so the electrical activity of the heart must be accurately represented on the paper trace. Do not undertake or attempt any procedure unless you are, or have supervision from, a properly trained, experienced and competent person. Always first explain the procedure to the patient and obtain their consent, in line with the policies of your employer or educational institution. Page 5 of 7 Observations Adults Recording a 12-lead electrocardiogram (ECG) Page 6 Setting the paper speed 1 2 Q\ A 3 W@ ! S Z ; 4 E# ? D X R$ = : T - F_ C / 5 G 6 Y& + , U * . V” 7 I % JÆ H~ 6 BØ 8 O ( KÅ 9 P 9 LÜ 0 Config X mm/s Auto Filter Man mm/mV Ergo Arrhy Height =10 mm 7 NÖ MÄ Alt Pat 25 mm/s The machine will often set the paper speed automatically. If not, it should be set at an internationally agreed speed of 25 mm/s. The final trace should show the paper speed; this information is important as the graph paper represents time on the 12-lead ECG. In a healthy person, each electrical part of the cardiac cycle should take a specific amount of time to pass through the heart. If the machine prints at a standard speed, these times can be calculated from the tracing on the graph paper. Print ECG Record the patient’s details 1 2 Q\ A 3 W@ ! S Z ; 4 E# ? X D : R$ = C T - F_ / 5 G , V” 6 Y& + U * H~ . BØ 7 I % JÆ 6 NÖ 8 O ( KÅ 9 P 9 LÜ 0 X Config 1 mm/s Auto Q\ Filter Man A 7 MÄ Alt mm/mV Pat S Z Ergo Arrhy MRPBODY 2 D 8 9 3 4 2 Date 3 W@ ! ; 4 E# ? X D : R$ = C T - F_ / 5 G , V” 6 Y& + U * . BØ 7 I % H~ 6 NÖ 8 O ( JÆ KÅ 9 P 9 LÜ 0 X Config mm/s Auto Filter Man mm/mV Ergo Arrhy 7 MÄ Alt Pat YORK WARD Enter the patient’s name and identification number into the machine. This is essential as many departments store the ECG electronically and there is a significant risk of incorrect patient management if an ECG result is linked to the wrong patient record. Document the time the recording was made, and any notes on significant clinical signs or symptoms, such as chest pain. Troubleshooting — amputee In an amputee, you can place the electrodes towards the end of the stump, provided that they are not on the torso itself. Note the limb that is missing on the ECG recording. When you are confident that everything is ready, print the ECG. Some machines allow you to view the ECG on a screen before printing, so that you know the trace is of a good quality. Check patient’s name and details Date: 18 5 2019 Time: 10:29 Ensure that you are happy with the quality of the tracing before taking all the leads off the patient. Once again, check that the tracing carries details of the patient’s name and identification number, and the date and time of recording. Do not undertake or attempt any procedure unless you are, or have supervision from, a properly trained, experienced and competent person. Always first explain the procedure to the patient and obtain their consent, in line with the policies of your employer or educational institution. Page 6 of 7 Observations Adults Recording a 12-lead electrocardiogram (ECG) Page 7 (b) Muscle tremor Artefacts: (a) Electrical interference Electrical activity in the environment can produce a characteristic thickened line on the ECG, as shown. Move electrical appliances, such as syringe drivers, further from the patient. Try changing electrodes to improve skin contact. Using the machine’s manual filter button (if present) helps to reduce extraneous electrical activity, but activate this only when absolutely necessary because it can distort the recording (Campbell et al., 2017). You should write on the recording that the filter has been applied. Muscle tremor occurs if the patient is not lying still, or is moving due to involuntary movement or shivering. Reassure the patient and ask them to lie as still as possible. Try to avoid moving the leads up the limbs, as this may affect the recording (Campbell et al., 2017), but if needed you may have to do this, as described for someone with an amputation. Once again, utilise the filter button, but only if absolutely necessary. Always add a comment to the ECG when a change from the 'standard' recording is made. L F N R C1 C2 C3 C1 L C2 45 F 1 R Check equipment Patient Notes General Notes 23 6 Documentation Disconnect the leads, clean them according to local protocol, and carefully put away all equipment (Jevon, 2010). If the patient’s condition is unstable (for example, ongoing chest pain), the sticky tabs may be left in place so that another 12-lead ECG can be undertaken quickly. If further recordings are not planned, skin electrodes should be removed. N A wandering baseline appears as a trace that does not align with the horizontal lines of the graph paper. It is important to correct this as it will make it difficult to detect ECG abnormalities. Change the electrodes and ensure that the skin where they are attached is adequately shaved of hair. You may need to roughen the skin with an emery pad. A flat line on the ECG tracing for a specific lead usually means a disconnection of that lead (Hammond & Spurgeon, 2015). C3 Disconnect ECG (c) Wandering baseline ? X Allergy Notes ECG recorded By Staff Nurse Graham Dr Greene informed 1 2 Q\ A 3 W@ ! S Z ; 4 E# ? X D : R$ = C T - F_ / 5 G , V” 6 Y& + U * 7 I % H~ . BØ 8 O ( JÆ 6 9 P 9 KÅ LÜ 0 X Config mm/s Auto Filter Man mm/mV Ergo Arrhy 7 NÖ MÄ Alt Pat N R R 1 2 L 3 4 5 6 C1 C2 C3 C1 N F C2 C3 L F OK Cancel Record in the notes that a 12-lead ECG has been taken and note which clinician has been informed. If able, note any changes to the normal ECG and any subsequent care or treatment undertaken. Put the ECG machine away carefully without tangling the wires. If necessary, top up the supplies, such as ECG paper or electrodes, or delegate a member of staff to do this. Do not undertake or attempt any procedure unless you are, or have supervision from, a properly trained, experienced and competent person. Always first explain the procedure to the patient and obtain their consent, in line with the policies of your employer or educational institution. Page 7 of 7


