MOUNTING
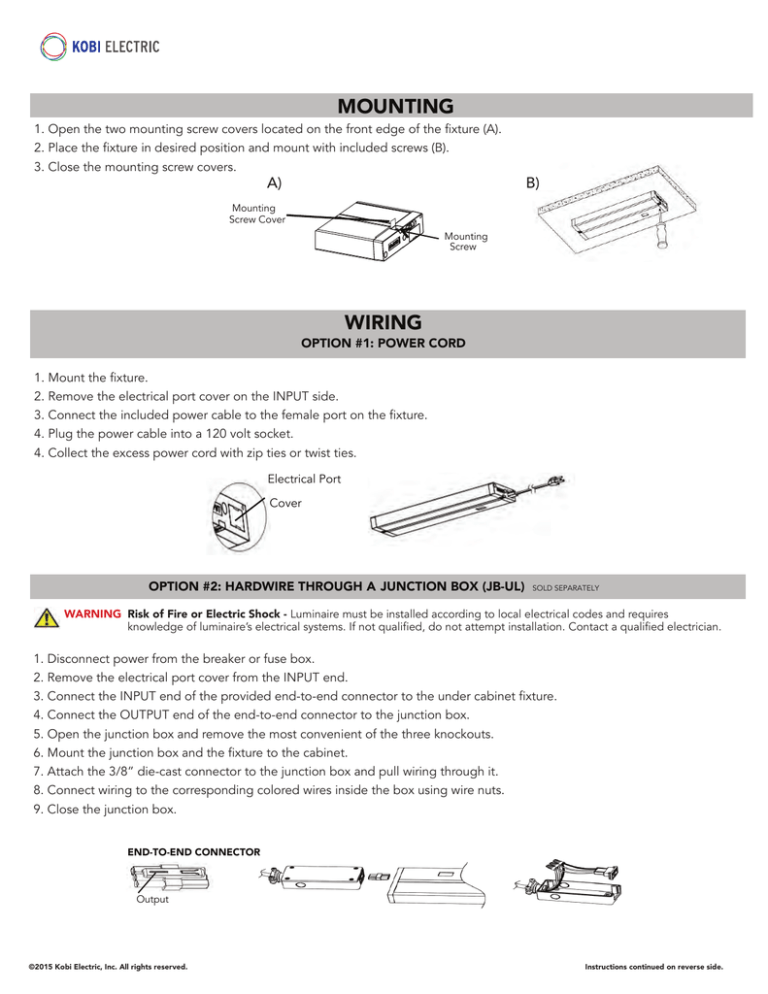
1. Open the two mounting screw covers located on the front edge of the fixture (A).
2. Place the fixture in desired position and mount with included screws (B).
3. Close the mounting screw covers.
A)
B)
Mounting
Screw Cover
Mounting
Screw
WIRING
OPTION #1: POWER CORD
1. Mount the fixture.
2. Remove the electrical port cover on the INPUT side.
3. Connect the included power cable to the female port on the fixture.
4. Plug the power cable into a 120 volt socket.
4. Collect the excess power cord with zip ties or twist ties.
Electrical Port
Cover
OPTION #2: HARDWIRE THROUGH A JUNCTION BOX (JB-UL)
SOLD SEPARATELY
WARNING Risk of Fire or Electric Shock - Luminaire must be installed according to local electrical codes and requires
knowledge of luminaire’s electrical systems. If not qualified, do not attempt installation. Contact a qualified electrician.
1. Disconnect power from the breaker or fuse box.
2. Remove the electrical port cover from the INPUT end.
3. Connect the INPUT end of the provided end-to-end connector to the under cabinet fixture.
4. Connect the OUTPUT end of the end-to-end connector to the junction box.
5. Open the junction box and remove the most convenient of the three knockouts.
6. Mount the junction box and the fixture to the cabinet.
7. Attach the 3/8” die-cast connector to the junction box and pull wiring through it.
8. Connect wiring to the corresponding colored wires inside the box using wire nuts.
9. Close the junction box.
END-TO-END CONNECTOR
Output
©2015 Kobi Electric, Inc. All rights reserved.
Instructions continued on reverse side.
OPTION #3: HARDWIRE DIRECT TO FIXTURE
WARNING Risk of Fire or Electric Shock - Luminaire must be installed according to local electrical codes and requires
knowledge of luminaire’s electrical systems. If not qualified, do not attempt installation. Contact a qualified electrician.
1. Disconnect power from the breaker or fuse box.
2. Remove the most convenient of 3 knockouts and attach the provided 3/8” die-cast connector.
3. Mount the fixture.
FRONT COVER
4. Open the front panel of the fixture to access the wiring by
REAR ACCESS (C)
4. Remove the rear access panel by loosening the rear screw.
simultaneously sliding tabs on either side of the fixture (A).
5. Insert the wiring from the power source through the
5. Insert the wiring from the power source through the
connector and connect them to the corresponding wiring
connector and connect them to the corresponding wiring
inside the fixture.
inside the fixture (B).
BLACK = Hot
BLACK = Hot
WHITE = Neutral
GREEN = Ground
WHITE = Neutral
GREEN = Ground
6. Ensure excess wires are settled inside the fixture.
6. Ensure excess wires are settled inside the fixture.
7. Close the rear access panel.
7. Close the front cover.
B)
WHITE (NEUTRAL) JUNCTION
BLACK (HOT) JUNCTION
3/8" DIE-CAST
CONNECTOR
A)
GREEN (GROUND)
JUNCTION
PUSH-IN CONNECTORS
SLIDE
C)
DRIVER
PUSH-IN
CONNECTORS
REAR ACCESS DOOR
SLIDE
3/8” DIE-CAST
CONNECTOR
OPEN
Cable (model UC-C-24)
JOINING MULTIPLE FIXTURES
End-to-End Connector (provided)
SOLD SEPARATELY
1. Remove electrical port covers on the facing ends.
2. Connect the OUTPUT end of the cable to the
OUTPUT of the first fixture.
3. Connect the INPUT end of the cable to the INPUT
of the next fixture.
MAXIMUM NO. FIXTURES
IN SEQUENCE
UC11-**-##
50pcs
UC14-**-##
50pcs
UC22-**-##
50pcs
UC24-**-##
50pcs
UC28-**-##
50pcs
UC33-**-##
50pcs
UC42-**-##
50pcs
©2015 Kobi Electric, Inc. All rights reserved.
2. Connect the OUTPUT side of the end-to-end connector
to the OUTPUT of the first fixture.
3. Connect INPUT side of the end-to-end connectors the
INPUT of the next fixture.
END-TO-END CONNECTOR
Input
UC-C-24
MODEL
1. Remove electrical port covers on the facing ends
of two fixtures.
Output
** CCT
## Housing Color

