(DS12) Product Guide
advertisement

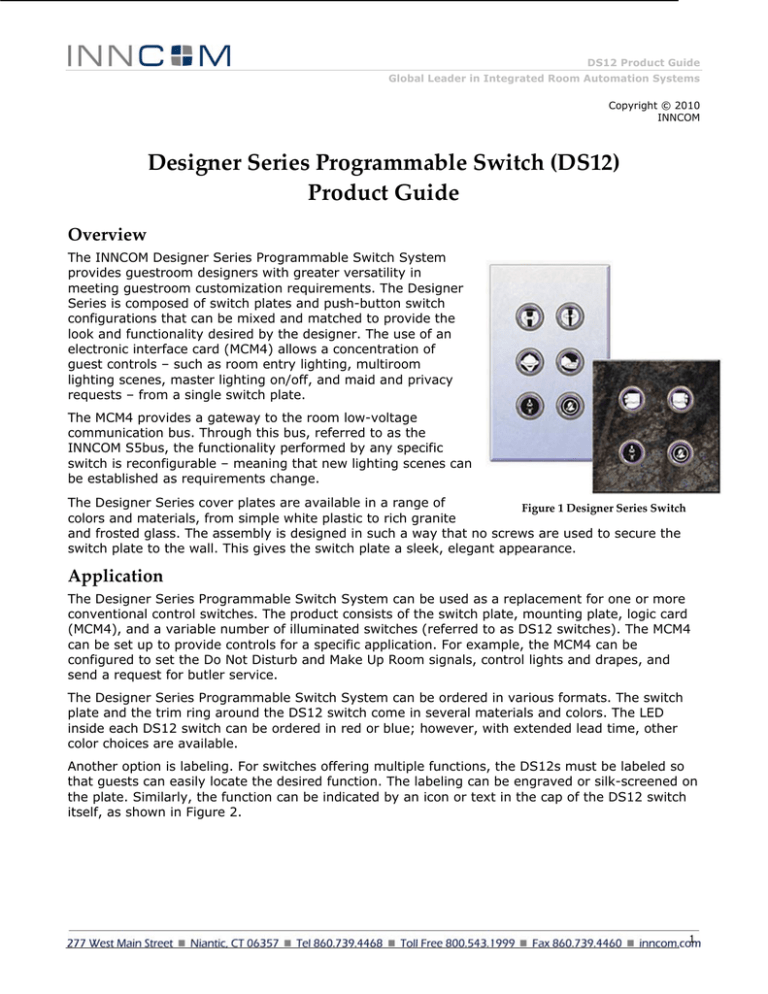
DS12 Product Guide Global Leader in Integrated Room Automation Systems Copyright © 2010 INNCOM Designer Series Programmable Switch (DS12) Product Guide Overview The INNCOM Designer Series Programmable Switch System provides guestroom designers with greater versatility in meeting guestroom customization requirements. The Designer Series is composed of switch plates and push-button switch configurations that can be mixed and matched to provide the look and functionality desired by the designer. The use of an electronic interface card (MCM4) allows a concentration of guest controls – such as room entry lighting, multiroom lighting scenes, master lighting on/off, and maid and privacy requests – from a single switch plate. The MCM4 provides a gateway to the room low-voltage communication bus. Through this bus, referred to as the INNCOM S5bus, the functionality performed by any specific switch is reconfigurable – meaning that new lighting scenes can be established as requirements change. The Designer Series cover plates are available in a range of Figure 1 Designer Series Switch colors and materials, from simple white plastic to rich granite and frosted glass. The assembly is designed in such a way that no screws are used to secure the switch plate to the wall. This gives the switch plate a sleek, elegant appearance. Application The Designer Series Programmable Switch System can be used as a replacement for one or more conventional control switches. The product consists of the switch plate, mounting plate, logic card (MCM4), and a variable number of illuminated switches (referred to as DS12 switches). The MCM4 can be set up to provide controls for a specific application. For example, the MCM4 can be configured to set the Do Not Disturb and Make Up Room signals, control lights and drapes, and send a request for butler service. The Designer Series Programmable Switch System can be ordered in various formats. The switch plate and the trim ring around the DS12 switch come in several materials and colors. The LED inside each DS12 switch can be ordered in red or blue; however, with extended lead time, other color choices are available. Another option is labeling. For switches offering multiple functions, the DS12s must be labeled so that guests can easily locate the desired function. The labeling can be engraved or silk-screened on the plate. Similarly, the function can be indicated by an icon or text in the cap of the DS12 switch itself, as shown in Figure 2. 1 DS12 Product Guide Page 2 of 10 Figure 2 Custom Switch Plate with icons Figure 3 Unitary DS12 Switch Installation Requirements The DS12 itself (Figure 3) is a unitary switch; i.e., a free-standing assembly. It contains a threaded barrel that fits into a 5/8” (16 mm) drilled opening in the plate. To assemble a plate for a particular application, the installer presses the plate into the framing plate and then inserts each DS12 through the aligned openings, securing it by means of a washer and threaded nut. If the cap contains an icon, before the nut is tightened the installer must ensure that the icon is positioned correctly. The nut can be tightened sufficiently by hand; no tool is needed. Once the DS12s have been inserted into the plate and matching framing plate, the assembly can be mounted in a singlegang electrical box, a single-gang mud ring, or a single-gang low-voltage caddy by means of the mounting plates (Figure 3). This is done by firmly pressing the framing plate tabs into the tab receptor openings of the DS12 wall mounting plate. Figure 4 DS12 Assembly DS12 Product Guide Page 3 of 10 The plastic wall caddy is the most cost-effective installation solution for mounting the DS12 assembly in drywall. The caddy also offers ease of installation and provides a low-profile mounting depth. Note: In many cases the assembly of the switches into the plate and framing plate will take place in the factory. The above instructions are provided to enhance understanding of the product. Wiring The Designer Series Switch is a low-voltage controller; there are no associated high-voltage devices or wiring. Termination is via pinned headers in the MCM4 (Figure 5) Figure 6. Figure 5 Typical Corresponding Numbered Positions on a Switch Plate and MCM4 The DS12 assembly is powered with INNCOM’s S5bus, which contains wires for power and ground, and a communication wire not used for power transfer. As Figure 5 illustrates, the S5-Bus can link the DS12 assembly to other INNCOM devices. Because the DS12 assembly can have a variable number of DS12s, the DS12 positions on the switch plate are numbered to correspond to positions on the MCM4 (Figure 5). Whatever the number or layout of DS12s in the switch plate, the position numbers will remain the same; therefore, a DS12 in position 3, for example, will always be wired to position 3 of the MCM 4. The MCM4 can support six DS12s, and the DS12s can be mounted in more than one plate. This allows flexibility in mounting because in some applications two assemblies can be served by one MCM4. DS12 Product Guide Page 4 of 10 Technical Specifications Table 1. Technical Specifications and Current Consumption Voltage 12VDC Current Maximum output 31mA (see Table 2) Operating Environment 40 to 150 °F (5 to 65 °C) Mounting 20-gauge wall mount bracket and plastic framing plate (both provided) Dimensions: Switch Plate MCM4 DS12 Switch See Figure 5. See Figure 5. See Figure 2. Approvals FCC Part 15 Current Consumption = 13 mA + N (3mA) where N is the number of DS12s connected. Table 2. Configuration Load (includes logic board) 1 DS12 16mA 2 DS12 19mA 3 DS12 22mA 4 DS12 25mA 5 DS12 28mA 6 DS12 31mA Figure 6 Dimensions of Switch Plate, Frame, and MCM4 DS12 Product Guide Page 5 of 10 Ordering Specifications Tables 3 through 5 provide ordering options for the DS12 Barrel, Button Cap, and Decora Plate, along with the part numbers for these items. The other components needed for the system are the Wall Mounting Plate (46-2003.b), Framing Plate (46-2009), and MCM4 (01-9982). Refer to Figures 4 and 5 regarding the components and how they link together. Table 3 Ordering Information for DS12 Barrel DS12 Barrel Part Number 01‐9989.l.c.s l LED color • • • • • • • c Barrel color White (wh), black (bl), eagle almond (ea), chrome (ch), brass (br), custom (xx) wh s rb = 1 red, 1 blue LEDs rr = 2 red LEDs bb = 2 blue LEDs rg = 1 red, 1 green LEDs 00 = no LEDs (full wire harness) ps = passive switch (no LEDs, 2-wire flying leads) xx = customer-specified color bl ea ch br Barrel size 7/8" length (23mm), 1 1/4" length (32mm). Note: Both lengths have diameter 5/8" (16mm). 23mm 32mm Part Number example: 01-9989.rg.ea.23 = DS12 barrel with 1 red and 1 green LED, eagle almond barrel color, and 23 mm barrel length. DS12 Product Guide Page 6 of 10 Table 4 Ordering Information for DS12 Button Cap DS12 Button Cap Part Number 53-9999.ec.ic.i ec Exterior Cap • • • • • • • ic cl = clear wh = white bl = black ea = eagle almond ch = chrome br = brass xx = customer-specified color Interior Cap • • • • • • • mk = milky (translucent) wh = white bl = black ea = eagle almond ch = chrome br = brass xx = customer-specified color Note: When the exterior cap is solid, it is not necessary to specify color for the interior cap. Cap Assembly Examples i 53-9999.wh.xx.e 53-9999.bl.xx.e 53-9999.ea.xx.e 53-9999.ch.xx.e 53-9999.br.xx.e 53-9999.cl.mk.e 53-9999.cl.wh.e 53-9999.cl.bl.e 53-9999.cl.ch.e 53-9999.cl.br.e 53-9999.xx.xx.e 53-9999.cl.ea.e Icon DND = Do Not Disturb MUR = Make Up Room DBL = Doorbell LTB = Light Bulb DL = Dim Lights DO = Drapes Open DC = Drapes Closed BL = Bed Left BR = Bed Right E = No Icon XX = Custom Icon Note: Icons are placed on the interior cap only when the exterior cap is clear. DS12 Product Guide Page 7 of 10 DS12 Button Cap Part Number 53-9999.ec.ic.i Icon Examples DND MUR DBL LTB DO DC BL BR DL Part Number Examples: 53-9999.cl.mk.MUR = DS12 Cap with clear exterior, milky interior, and MUR icon. 53-9999.ch.xx.E = DS12 Cap in chrome with no icon. DS12 Product Guide Page 8 of 10 Table 5. Ordering Information for DS12 Decora Plates DS12 Decora Plates Part Number xx-xxxx.c.m.f.p c Configuration A6 A3l A3r A1 B4 B2b m A4t Materials p = plastic g = glass b = brass c = chrome x = custom B2e A4b A4c A2t B2l B2c B1 43c A2c A2b B2r B2t DS12 Product Guide Page 9 of 10 DS12 Decora Plates Part Number xx-xxxx.c.m.f.p f Finish Plastic Black (bl), white (wh), eagle almond (ea), Custom (xx) bl wh ea Glass Frosted white (fw), frosted black (fb), custom (c) fw p fb DS Framing Plate Color Black (bl), white (wh), eagle almond (ea) bl wh ea DS12 Product Guide Page 10 of 10 Example: 46-2009.A4t.p.bl.bl = Framing plate in American standard size with four drilled openings in positions 1, 2, 4, and 5; manufactured in plastic; plate colored black; framing plate colored black. Note: The framing plate is always shipped with a metal wall mounting bracket, PN 46-2003.B. Commissioning Requirements The Designer Series Switch supports being assigned a device address and device channel, and these commands can be executed from a linked e4 Smart Digital Thermostat, a sneezer tool, or the central server. References Title Location Document Revision History Table 3. Document Revision History Revision Date Issued Reason for change v1.0 23-Apr-2007 First issue v1.1 28-Jan-2009 Corrected dimensioning, reformatted.


