Model EP-311/313
Electropneumatic Transducer
Technical Information
Rev. 0
7400 Flying Cloud Drive • Minneapolis, MN 55344-3720 • USA
800-843-5116 • 952-835-1626 • Fax 952-829-5331
www.mamacsys.com
For additional information, see the accompanying data sheet for this
transducer.
Ordering Information
MANUAL OVERRIDE
RANGE
311
Without override
315
3 - 15 psig
313
With override
020
0 to 20 psig
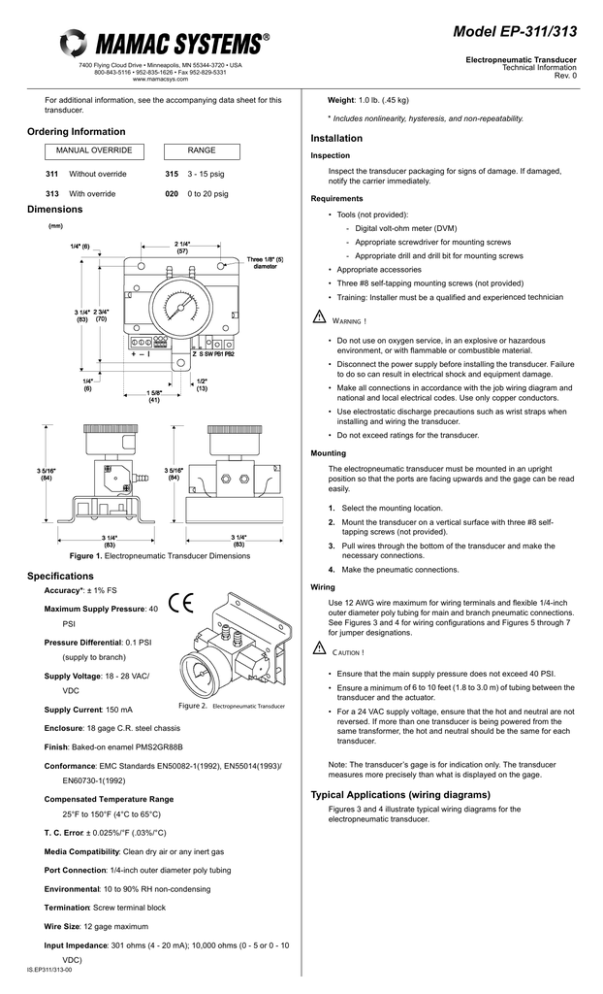
Dimensions
Weight: 1.0 lb. (.45 kg)
* Includes nonlinearity, hysteresis, and non-repeatability.
Installation
Inspection
Inspect the transducer packaging for signs of damage. If damaged,
notify the carrier immediately.
Requirements
• Tools (not provided):
- Digital volt-ohm meter (DVM)
- Appropriate screwdriver for mounting screws
- Appropriate drill and drill bit for mounting screws
• Appropriate accessories
• Three #8 self-tapping mounting screws (not provided)
• Training: Installer must be a qualified and experienced technician
W ARNING !
• Do not use on oxygen service, in an explosive or hazardous
environment, or with flammable or combustible material.
• Disconnect the power supply before installing the transducer. Failure
to do so can result in electrical shock and equipment damage.
• Make all connections in accordance with the job wiring diagram and
national and local electrical codes. Use only copper conductors.
• Use electrostatic discharge precautions such as wrist straps when
installing and wiring the transducer.
• Do not exceed ratings for the transducer.
Mounting
The electropneumatic transducer must be mounted in an upright
position so that the ports are facing upwards and the gage can be read
easily.
1. Select the mounting location.
2. Mount the transducer on a vertical surface with three #8 selftapping screws (not provided).
Figure 1. Electropneumatic Transducer Dimensions
4. Make the pneumatic connections.
Specifications
Wiring
Accuracy*: ± 1% FS
Use 12 AWG wire maximum for wiring terminals and flexible 1/4-inch
outer diameter poly tubing for main and branch pneumatic connections.
See Figures 3 and 4 for wiring configurations and Figures 5 through 7
for jumper designations.
Maximum Supply Pressure: 40
PSI
Pressure Differential: 0.1 PSI
C AUTION !
(supply to branch)
• Ensure that the main supply pressure does not exceed 40 PSI.
Supply Voltage: 18 - 28 VAC/
VDC
Supply Current: 150 mA
Figure 2.
Electropneumatic Transducer
Enclosure: 18 gage C.R. steel chassis
Finish: Baked-on enamel PMS2GR88B
Conformance: EMC Standards EN50082-1(1992), EN55014(1993)/
EN60730-1(1992)
Compensated Temperature Range:
25°F to 150°F (4°C to 65°C)
T. C. Error: ± 0.025%/°F (.03%/°C)
Media Compatibility: Clean dry air or any inert gas
Port Connection: 1/4-inch outer diameter poly tubing
Environmental: 10 to 90% RH non-condensing
Termination: Screw terminal block
Wire Size: 12 gage maximum
Input Impedance: 301 ohms (4 - 20 mA); 10,000 ohms (0 - 5 or 0 - 10
VDC)
IS.EP311/313-00
3. Pull wires through the bottom of the transducer and make the
necessary connections.
• Ensure a minimum of 6 to 10 feet (1.8 to 3.0 m) of tubing between the
transducer and the actuator.
• For a 24 VAC supply voltage, ensure that the hot and neutral are not
reversed. If more than one transducer is being powered from the
same transformer, the hot and neutral should be the same for each
transducer.
Note: The transducer’s gage is for indication only. The transducer
measures more precisely than what is displayed on the gage.
Typical Applications (wiring diagrams)
Figures 3 and 4 illustrate typical wiring diagrams for the
electropneumatic transducer.
Transducer Operation
1. Adjust the input signal to obtain a maximum output pressure for the
appropriate range.
2. Ensure that the output is 15 or 20 PSI.
3. Adjust the input signal to obtain a minimum output pressure.
4. Ensure that the output is 0 or 3 PSI.
Calibration
All electropneumatic transducers are factory calibrated to meet or
exceed published specifications. If field adjustment is necessary, follow
these instructions:
Figure 3. Wiring the Electropneumatic Transducer With a 24 VAC Supply
1. Connect air to the Main port. See Figure 8.
2. Connect an accurate gage to the Branch port using a minimum of 6
to 10 feet (1.8 to 3.0 m) of tubing.
3. Connect the [+] and [-] terminals to an appropriate power source for
the transducer. The transducer can accept either a 24 VAC or VDC
supply voltage. The maximum supply voltage should not exceed 30
VAC/VDC.
4. Apply a low input signal to the [-] and [I] terminals (0 VDC or 4 mA).
5. Adjust [Z] to obtain the desired low output pressure.
6. Apply a high input signal to the [-] and [I] terminals (5/10 VDC or 20
mA).
7. Adjust [S] to obtain the desired high output pressure.
8. Repeat steps 4 through 7 until the transducer is fully calibrated.
Figure 4. Wiring the Electropneumatic Transducer With a 24 VDC Supply
CAUTION!
• This transducer contains a half-wave rectifier power supply and must
not be powered from transformers powering other devices with nonisolated full-wave rectifier power supplies.
Adjustments
Jumper Configuration
The electropneumatic transducer is factory configured for 4 - 20 mA
output. To change the input configuration, adjust the jumper settings.
See Figures 5, 6, and 7.
Figure 5. Jumper Settings for Electropneumatic
Transducers With 4 - 20 mA Input
Figure 8. Terminal Locations on the Electropneumatic Transducer
Figure 6. Jumper Settings for Electropneumatic
Transducers With 0 - 5 VDC Input
Maintenance
Perform regular maintenance on the total system to ensure the
sustained optimum performance of the electropneumatic transducer.
Field Repair
Do not attempt to repair the electropneumatic transducer. Replace a
malfunctioning transducer with a functional transducer if necessary.
Figure 7. Jumper Settings for Electropneumatic
Transducers With 0 - 10 VDC Input
Checkout
1. Verify that the transducer is mounted in the correct position.
2. Verify the appropriate input signal and supply voltage.
3. Verify the appropriate input configuration.
CAUTION!
Warranty
See the accompanying data sheet for additional information. For
technical / application assistance, call your nearest office.
EUROPE
AUSTRALIA
Baird House, Units 6 & 7
Dudley Innovation Centre
Pensnett Estate • Kingswinford
West Midlands • DY6 8XZ
United Kingdom
01384-271113 • Fax 01384-271114
4 Armiger Court, Unit 2
Holden Hill • S.A. 5088
Australia
08-8359-4333 • Fax 08-8395-4433
• Do not connect 120 VAC to the electropneumatic transducer.
IS.EP311/313-00
ASIA
CANADA
No. 22 Lorong 21A Geylang
#11-02 Chin Hin Hang Building
Singapore • 388431
65-6392-7273 • Fax 65-6392-7276
155 Mcintosh Drive, Unit 5
Markham • Ontario • L3R 0N6
Canada
905-474-9215 • Fax 905-474-0876
Copyright © Mamac Systems 2003. All rights reserved.
Page 2 of 2

