ADP Resubmission Process
advertisement
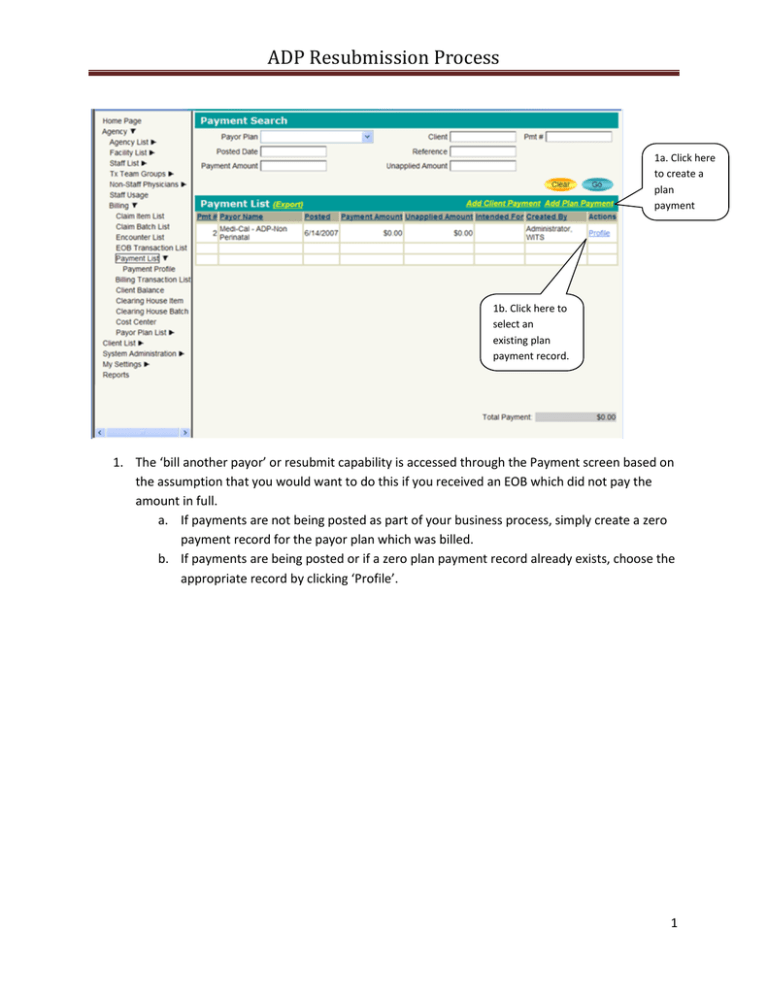
ADP Resubmission Process 1a. Click here to create a plan payment record. 1b. Click here to select an existing plan payment record. 1. The ‘bill another payor’ or resubmit capability is accessed through the Payment screen based on the assumption that you would want to do this if you received an EOB which did not pay the amount in full. a. If payments are not being posted as part of your business process, simply create a zero payment record for the payor plan which was billed. b. If payments are being posted or if a zero plan payment record already exists, choose the appropriate record by clicking ‘Profile’. 1 ADP Resubmission Process 2a. Select the desired plan 2c. Indicate a zero Payment Amount. 2b. Select the Payment transaction type. 3. Click here to go to the Payment Application Claim List. 2d. Click here to create a payment record. 2. If needed, create a new zero payment record as illustrated above by selecting the appropriate payor plan and clicking Save. 3. If you are in an existing payment record or after you have completed Step 2, click Apply Payment to see the Payment Application Claim List. 2 ADP Resubmission Process 4a. Search for the client of interest. 4b. Click here to see the client’s claims with a nonzero balance. 5. Click here to select a claim for resubmission. 4. By default, the search will return all claims with a non-zero balance which have been billed to this Payor Plan, i.e. all those with an outstanding balance or a credit balance. To limit the number claims returned , search for the client of interest and click Go. 5. Identify the claim that you want to submit. Note that multiple encounters may be included on a single claim. 3 ADP Resubmission Process 6. Click here to Bill Another Payor. 6. Click Bill Another Payor. This is used to re-submit to the same payor (a resubmission) or bill to a different payor when the previous billing was to the incorrect payor or bill to a secondary/tertiary payor for COB coordination. 4 ADP Resubmission Process 7a. ADP is always primary. 1. 7b. Select the ADP group & plan. 7d. Click here to return to Payment Application Claim List. 7c. Set the status to Hold to make these easier to find when performing a Claim Item Search later. 7. For resubmissions to ADP, the information should be entered as above. 5 ADP Resubmission Process 8a. Select another client OR 8b. Select another claim OR 8c. Finish and go to the Claim Item List. 8. If you are done, click Finish and go to Claim Item List to continue. Otherwise, select another claim for the same client or re-query for a different client. In this scenario, we are going to select another claim which includes multiple encounters. 6 ADP Resubmission Process 9. Click here to Bill Another Payor. 9. This returns you to the Payment Application Claim Profile where you simply click Bill Another Payor. 7 ADP Resubmission Process 10. Click here to remove an encounter which should not be resubmitted. 10. The header information should be completed as in Step 7. Since this claim included multiple encounters, use the Remove action to remove any encounters that you do not want to resubmit. 8 ADP Resubmission Process 11. Click here save the information & return to Payment Application Claim List. 11. Once the list reflects the encounters from this claim which should be resubmitted, click Finish. This will bring you back to Payment Application Claim List (Step 8). 9 ADP Resubmission Process 11b. Select the encounter which is being resubmitted. 11a. Search for claim items with a HOLD status. 12. In this scenario, we are assuming that you were finished identifying all of the items which need to be resubmitted and as directed in Step 8, have gone to the Claim Item List screen. a. Search on Claim Items with a status of HOLD. b. Click on the Profile action for each encounter which is to be resubmitted. 13a. Select the Multiple Service Override and Delay Reason. 13b. Click here to save your changes. 14a. Click here to change the status to Released. 14b. Click here to return to the Claim Item List. 10 ADP Resubmission Process 13. Select the appropriate Multiple Service Override Reason and Delay Reason, if needed. Click Save. 14. Choose the Administrative Action Release and Finish. This encounter will be included in the next Claim Batching process. Repeat as necessary. 11
