Specifications
XLS13XY
XLS35XY
WIRELAB.XY
Ultra Accurate Table-Top Laser Micrometer
Laser Systems
for the Wire Industry
All dimensions are in mm.
WIRELAB
XY 13/A
XY 13/B
XY 13/A/HF
XY 13/B/HF
XY 35/B
XY 35/B/HF
XLS13XY/200/A XLS13XY/200/B XLS13XY/1200/A XLS13XY/1200/B XLS35XY/200/B XLS35XY/1200/B
Gauge Model
(mm)
13 x 13 (1)
4 x 4 (2)
13 x 13 (1)
4 x 4 (3)
35 x 35 (4)
Measuring Field
(mm)
0.1 ÷ 10
0.03 ÷ 3
0.1 ÷ 10
0.05 ÷ 3
0.2 ÷ 32
Measurable Diameters
(µm)
10 / 1 / 0.1 / 0.01
Resolution (Selectable)
(µm)
± 0.5 (6)
± 1 (7)
Linearity (Centred Product) (5)
(µm)
± 1.5
± 0.8
± 1.5
± 0.8
± 2.5
±5
Linearity (Full Range) (8)
(mm)
±1
± 0.5
±1
± 0.5
± 1.5
Linearity (Reduced Field) (9)
(µm)
± 0.15
± 0.08
± 0.05
± 0.03
± 0.3
± 0.2
Repeatability (T=1s, ±3σ)
(µm)
± 0.75
±2
±4
Single Shot Repeatability (±3σ)
(mm)
0.1 x 4
0.04 x 0.1
0.05 x 4
0.05 x 0.1
0.2 x 0.1
Beam Spot Size (s,l) (10)
(Hz)
200 (X) x 200 (Y)
1200 (X) x 1200 (Y)
200 (X) x 200 (Y) 1200 (X) x 1200 (Y)
Scanning Frequency
(m/s)
65
98
120
180
Scanning Speed
- 0.0180
- 0.0184
- 0.0090
Gauge Thermal Coefficient (11) (µm/mm°C)
Laser Source
Dimensions (12)
Weight (12)
VLD (Visible Laser Diode); λ = 650 nm
(mm)
(kg)
292 x 137 x 49
2.5
352.5 x 258.2 x 72
5.8
Notes
( ) For Ø ≥ 0.1 mm; for smaller dia.the field is proportionally reduced up to 1 x 1 mm for Ø = 0.03 mm.
(8) Maximum measurable shift of the average diameter (X+Y)/2, when a master is moved along the
two X and Y axes crossing the centre of the field, checked with Ø = 3 mm (XLS13XY/*/A), Ø = 1 mm
(XLS13XY/*/B) or Ø = 8 mm (XLS35XY).
(3) For Ø ≥ 0.1 mm; for smaller dia. the field is proportionally reduced up to 1 x 1 mm for Ø = 0.05 mm.
(9) The field is 5 x 5 (13XY/*/A), 2 x 2 (13XY/*/A) or 16 x 16 (35XY).
(4) For Ø ≥ 0.3 mm; for smaller dia. the field is proportionally reduced up to 20 x 20 mm for Ø = 0.2 mm.
(10) Elliptical spot: “s” is the thickness and “l” is the width.
(5) Related to the average diameter (X+Y)/2.
(11) Typical value. It states the measurement drift due to the room temperature change, when measuring a
master with null coefficient of expansion (INVAR).
(1) For Ø ≥ 0.3 mm; for smaller dia. the field is proportionally reduced up to 4 x 4 mm for Ø = 0.1 mm.
2
(6) For Ø ≤ 1 mm. For Ø > 1 mm the linearity is ± 1 µm. The value is inclusive of the Aeroel’s masters uncertainty
(± 0.3 µm )
(12) Referred only to the laser sensor, without base.
(7) For Ø ≤ 15 mm. For 15 ≤ Ø ≤ 32 mm the linearity is ± 1.5 µm (± 2.5 µm for 1200/B model). The value is
inclusive of the Aeroel’s masters uncertainty (± 0.3 µm ).
Specifications subject to change without notice. For additional details and complete specifications please see the gauge data sheet.
CE-100 Operator’s Interface Panel
Monochromatic LCD Display, 240 x 128, backlit
“Touch-Sensitive” capacitive keyboard, with 34 keys and 7 warning LED
RS485 interface to connect the XLS gauges
8 protected and optocoupled outputs, 4 optocoupled inputs,
2 inputs to the gauge
Ethernet & RS232 ports and Centronics output for parallel printer
Available with adjustable table-top base or for 19” Rack mounting
Dimensions: 132 x 300 x 72 mm (panel alone)
Weight: 3.4 kg
Power supply: 24 VDC, 100 mA Typical (1 A max)
AEROEL S.R.L.
Via Pier Paolo Pasolini 35/3
Pradamano (UD)
33040 - ITALY
Phone +39 0432 671301
Fax +39 0432 671543
e-mail: aeroel@aeroel.it
http: //www.aeroel.it
D00100_E rev. 1,0 - 09.03.2007
Copyright © 2007 Aeroel s.r.l. - All rights reserved
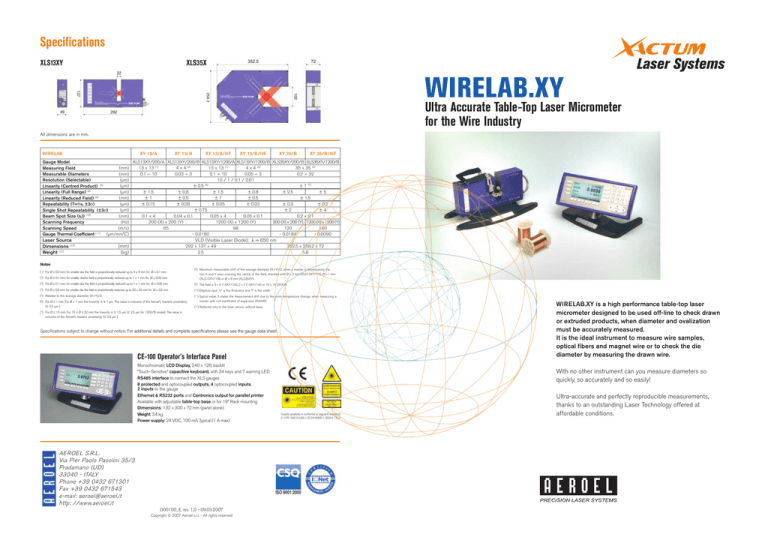
WIRELAB.XY is a high performance table-top laser
micrometer designed to be used off-line to check drawn
or extruded products, when diameter and ovalization
must be accurately measured.
It is the ideal instrument to measure wire samples,
optical fibers and magnet wire or to check the die
diameter by measuring the drawn wire.
With no other instrument can you measure diameters so
quickly, so accurately and so easily!
Questo prodotto è conforme ai seguenti standard:
21 CFR 1040.10 (USA) • CEI EN-60825-1; 2003-4-1 (EU)
Ultra-accurate and perfectly reproducible measurements,
thanks to an outstanding Laser Technology offered at
affordable conditions.
How does it work ?
The Wirelab software
The WIRELAB system uses a laser gauge of the XACTUM series, which allows one to make fast and
repeatable measurements in a wide range of diameters. The measurement is made by placing the part
on a V block. The part is measured in two orthoginal directions (X and Y) in a way to calculate both the
diameters DX and DY, their difference |DX-DY| and the average diameter (DX+DY)/2.
Smart software for easy programming.
Many pop-up menus and sub-menus are available, to
make the system set-up and programming very easy.
This is usually done by authorized personnel, who will
have his own password to access system programming:
the operator will only be allowed to recall pre-stored
parameters and to make the measurements.
Using a special fixture to manually rotate the part, the diameter can be
measured over 360° of the circumference to precisely measure the maximum
MAX-D, the minimumMIN-D and ovality which is really MAX-D - MIN-D.
The measured values are displayed on a highly visible backlit LCD display.
They are compared with the tolerance limits to check the dimensional conformity of the part.
Through the RS232 serial port or the Ethernet link, the WIRELAB can be connected to an external
PC. By using the GageXcom software all measured data are presented in real time to an Excel spread
sheet in a way to allow further data processing by the user to personalize the measurment data.
System Composition
The Basic system consists of:
• XLS13XY or XLS35XY dual axis Xactum Intelligent
Laser Micrometer;
• CE-100 Operator’s Interface Panel, Table-Top version;
• WIRELAB.XY software pre-installed in the gauge;
• Base plate for the gauge;
• 0.5 m connecting cable.
Some optional accessories are available:
• Foot switch, to start the measurement while keeping the
hands free for sample handling;
• GageXcom, PC software, Windows (*) compatible, for real
time data transfer into Excel (*) spread sheets;
• Hand driven rotating fixture (for the XLS13XY only);
• Fixed V blocks to hold samples;
• Gauge Calibration Report.
Benefits
Objective and highly reproducible results : no matter
what the operator’s skill level.
Ultra accurate: measure to an accuracy that before was
only achievable in a metrology room, by using much more
expensive equipment and specialized personnel.
Highly flexible: different samples and sizes can be
measured without system pre-setting or re-mastering.
Extremely fast and easy to use: reduce inspection time
and improve measurement capability
Competitive price: the favorable cost-to-benefit ratio
ensures a quick pay back time.
Quality certification: measurement results can be
immediately recorded and processed by an external
computer to get custom made printed reports.
3 years guarantee: very long operational life by using high
quality components and a solid state laser diode.
(*) Windows and Excel are registered trade marks of Microsoft Corporation
Multiple language menu
The menu and the display
messages are in English,
Italian, German and French,
each language being
selectable by the operator.
Gauging flexibility
3 measuring modes are available: Free Running,
On-Command Single Shot, and On-Command
Continuous (from a Start to a Stop command).
An additional Auto-start mode is included to trigger
automatically a Single Shot measurement when a part
is detected by the laser (after a programmable delay).
All on-command measurements are triggered using a
touch button on the display, an optional foot-switch or
the serial line. When in Free-Running mode, the display
will continuously show the diameters measured along
the X and Y axes. The On-Command Single-Shot
mode is used to get one set of measured values only,
just after the Start input. The Continuous mode is used
to check the full geometry of the section, taking several
readings, all along the 360° of the sample circumference.
The maximum and
minimum diameters
are retained, as well
as the Max-Min
value, which is the
true ovality of the
sample.
Display millimeters or inches
The measurement unit can be selected by the user;
switching the unit is immediate, with automatic data
conversion and saving.
Transparent products can be easily measured
By setting the Glass Logic mode to ON, it is possible to
check transparent samples, like optical fibers or glass
tubes. The mode switching is immediate, no additional presetting or re-mastering is required.
Highly visible display
The measured values are shown in large characters
on a high-visibility, backlit LCD display. 3 values can be
displayed at the same time, each one is chosen among the
results available in the selected measuring mode.
Tolerance Checking
The user can program the nominal values and the
tolerances for each product being measured: atfer any
check the Go, No-Go and Pre-alarm messages are
displayed and output signals are activated, to switch-on
lamps or to drive other external devices.
Library for 1000 products
It is possible to save in memory, in a Product Library, up
to 1000 different sets of nominal and tolerance values,
for each specific part
to be checked: to
program the Wirelab
for a new product, just
dial in the new part
number and recall the
new control set.
Permanent self calibration
An exclusive self calibration device is included in each
Aeroel gauge: this is based on a real master inserted
inside the gauge and checked at each scan. Periodical remastering is no longer required, but the Factory Calibration
can be changed by the user to fit his own master. At any
time the Factory Calibration can be restored.
Insensitive to the ambient temperature change
The self calibration device and the excellent thermal
stability of the gauge automatically compensate for the
drift due to the ambient temperature change making it
possible to use the Wirelab in the workshop.
Connecting Wirelab to a PC
Through the Ethernet link, Wirelab can be connected to
a PC to transmit the measured data or to be remotely
programmed. Using the GageXcom PC software, it is
possible to transfer in real time all the measured data into
an Excel spread sheet, to allow further data processing and
custom report editing,
using the standard Excel
functions. The system
programming is also
possible through Excel,
using another spread
sheet to input the
programming parameters
being sent to the gauge.
I/O Lines for Easy Interfacing.
8output lines for Go, No-Go and Prealarm inputs for each
measured dimension, and a Start/Stop input to connect
the foot switch.


