Category 5, Shielded, Offset, Press Fit,
Modular Jacks with Integrated
Light Emitting Diodes (LED)
NOTE
i
Application Specification
114-- 13179
26 APR 10 Rev D
All numerical values are in metric units [with U.S. customary units in brackets]. Dimensions are in millimeters. Unless
otherwise specified, dimensions have a tolerance of +0.13 and angles have a tolerance of +2_. Figures and
illustrations are for identification only and are not drawn to scale.
1. INTRODUCTION
This specification covers the requirements for application of Category 5, Shielded, Offset, Press Fit Modular
Jacks with Integrated Light Emitting Diodes (LED) for printed circuit (pc) board and panel mount applications.
These modular jacks are available in 1x1 and 1x4 configurations. When the modular jacks are mounted onto a
pc board, a portion of the bottom row extends below the pc board, thereby reducing the overall profile height of
the modular jack. The modular jack accepts 8--position Category 5 modular plug assemblies.
The modular jacks consist of a housing and a shield. The housing features standoffs to ensure proper seating
on the pc board. The connector assembly features compliant pin contacts for mechanical retention to the pc
board, and to provide Electromagnetic Interference (EMI) suppression and panel ground springs. The modular
jack is available with or without integrated LED’s. The modular jacks must be pressed onto the pc board by
press tooling. The connector is designed to be inserted into a panel after being seated onto the pc board.
When corresponding with Tyco Electronics Personnel, use the terminology provided in this specification to
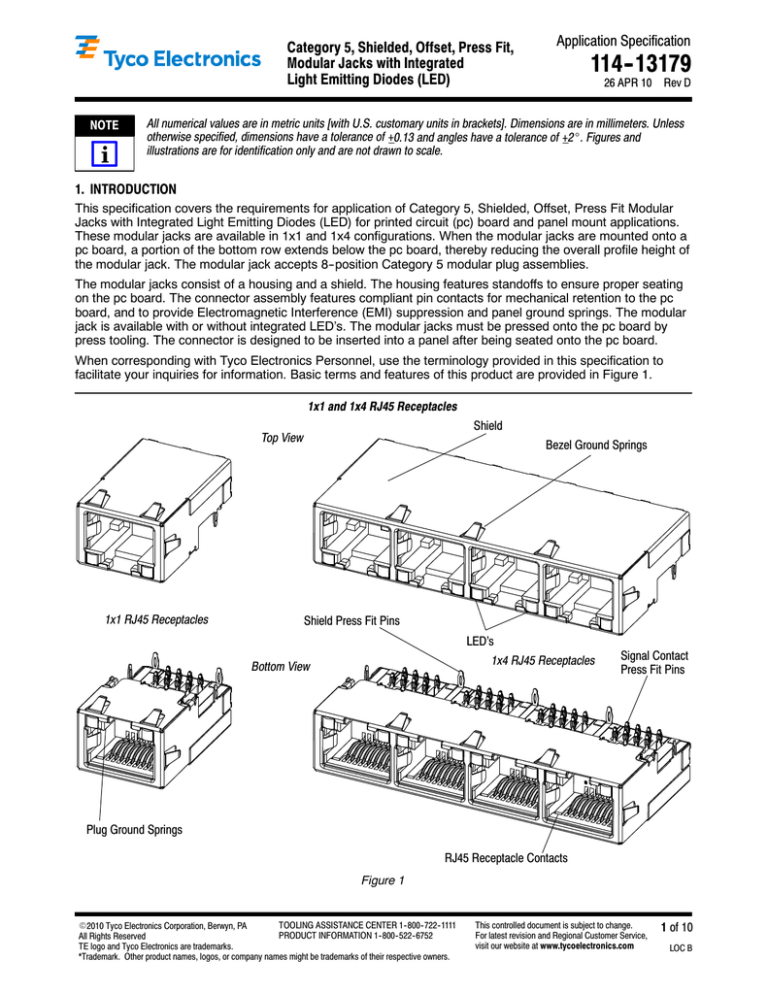
facilitate your inquiries for information. Basic terms and features of this product are provided in Figure 1.
1x1 and 1x4 RJ45 Receptacles
Shield
Top View
1x1 RJ45 Receptacles
Bezel Ground Springs
Shield Press Fit Pins
LED’s
1x4 RJ45 Receptacles
Bottom View
Signal Contact
Press Fit Pins
Plug Ground Springs
RJ45 Receptacle Contacts
Figure 1
TOOLING ASSISTANCE CENTER 1-- 800-- 722-- 1111
E2010 Tyco Electronics Corporation, Berwyn, PA
PRODUCT INFORMATION 1-- 800-- 522-- 6752
All Rights Reserved
TE logo and Tyco Electronics are trademarks.
*Trademark. Other product names, logos, or company names might be trademarks of their respective owners.
This controlled document is subject to change.
For latest revision and Regional Customer Service,
visit our website at www.tycoelectronics.com
1 of 10
LOC B
Category 5 Modular Jacks with Integrated LED
114- 13179
2. REFERENCE MATERIAL
2.1. Revision Summary
S Updated document to corporate requirements and new format
S Changed “Design Objective” to “Product Specification” in Paragraph 2.4
S Added new information to table in Figure 3 and corrected leader arrows in Figure 4
2.2. Customer Assistance
Reference Product Base Part Numbers 1888250, 1888251, and Product Code 2239 are representative
numbers of the Category 5, Shielded, Offset, Press Fit, Modular Jacks with Integrated Light Emitting Diodes
(LED). Use of these numbers will identify the product line and expedite your inquiries through a service network
established to help you obtain product and tooling information. Such information can be obtained through a
local Tyco Electronics Representative or, after purchase, by calling the Tooling Assistance Center or the
Product Information numbers at the bottom of page 1.
2.3. Drawings
Customer Drawings for specific products are available from the responsible Tyco Electronics Engineering
Department via the service network. The information contained in the Customer Drawings takes priority if there
is a conflict with this specification or with any other technical documentation supplied by Tyco Electronics.
2.4. Specifications
Product Specification 108--2274 provides product performance and test information.
3. REQUIREMENTS
3.1. Safety
Do not stack component packages so high that the shipping containers can buckle or deform.
3.2. Limitations
The connectors are designed to operate in a temperature range of --40 to 85C [--40 to 185F].
NOTE
i
The panel requirements given in this document are specifically configured for products used in the communications
industry. It is strongly recommended that this panel configuration NOT be used for peripheral component interconnect
(PCI) applications.
3.3. Materials
The front housing is molded from thermoplastic, UL 94--V--0. All jack interface and compliant pin contacts are
made from Phosphor Bronze under plated with nickel, plated with gold or tin at the plug/pc board interface
area. The shells are made from brass plated with nickel.
3.4. Storage
A. Ultraviolet Light
Prolonged exposure to ultraviolet light may deteriorate the chemical composition used in the connector
material.
B. Shelf Life
The connectors should remain in the shipping container until ready for use to prevent deformation to the
compliant pin contacts and mounting posts. The connector should be used on a first in, first out basis to
avoid storage contamination that could adversely affect signal transmission and performance.
C. Chemical Exposure
Do not store connectors or cage assemblies near any chemicals listed below as they may cause stress
corrosion cracking in the compliant pin contacts or mounting posts.
Alkalies
Amines
2 of 10
Ammonia
Carbonates
Citrates
Nitrites
Phosphates Citrates
Sulfides Nitrites
Tyco Electronics Corporation
Sulfur Compounds
Tartrates
Rev D
Category 5 Modular Jacks with Integrated LED
114- 13179
3.5. LED Operation
The LED operation requirements for these modular jacks are provided in Figures 2 and 3.
DESCRIPTION
(Test Condition)
Luminance Intensity, Iv @ 20mA
Viewing Angle
LIGHT PIPE MODULAR JACK
ABSOLUTE MAXIMUM RATING
GREEN
YELLOW
BI-- COLOR
8 Typ (2.6 min)
7 Typ (1.8 min)
5 Typ (1.8 min)
4 Typ (1.6 min)
100
100
100
Lens
With Resistor (250 Ohm)
Forward Voltage, Vf = 20mA
Reverse Voltage
Peak Forward Current
DC Forward Current
Reverse Current, VR = 5V
Operating/Storage Temperature
UNIT
[Iv(mcd)]
Green
No
2.5
Yellow
No
2.5
White Diffused
No
2.5
--V
5
140
25
10
--40 TO 85C
[--40 to 185F]
5
140
25
10
--40 TO 85C
[--40 to 185F]
5
140
25
10
--40 TO 85C
[--40 to 185F]
V
mA
mA
3.6. PC Board
A. Material and Thickness
mA
C
[F]
Figure 2
The pc board material shall be glass epoxy (FR--4 or G--10). The minimum pc board thickness shall be
1.60 +0.16 mm.
NOTE
Contact PRODUCT INFORMATION at the number at the bottom of page 1 for suitability of other pc board materials.
i
B. Tolerance
Maximum allowable bow of the pc board shall be 0.08 mm over the length of the connector.
C. Hole Dimensions
The holes for the connector must be drilled and plated through to dimensions specified in Figure 3. The pc
board holes can withstand modular jack removal up to three times without damage to the plated through
hole.
D. Layout
The holes for the connector must be precisely located to ensure proper placement and optimum
performance of the connector. Recommended hole pattern, dimensions, and tolerances are provided in
Figure 4.
SURFACE FINISH
THICKNESS
PLATING
0.004--0.010
Hot Air Solder Leveling (HASL) Tin--Lead (Sn--Pb)
0.0005--0.004
Immersion Tin (Sn)
0.0002--0.0005
Organic Solderability Preservative (OSP)
0.0001--0.0005 Au; 0.00127--0.0076 Ni
Immersion Gold (Au) Over Nickel (Ni) (ENIG)
0.0001--0.0005
Immersion Silver (Ag)
Figure 3 (cont’d)
Rev D
Tyco Electronics Corporation
3 of 10
Category 5 Modular Jacks with Integrated LED
114- 13179
Recommended Hole Dimensions: LED Contact
1.00 Ref Pad Diameter
Tin-- Lead Plating
0.004-- 0.010
Finished Hole Dia
After Plating 0.55-- 0.65
Copper Thickness 0.025-- 0.050
(Maximum Hardness of Copper
to be 150 Knoop)
0.675-- 0.725
Drilled Hole Dia
Recommended Hole Dimensions: Shield Pins
Tin-- Lead Plating
0.004-- 0.010
1.00-- 1.10 Finished
Hole Dia After Plating
Copper Thickness 0.025-- 0.050
(Maximum Hardness of Copper
to be 150 Knoop)
Drilled Hole Dia
1.125-- 1.175
Recommended Hole Dimensions: Signal Contacts
Tin-- Lead Plating
0.004-- 0.010
0.75-- 0.85 Finished
Hole Dia After Plating
Copper Thickness 0.025-- 0.050
(Maximum Hardness of Copper
to be 150 Knoop)
Drilled Hole Dia
0.875-- 0.925
Figure 3 (end)
4 of 10
Tyco Electronics Corporation
Rev D
Category 5 Modular Jacks with Integrated LED
114- 13179
Recommended PC Board Layout. See Drawing for “Side A” Reference
(AMC PC Board Width Shown)
PC BOARD CUTOUT
Standard Face Plate
AMC Module Face Plate
“D”
11.34
11.50
58
1.05
THRU--HOLE REFERENCE
DESIGNATORS FOR LAYOUT
PURPOSES ONLY
0.05
0.1
A B
FINISHED PTH DIAMETER
5 PLC
13.97
2 PLC
SEE DETAIL H
11.85
--A-6.25
2 PLC
R 0.50
TYP
1.55 REF
ANNULAR RING
TYP
OF DATUM B
D
13.97
3 PLC
20.955
29
60.00
0.10
--B--
73.50
0.1
8
0.10
A B
1.05
0.05
A B
0.1
FINISHED PTH DIAMETER
4 PLC
16.09
6.00
2 PLC
SEE DETAIL H
THRU--HOLE REFERENCE
DESIGNATORS FOR LAYOUT
PURPOSES ONLY
1.55 REF
ANNULAR RING
TYP
11.85
6.25
--A-R 0.50
TYP
D
8.045
2 PLC
18.09
OF DATUM B
0.10
--B--
73.50
0.1
0.10
A B
8
Figure 4 (cont’d)
Rev D
Tyco Electronics Corporation
5 of 10
Category 5 Modular Jacks with Integrated LED
114- 13179
3.556
DETAIL H
2.032
TYP
OF DATUM B
1.016
TYP
0.80
0.05
1.3 REF
ANNULAR RING
TYP
0.1
A B
FINISHED PTH DIA
32 PLC
9.64
7.1
3.8
1.5
0.60
5.58
2 PLC
0.05
4.14
2 PLC
1.1 REF
ANNULAR RING
TYP
0.1
A B
FINISHED PTH DIA 16 PLC
Figure 4 (end)
3.7. Insertion Force
To properly seat the modular jack and avoid damage to any components during seating, the appropriate
insertion force must be used. The minimum force necessary to seat modular jacks with LED’s onto a pc board
with nominal size holes is provided in Figure 5. Insertion force for all other variations must be determined by
using the data stated.
NOTE
i
For example, modular jacks without LED’s would require slightly less insertion force, and modular jacks seated onto pc
boards with minimum size holes would require significantly more insertion force that stated in Figure 5.
MODULAR JACK
MINIMUM INSERTION FORCE (N [lbs-- Force])
(Modular Jacks with LED’s onto PC Board with Nominal Size Holes)
1X1
234 [48]
1X4
707 [159]
Figure 5
3.8. Checking Installed Connector
All contacts, pc board ground pins, and pc board side ground pins (if applicable) must be fully inserted into the
pc board holes. All standoffs must be seated on the pc board not exceeding the dimensions shown in Figure 6.
See customer drawing for additional details.
0.10 Max Standoff
to PC Board
Standoff (Ref)
6 of 10
7.38 Max
Figure 6
Tyco Electronics Corporation
Rev D
Category 5 Modular Jacks with Integrated LED
114- 13179
3.9. Panel Mounting
The panel must be cut using the dimensions provided on the customer drawing for the specific modular jack.
The panel thickness shall be approximately 0.60 mm. A reference sample of a recommended panel cutout for
the modular jack is shown in Figures 7 and 8.
The panel must provide a cutout that allows proper mounting of the connector. The connector panel ground
springs must be compressed by the panel in order to provide an electrical ground between the connector and
the panel for EMI suppression. Care must be used to avoid interference between adjacent connectors and
other components. Dimensions for panel cutout and minimum allowable distance between cutouts are shown in
Figure 8. See the customer drawings for additional details.
--A-11.59
0.25
REF
2.56
REF
0.25
--M--
VIEW SHOWN ASSEMBLED
TO PCB AND RECOMMENDED
STANDARD FACE PLATE
--A-8
2.40
REF
11.75
0.50
0.25
8
0.25
SIDE A
1.60
0.16
8
--M-SIDE B
8
0.50
VIEW SHOWN ASSEMBLED
TO PCB AND RECOMMENDED
AMC MODULE FACE PLATE
Figure 7
Rev D
Tyco Electronics Corporation
7 of 10
Category 5 Modular Jacks with Integrated LED
114- 13179
3.10. PC Board and Panel Position
The panel and pc board must be positioned in relation to each other in order to avoid interference with the
function of the connector panel ground springs. This relationship must conform to the dimensions shown in
Figure 8.
8
--M-7.88
Recommended Panel Cutout
AMC Module Face Plate
13 MIN
2 PLC
16.84
0.10
1.3
2 PLC
12.58
Z
0.10
0.10
8
SECTION Z--Z
R0.65
2 PLC
11.75
Z
73.8 REF
--A--
AMC SINGLE WIDTH, HALF HEIGHT MODULE FACE PLATE
Side view applies to both 1x1 and 1x4
1x1 RJ45 Assembly
Recommended Panel Cutout
Standard Flat Panel
11.59
--M--
0.10
X
12.34
--A--
7.76
16.94
0.65
SECTION X--X
X
STANDARD FACE PLATE
Side view applies to both 1x1 and 1x4
1x1 RJ45 Assembly
Recommended Panel Cutout
1x4 Front View
58.75
58.85
0.10
Z
0.10
X
Z
X
73.8 REF
AMC SINGLE WIDTH, HALF HEIGHT MODULE FACE PLATE
STANDARD FACE PLATE
AMC Module Face Plate
Standard Flat Panel
Figure 8
3.11. Placement
The following requirements also apply to connectors used for rework purposes.
CAUTION
!
Connectors should be handled only by the shield and to avoid deformation, contamination, or damage to the compliant
pin contacts.
A. Registration
The compliant pin contacts must be aligned with matching holes in the pc board, then inserted into the pc
board simultaneously to prevent twisting or bending of the compliant pin contacts. The shield pins will
need to be located first, followed by the signal contacts and then the LED contacts.
8 of 10
Tyco Electronics Corporation
Rev D
Category 5 Modular Jacks with Integrated LED
114- 13179
B. Seating
Using proper seating force and seating height is essential to interconnection performance. The force used
to seat the connector must be applied evenly to prevent deformation or damage to the compliant pin
contacts. The force required to seat the connector onto the pc board can be calculate by:
Number of compliant pins X 22.25 N [5 lbs] (Force per Compliant Pin) = Seating Force
CAUTION
Over--driving of the connector will deform parts critical to the quality of the connection to the pc board. Maximum force
occurs prior to the connector assembly bottoming on the pc board.
!
The shut height of the application tool must be specifically set for proper seating of the connector. The
shut height can be calculated by:
Seating Height (Connector Seated) + Height of Tool + PC Board Thickness + PC Board Support Base
= Shut Height of Ram
The seating height, measured from the top of the connector assembly (not including panel ground springs
or fold over tabs) to the top of the pc board, is given in Figure 6.
The connector assembly must be seated on the pc board not to exceed the dimensions shown in Figure 6.
NOTE
The shut height may be adjusted to obtain the 0.10 mm maximum gap between the standoffs of the connector
assembly and the pc board.
i
3.12. Checking Assembly
After assembly, the panel must compress the connector panel ground springs. A slight bow in the shield is
permitted. The panel and pc board must be positioned according to the dimensions shown in Figure 8.
3.13. Repair/Replacement
These modular jacks are not repairable. Damaged or defective modular jacks MUST NOT be used. Damaged
or defective modular jacks must be removed and replaced. Modular jacks may be removed by standard
desoldering methods. The modular jacks MUST NOT be re--used after being removed from the pc board.
4. QUALIFICATIONS
No qualification documentation is available at the time of publication of this document.
5. TOOLING
5.1. PC Board Support
A pc board support must be used with the seating tool. The support fixture provides proper support for the pc
board and protects the pc board and the connector assembly from damage. The support fixture must be
customer designed. It is recommended that the support fixture be at least 25.4 mm longer and wider than the
pc board and have flat surfaces with holes or channels long enough and deep enough to receive any
protruding components of the connector assembly or customer pc board. See Figure 9.
5.2. Arbor Frame Assembly
Manual arbor frame assemblies are used to exert a downward force used to apply connectors to a pc board
using seating tools. These frame assemblies are commercially available or you may contact Tyco Electronics
Tooling Center at the bottom of page 1. See Figure 9.
PC Board Support
(Customer Supplied)
Arbor Frame Assembly
(Commercially Available or
Contact Tyco Electronics)
Holes
(Ref)
Channel
(Ref)
Rev D
Figure 9
Tyco Electronics Corporation
9 of 10
Category 5 Modular Jacks with Integrated LED
114- 13179
6. VISUAL AID
Figure 10 shows a typical application of a Category 5, Shielded, Offset, Press Fit, Modular Jack with Integrated
Light Emitting Diodes (LED). This illustration should be used by production personnel to ensure a correctly
applied product. Applications which DO NOT appear correct should be inspected using the information in the
preceding pages of this specification and in the instructional material shipped with the product or tooling.
NOTE: 1X4 AMC MODULE FACE PLATE AND CARD SHOWN, 1X1 WOULD HAVE THE SAME REQUIREMENTS
(ASSEMBLY SHOWN IN TAB UP ORIENTATION)
ALL CONTACTS, PC BOARD GROUND
PINS, AND (IF APPLICABLE) LED
CONTACTS MUST BE FULLY INSERTED INTO THE PC BOARD HOLES
PANEL GROUND(S)
MUST TOUCH PANEL
SIDE “A”
SEE FIGURE 4
ALL STANDOFFS MUST BE
VISUALLY SEATED ON THE
PC BOARD (REVERSE SIDE)
THERE MUST BE NO
DAMAGE TO ANY PART
OF THE MODULAR JACK
FIGURE 10.
10 of 10
VISUAL AID
Tyco Electronics Corporation
Rev D


