Standard Groove Specifications
25.01
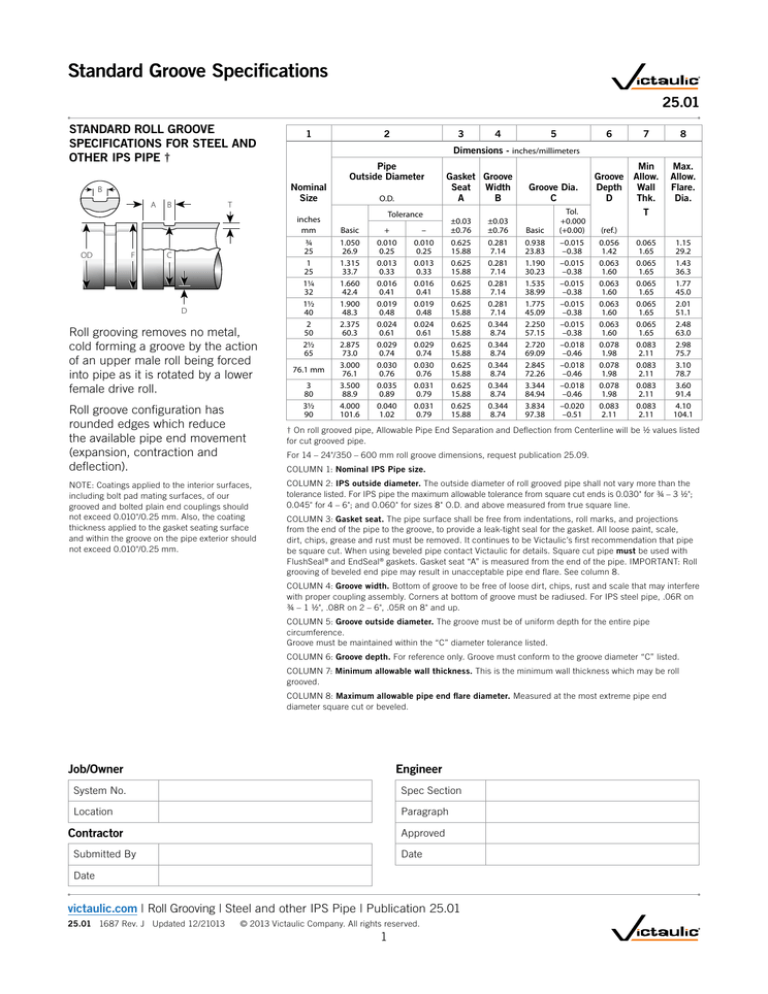
STANDARD ROLL GROOVE
SPECIFICATIONS FOR STEEL AND
OTHER IPS PIPE †
OD
F
T
B
C
D
Roll grooving removes no metal,
cold forming a groove by the action
of an upper male roll being forced
into pipe as it is rotated by a lower
female drive roll.
Roll groove configuration has
rounded edges which reduce
the available pipe end movement
(expansion, contraction and
deflection).
NOTE: Coatings applied to the interior surfaces,
including bolt pad mating surfaces, of our
grooved and bolted plain end couplings should
not exceed 0.010"/0.25 mm. Also, the coating
thickness applied to the gasket seating surface
and within the groove on the pipe exterior should
not exceed 0.010"/0.25 mm.
2
3
4
5
6
7
8
Dimensions - inches/millimeters
Nominal
Size
B
A
1
inches
mm
¾
25
1
25
1¼
32
1½
40
2
50
2½
65
76.1 mm
3
80
3½
90
Pipe
Outside Diameter
O.D.
Gasket Groove
Seat Width
A
B
Tolerance
Basic
1.050
26.9
1.315
33.7
1.660
42.4
1.900
48.3
2.375
60.3
2.875
73.0
3.000
76.1
3.500
88.9
4.000
101.6
+
0.010
0.25
0.013
0.33
0.016
0.41
0.019
0.48
0.024
0.61
0.029
0.74
0.030
0.76
0.035
0.89
0.040
1.02
–
0.010
0.25
0.013
0.33
0.016
0.41
0.019
0.48
0.024
0.61
0.029
0.74
0.030
0.76
0.031
0.79
0.031
0.79
±0.03
±0.76
0.625
15.88
0.625
15.88
0.625
15.88
0.625
15.88
0.625
15.88
0.625
15.88
0.625
15.88
0.625
15.88
0.625
15.88
±0.03
±0.76
0.281
7.14
0.281
7.14
0.281
7.14
0.281
7.14
0.344
8.74
0.344
8.74
0.344
8.74
0.344
8.74
0.344
8.74
Groove Dia.
C
Basic
0.938
23.83
1.190
30.23
1.535
38.99
1.775
45.09
2.250
57.15
2.720
69.09
2.845
72.26
3.344
84.94
3.834
97.38
Tol.
+0.000
(+0.00)
–0.015
–0.38
–0.015
–0.38
–0.015
–0.38
–0.015
–0.38
–0.015
–0.38
–0.018
–0.46
–0.018
–0.46
–0.018
–0.46
–0.020
–0.51
Min
Groove Allow.
Depth Wall
D
Thk.
Max.
Allow.
Flare.
Dia.
T
(ref.)
0.056
1.42
0.063
1.60
0.063
1.60
0.063
1.60
0.063
1.60
0.078
1.98
0.078
1.98
0.078
1.98
0.083
2.11
0.065
1.65
0.065
1.65
0.065
1.65
0.065
1.65
0.065
1.65
0.083
2.11
0.083
2.11
0.083
2.11
0.083
2.11
1.15
29.2
1.43
36.3
1.77
45.0
2.01
51.1
2.48
63.0
2.98
75.7
3.10
78.7
3.60
91.4
4.10
104.1
† On roll grooved pipe, Allowable Pipe End Separation and Deflection from Centerline will be ½ values listed
for cut grooved pipe.
For 14 – 24"/350 – 600 mm roll groove dimensions, request publication 25.09.
COLUMN 1: Nominal IPS Pipe size.
COLUMN 2: IPS outside diameter. The outside diameter of roll grooved pipe shall not vary more than the
tolerance listed. For IPS pipe the maximum allowable tolerance from square cut ends is 0.030" for ¾ – 3 ½";
0.045" for 4 – 6"; and 0.060" for sizes 8" O.D. and above measured from true square line.
COLUMN 3: Gasket seat. The pipe surface shall be free from indentations, roll marks, and projections
from the end of the pipe to the groove, to provide a leak-tight seal for the gasket. All loose paint, scale,
dirt, chips, grease and rust must be removed. It continues to be Victaulic’s first recommendation that pipe
be square cut. When using beveled pipe contact Victaulic for details. Square cut pipe must be used with
FlushSeal® and EndSeal® gaskets. Gasket seat “A” is measured from the end of the pipe. IMPORTANT: Roll
grooving of beveled end pipe may result in unacceptable pipe end flare. See column 8.
COLUMN 4: Groove width. Bottom of groove to be free of loose dirt, chips, rust and scale that may interfere
with proper coupling assembly. Corners at bottom of groove must be radiused. For IPS steel pipe, .06R on
¾ – 1 ½", .08R on 2 – 6", .05R on 8" and up.
COLUMN 5: Groove outside diameter. The groove must be of uniform depth for the entire pipe
circumference.
Groove must be maintained within the “C” diameter tolerance listed.
COLUMN 6: Groove depth. For reference only. Groove must conform to the groove diameter “C” listed.
COLUMN 7: Minimum allowable wall thickness. This is the minimum wall thickness which may be roll
grooved.
COLUMN 8: Maximum allowable pipe end flare diameter. Measured at the most extreme pipe end
diameter square cut or beveled.
Job/Owner
Engineer
System No.
Spec Section
Location
Paragraph
Contractor
Approved
Submitted By
Date
Date
victaulic.com | Roll Grooving | Steel and other IPS Pipe | Publication 25.01
25.01 1687 Rev. J Updated 12/21013
© 2013 Victaulic Company. All rights reserved.
1
victaulic.com | Roll Grooving | Steel and other IPS Pipe | Publication 25.01
STANDARD ROLL GROOVE
SPECIFICATIONS FOR STEEL AND
OTHER IPS PIPE †
B
A
OD
F
1
inches
mm
4
100
C
108.0 mm
4½
120
D
Roll grooving removes no metal,
cold forming a groove by the action
of an upper male roll being forced
into pipe as it is rotated by a lower
female drive roll.
Roll groove configuration has
rounded edges which reduce
the available pipe end movement
(expansion, contraction and
deflection).
NOTE: Coatings applied to the interior surfaces,
including bolt pad mating surfaces, of our
grooved and bolted plain end couplings should
not exceed 0.010"/0.25 mm. Also, the coating
thickness applied to the gasket seating surface
and within the groove on the pipe exterior should
not exceed 0.010"/0.25 mm.
2
3
4
5
6
7
8
Dimensions - inches/millimeters
Nominal
Size
T
B
TABLE CONTINUED
133.0 mm
139.7 mm
5
125
152.4 mm
159.0 mm
Pipe
Outside Diameter
O.D.
Tolerance
Basic
4.500
114.3
4.250
108.0
5.000
127.0
5.250
133.0
5.500
139.7
5.563
141.3
6.000
152.4
6.250
159.0
+
0.045
1.14
0.043
1.09
0.050
1.27
0.053
1.35
0.056
1.42
0.056
1.42
0.056
1.42
0.063
1.60
–
0.031
0.79
0.031
0.79
0.031
0.79
0.031
0.79
0.031
0.79
0.031
0.79
0.031
0.79
0.031
0.79
Gasket Groove
Seat Width
A
B
±0.03
±0.76
0.625
15.88
0.625
15.88
0.625
15.88
0.625
15.88
0.625
15.88
0.625
15.88
0.625
15.88
0.625
15.88
±0.03
±0.76
0.344
8.74
0.344
8.74
0.344
8.74
0.344
8.74
0.344
8.74
0.344
8.74
0.344
8.74
0.344
8.74
Groove Dia.
C
Basic
4.334
110.08
4.084
103.73
4.834
122.78
5.084
129.13
5.334
135.48
5.395
137.03
5.830
148.08
6.032
153.21
Tol.
+0.000
(+0.00)
–0.020
–0.51
–0.020
–0.51
–0.020
–0.51
–0.020
–0.51
–0.020
–0.51
–0.022
–0.56
–0.022
–0.56
–0.030
–0.76
Min
Groove Allow.
Depth Wall
D
Thk.
Max.
Allow.
Flare.
Dia.
T
(ref.)
0.083
2.11
0.083
2.11
0.083
2.11
0.083
2.11
0.083
2.11
0.084
2.13
0.085
2.16
0.109
2.77
0.083
2.11
0.083
2.11
0.095
2.41
0.109
2.77
0.109
2.77
0.109
2.77
0.109
2.77
0.109
2.77
4.60
116.8
4.35
110.5
5.10
129.5
5.35
135.9
5.60
142.2
5.66
143.8
6.10
154.9
6.35
161.3
† On roll grooved pipe, Allowable Pipe End Separation and Deflection from Centerline will be ½ values listed
for cut grooved pipe.
For 14 – 24"/350 – 600 mm roll groove dimensions, request publication 25.09.
COLUMN 1: Nominal IPS Pipe size.
COLUMN 2: IPS outside diameter. The outside diameter of roll grooved pipe shall not vary more than the
tolerance listed. For IPS pipe the maximum allowable tolerance from square cut ends is 0.030" for ¾ – 3 ½";
0.045" for 4 – 6"; and 0.060" for sizes 8" O.D. and above measured from true square line.
COLUMN 3: Gasket seat. The pipe surface shall be free from indentations, roll marks, and projections
from the end of the pipe to the groove, to provide a leak-tight seal for the gasket. All loose paint, scale,
dirt, chips, grease and rust must be removed. It continues to be Victaulic’s first recommendation that pipe
be square cut. When using beveled pipe contact Victaulic for details. Square cut pipe must be used with
FlushSeal® and EndSeal® gaskets. Gasket seat “A” is measured from the end of the pipe. IMPORTANT: Roll
grooving of beveled end pipe may result in unacceptable pipe end flare. See column 8.
COLUMN 4: Groove width. Bottom of groove to be free of loose dirt, chips, rust and scale that may interfere
with proper coupling assembly. Corners at bottom of groove must be radiused. For IPS steel pipe, .06R on
¾ – 1 ½", .08R on 2 – 6", .05R on 8" and up.
COLUMN 5: Groove outside diameter. The groove must be of uniform depth for the entire pipe
circumference.
Groove must be maintained within the “C” diameter tolerance listed.
COLUMN 6: Groove depth. For reference only. Groove must conform to the groove diameter “C” listed.
COLUMN 7: Minimum allowable wall thickness. This is the minimum wall thickness which may be roll
grooved.
COLUMN 8: Maximum allowable pipe end flare diameter. Measured at the most extreme pipe end
diameter square cut or beveled.
25.01 1687 Rev. J Updated 12/21013
victaulic.com
© 2013 Victaulic Company. All rights reserved.
2
victaulic.com | Roll Grooving | Steel and other IPS Pipe | Publication 25.01
STANDARD ROLL GROOVE
SPECIFICATIONS FOR STEEL AND
OTHER IPS PIPE †
T
B
inches
mm
OD
F
165.1 mm
C
6
150
203.2 mm
8
200
D
Roll grooving removes no metal,
cold forming a groove by the action
of an upper male roll being forced
into pipe as it is rotated by a lower
female drive roll.
254.0 mm
Roll groove configuration has
rounded edges which reduce
the available pipe end movement
(expansion, contraction and
deflection).
377.0 mm
NOTE: Coatings applied to the interior surfaces,
including bolt pad mating surfaces, of our
grooved and bolted plain end couplings should
not exceed 0.010"/0.25 mm. Also, the coating
thickness applied to the gasket seating surface
and within the groove on the pipe exterior should
not exceed 0.010"/0.25 mm.
2
3
4
5
6
7
8
Dimensions - inches/millimeters
Nominal
Size
B
A
1
10
250
304.8 mm
12
300
426.0 mm
480.0 mm
530.0 mm
630.0 mm
Pipe
Outside Diameter
O.D.
Tolerance
Basic
6.500
165.1
6.625
168.3
8.000
203.2
8.625
219.1
10.000
254.0
10.750
273.0
12.000
304.8
12.750
323.9
14.843
377.0
16.772
426.0
18.898
480.0
20.866
530.0
24.803
630.0
+
0.063
1.60
0.063
1.60
0.063
1.60
0.063
1.60
0.063
1.60
0.063
1.60
0.063
1.60
0.063
1.60
0.093
2.36
0.093
2.36
0.093
2.36
0.093
2.36
0.093
2.36
–
0.031
0.79
0.031
0.79
0.031
0.79
0.031
0.79
0.031
0.79
0.031
0.79
0.031
0.79
0.031
0.79
0.031
0.79
0.031
0.79
0.031
0.79
0.031
0.79
0.031
0.79
Gasket Groove
Seat Width
A
B
±0.03
±0.76
0.625
15.88
0.625
15.88
0.750
19.05
0.750
19.05
0.750
19.05
0.750
19.05
0.750
19.05
0.750
19.05
0.938
23.83
0.938
23.83
1.000
25.40
1.000
25.40
1.000
25.40
±0.03
±0.76
0.344
8.74
0.344
8.74
0.469
11.91
0.469
11.91
0.469
11.91
0.469
11.91
0.469
11.91
0.469
11.91
0.469
11.91
0.469
11.91
0.469
11.91
0.469
11.91
0.500
12.70
Groove Dia.
C
Basic
6.330
160.78
6.455
163.96
7.816
198.53
8.441
214.40
9.812
249.23
10.562
268.28
11.781
299.24
12.531
318.29
14.611
371.1
16.514
419.5
18.626
473.1
20.572
522.5
24.459
621.3
Tol.
+0.000
(+0.00)
–0.022
–0.56
–0.022
–0.56
–0.025
–0.64
–0.025
–0.64
–0.027
–0.69
–0.027
–0.69
–0.030
–0.76
–0.030
–0.76
–0.030
–0.76
–0.035
–0.89
–0.035
–0.89
–0.035
–0.89
–0.035
–0.89
Min
Groove Allow.
Depth Wall
D
Thk.
Max.
Allow.
Flare.
Dia.
T
(ref.)
0.085
2.16
0.085
2.16
0.092
2.34
0.092
2.34
0.094
2.39
0.094
2.39
0.109
2.77
0.109
2.77
0.116
2.94
0.129
3.28
0.136
3.45
0.147
3.73
0.172
4.37
0.109
2.77
0.109
2.77
0.109
2.77
0.109
2.77
0.134
3.40
0.134
3.40
0.156
3.96
0.156
3.96
0.177
4.50
0.177
4.50
0.236
5.99
0.236
5.99
0.276
7.01
6.60
167.6
6.73
170.9
8.17
207.5
8.80
223.5
10.17
258.3
10.92
277.4
12.17
309.1
12.92
328.2
15.00
381.00
16.93
430.00
19.06
484.1
21.03
534.2
25.00
635.00
† On roll grooved pipe, Allowable Pipe End Separation and Deflection from Centerline will be ½ values listed
for cut grooved pipe.
For 14 – 24"/350 – 600 mm roll groove dimensions, request publication 25.09.
COLUMN 1: Nominal IPS Pipe size.
COLUMN 2: IPS outside diameter. The outside diameter of roll grooved pipe shall not vary more than the
tolerance listed. For IPS pipe the maximum allowable tolerance from square cut ends is 0.030" for ¾ – 3 ½";
0.045" for 4 – 6"; and 0.060" for sizes 8" O.D. and above measured from true square line.
COLUMN 3: Gasket seat. The pipe surface shall be free from indentations, roll marks, and projections
from the end of the pipe to the groove, to provide a leak-tight seal for the gasket. All loose paint, scale,
dirt, chips, grease and rust must be removed. It continues to be Victaulic’s first recommendation that pipe
be square cut. When using beveled pipe contact Victaulic for details. Square cut pipe must be used with
FlushSeal® and EndSeal® gaskets. Gasket seat “A” is measured from the end of the pipe. IMPORTANT: Roll
grooving of beveled end pipe may result in unacceptable pipe end flare. See column 8.
COLUMN 4: Groove width. Bottom of groove to be free of loose dirt, chips, rust and scale that may interfere
with proper coupling assembly. Corners at bottom of groove must be radiused. For IPS steel pipe, .06R on
¾ – 1 ½", .08R on 2 – 6", .05R on 8" and up.
COLUMN 5: Groove outside diameter. The groove must be of uniform depth for the entire pipe
circumference.
Groove must be maintained within the “C” diameter tolerance listed.
COLUMN 6: Groove depth. For reference only. Groove must conform to the groove diameter “C” listed.
COLUMN 7: Minimum allowable wall thickness. This is the minimum wall thickness which may be roll
grooved.
COLUMN 8: Maximum allowable pipe end flare diameter. Measured at the most extreme pipe end
diameter square cut or beveled.
25.01 1687 Rev. J Updated 12/21013
victaulic.com
© 2013 Victaulic Company. All rights reserved.
3
victaulic.com | Roll Grooving | Steel and other IPS Pipe | Publication 25.01
STANDARD CUT GROOVE
SPECIFICATIONS FOR STEEL AND
OTHER IPS PIPE
B
OD
A
B
T
D
Cut grooving standard steel pipe
removes less metal, to less depth,
than threading, maintaining the
desired integrity of the pipe.
2
3
4
5
6
7
Dimensions - inches/millimeters
Nominal
Size
C
Exaggerated for Clarity
1
inches
mm
¾
20
1
25
1¼
32
1½
40
2
50
2½
65
76.1 mm
3
80
3½
90
4
100
4½
120
139.7 mm
5
125
152.4 mm
159 mm
165.1 mm
6
150
203.2 mm
8
200
254.0 mm
10
250
304.8 mm
Pipe
Outside Diameter
O.D.
Tolerance
Basic
1.050
26.9
1.315
33.7
1.660
42.4
1.900
48.3
2.375
60.3
2.875
73.0
3.000
76.1
3.500
88.9
4.000
101.6
4.500
114.3
5.000
127.0
5.500
139.7
5.563
141.3
6.000
152.4
6.250
159
6.500
165.1
6.625
168.3
8.000
203.2
8.625
219.1
10.000
254.0
10.750
273.0
12.000
304.8
+
0.010
0.25
0.013
0.33
0.016
0.41
0.019
0.48
0.024
0.61
0.029
0.74
0.030
0.76
0.035
0.89
0.040
1.02
0.045
1.14
0.050
1.27
0.056
1.42
0.056
1.42
0.056
1.42
0.063
1.60
0.063
1.60
0.063
1.60
0.063
1.60
0.063
1.60
0.063
1.60
0.063
1.60
0.063
1.60
–
0.010
0.25
0.013
0.33
0.016
0.41
0.019
0.48
0.024
0.61
0.029
0.74
0.030
0.76
0.031
0.79
0.031
0.79
0.031
0.79
0.031
0.79
0.031
0.79
0.031
0.79
0.031
0.79
0.031
0.79
0.031
0.79
0.031
0.79
0.031
0.79
0.031
0.79
0.031
0.79
0.031
0.79
0.031
0.79
Gasket
Seat
A
Groove
Width
B
±0.03
±0.76
0.625
15.88
0.625
15.88
0.625
15.88
0.625
15.88
0.625
15.88
0.625
15.88
0.625
15.88
0.625
15.88
0.625
15.88
0.625
15.88
0.625
15.88
0.625
15.88
0.625
15.88
0.625
15.88
0.625
15.88
0.625
15.88
0.625
15.88
0.750
19.05
0.750
19.05
0.750
19.05
0.750
19.05
0.750
19.05
±0.03
±0.76
0.313
7.95
0.313
7.95
0.313
7.95
0.313
7.95
0.313
7.95
0.313
7.95
0.313
7.95
0.313
7.95
0.313
7.95
0.375
9.53
0.375
9.53
0.375
9.53
0.375
9.53
0.375
9.53
0.375
9.53
0.375
9.53
0.375
9.53
0.438
11.13
0.438
11.13
0.500
12.70
0.500
12.70
0.500
12.70
Groove Dia.
C
Basic
0.938
23.83
1.190
30.23
1.535
38.99
1.775
45.09
2.250
57.15
2.720
69.09
2.845
72.26
3.344
84.94
3.834
97.38
4.334
110.08
4.834
122.78
5.334
135.48
5.395
137.03
5.830
148.08
6.032
153.2
6.330
160.78
6.455
163.96
7.816
198.53
8.441
214.40
9.812
249.23
10.562
268.28
11.781
299.24
Tol.
+0.000
(+0.00)
–0.015
–0.38
–0.015
–0.38
–0.015
–0.38
–0.015
–0.38
–0.015
–0.38
–0.018
–0.46
–0.018
–0.46
–0.018
–0.46
–0.020
–0.51
–0.020
–0.51
–0.020
–0.51
–0.020
–0.51
–0.020
–0.51
–0.022
–0.56
–0.030
–0.76
–0.022
–0.56
–0.022
–0.56
–0.022
–0.56
–0.025
–0.64
–0.025
–0.64
–0.027
–0.69
–0.027
–0.69
Groove
Min
Depth
Allow.
D
Wall Thk.
T
(ref.)
0.056
1.42
0.063
1.60
0.063
1.60
0.063
1.60
0.063
1.60
0.078
1.98
0.078
1.98
0.078
1.98
0.083
2.11
0.083
2.11
0.083
2.11
0.083
2.11
0.084
2.13
0.085
2.16
0.109
2.77
0.085
2.16
0.085
2.16
0.092
2.34
0.092
2.34
0.094
2.39
0.094
2.39
0.109
2.77
0.113
2.87
0.133
3.38
0.140
3.56
0.145
3.68
0.154
3.91
0.188
4.78
0.188
4.78
0.188
4.78
0.188
4.78
0.203
5.16
0.203
5.16
0.203
5.16
0.203
5.16
0.219
5.56
0.249
6.30
0.219
5.56
0.219
5.56
0.238
6.05
0.238
6.05
0.250
6.35
0.250
6.35
0.279
7.09
* 9/16"/14 mm width groove is required in sizes 22 – 24"/550 – 600 mm in order to obtain the maximum
allowable pipe end movement listed in Performance Data Charts. ½"/12 mm width groove will give ½ the
maximum allowance shown for 22 – 24"/550 – 600 mm. For double groove tool bit information, contact
Victaulic.
COLUMN 1: Nominal IPS Pipe size.
COLUMN 2: IPS outside diameter. The outside diameter of cut grooved pipe shall not vary more than the
tolerance listed. For IPS pipe the maximum allowable tolerance from square cut ends to 0.030" for ¾ – 3 ½";
0.045" for 4 – 6"; and 0.060" for sizes 8" O.D. and above measured from true square line.
COLUMN 3: Gasket seat. The pipe surface shall be free from indentations, roll marks, and projections
from the end of the pipe to the groove, to provide a leak-tight seal for the gasket. All loose paint, scale,
dirt, chips, grease and rust must be removed. It continues to be Victaulic’s first recommendation that pipe
be square cut. When using beveled pipe contact Victaulic for details. Square cut pipe must be used with
FlushSeal® and EndSeal® gaskets. Gasket seat “A” is measured from the end of the pipe.
COLUMN 4: Groove width. The bottom of groove to be free of loose dirt, chips, rust and scale that may
interfere with proper coupling assembly. Maximum permissible radius at bottom of groove is .015".
COLUMN 5: Groove outside diameter. The groove must be of uniform depth for the entire pipe
circumference. Groove must be maintained within the “C” diameter tolerance listed.
COLUMN 6: Groove depth. For reference only. Groove must conform to the groove diameter “C” listed.
COLUMN 7: Minimum allowable wall thickness. This is the minimum wall thickness which may be cut
grooved.
25.01 1687 Rev. J Updated 12/21013
victaulic.com
© 2013 Victaulic Company. All rights reserved.
4
victaulic.com | Roll Grooving | Steel and other IPS Pipe | Publication 25.01
STANDARD CUT GROOVE
SPECIFICATIONS FOR STEEL AND
OTHER IPS PIPE
B
OD
A
B
2
T
inches
mm
12
300
14
350
15
375
377.0 mm
D
Cut grooving standard steel pipe
removes less metal, to less depth,
than threading, maintaining the
desired integrity of the pipe.
3
4
5
6
7
Dimensions - inches/millimeters
Pipe
Outside Diameter
Nominal
Size
C
Exaggerated for Clarity
1
16
400
426.0 mm
18
450
480.0 mm
20
500
530.0 mm
22
550
24
600
630.0 mm
O.D.
Tolerance
Basic
12.750
323.9
14.000
355.6
15.000
381.0
14.843
377.0
16.000
406.4
16.772
426.0
18.000
457.2
18.898
480.0
20.000
508.0
20.866
530.0
22.000
559.0
24.000
610.0
24.803
630.0
+
0.063
1.60
0.063
1.60
0.063
1.60
0.063
2.36
0.063
1.60
0.063
2.36
0.063
1.60
0.063
2.36
0.063
1.60
0.063
2.36
0.063
1.60
0.063
1.60
0.093
2.36
–
0.031
0.79
0.031
0.79
0.031
0.79
0.031
0.79
0.031
0.79
0.031
0.79
0.031
0.79
0.031
0.79
0.031
0.79
0.031
0.79
0.031
0.79
0.031
0.79
0.031
0.79
Gasket
Seat
A
Groove
Width
B
±0.03
±0.76
0.750
19.05
0.938
23.83
0.938
23.83
0.938
23.83
0.938
23.83
0.938
23.83
1.000
25.40
1.000
25.40
1.000
25.40
1.000
25.40
1.000
25.40
1.000
25.40
1.000
25.40
±0.03
±0.76
0.500
12.70
0.500
12.70
0.500
12.70
0.500
12.70
0.500
12.70
0.500
12.70
0.500
12.70
0.500
12.70
0.500
12.70
0.500
12.70
0.563*
14.30
0.563*
14.30
0.563
14.30
Groove Dia.
C
Basic
12.531
318.29
13.781
350.04
14.781
375.44
14.611
371.1
15.781
400.84
16.514
419.5
17.781
451.64
18.626
473.1
19.781
502.44
20.572
522.5
21.656
550.06
23.656
600.86
24.459
621.3
Tol.
+0.000
(+0.00)
–0.030
–0.76
–0.030
–0.76
–0.030
–0.76
–0.030
–0.76
–0.030
–0.76
–0.030
–0.76
–0.030
–0.76
–0.030
–0.76
–0.030
–0.76
–0.030
–0.76
–0.030
–0.76
–0.030
–0.76
–0.035
–0.89
Groove
Min
Depth
Allow.
D
Wall Thk.
T
(ref.)
0.109
2.77
0.109
2.77
0.109
2.77
0.116
2.94
0.109
2.77
0.129
3.28
0.109
2.77
0.136
3.45
0.109
2.77
0.147
3.73
0.172
4.37
0.172
4.37
0.172
4.37
0.279
7.09
0.281
7.14
0.312
7.92
0.315
8.00
0.312
7.92
0.335
8.51
0.312
7.92
0.354
8.99
0.312
7.92
0.354
8.99
0.375
9.53
0.375
9.53
0.394
10.00
* 9/16"/14 mm width groove is required in sizes 22 – 24"/550 – 600 mm in order to obtain the maximum
allowable pipe end movement listed in Performance Data Charts. ½"/12 mm width groove will give ½ the
maximum allowance shown for 22 – 24"/550 – 600 mm. For double groove tool bit information, contact
Victaulic.
COLUMN 1: Nominal IPS Pipe size.
COLUMN 2: IPS outside diameter. The outside diameter of cut grooved pipe shall not vary more than the
tolerance listed. For IPS pipe the maximum allowable tolerance from square cut ends to 0.030" for ¾ – 3 ½";
0.045" for 4 – 6"; and 0.060" for sizes 8" O.D. and above measured from true square line.
COLUMN 3: Gasket seat. The pipe surface shall be free from indentations, roll marks, and projections
from the end of the pipe to the groove, to provide a leak-tight seal for the gasket. All loose paint, scale,
dirt, chips, grease and rust must be removed. It continues to be Victaulic’s first recommendation that pipe
be square cut. When using beveled pipe contact Victaulic for details. Square cut pipe must be used with
FlushSeal® and EndSeal® gaskets. Gasket seat “A” is measured from the end of the pipe.
COLUMN 4: Groove width. The bottom of groove to be free of loose dirt, chips, rust and scale that may
interfere with proper coupling assembly. Maximum permissible radius at bottom of groove is .015".
COLUMN 5: Groove outside diameter. The groove must be of uniform depth for the entire pipe
circumference. Groove must be maintained within the “C” diameter tolerance listed.
COLUMN 6: Groove depth. For reference only. Groove must conform to the groove diameter “C” listed.
COLUMN 7: Minimum allowable wall thickness. This is the minimum wall thickness which may be cut
grooved.
Installation
Reference should always be made to the I-100 Victaulic Field Installation Handbook for
the product you are installing. Handbooks are included with each shipment of Victaulic
products for complete installation and assembly data, and are available in PDF format
on our website at www.victaulic.com.
Note
This product shall be manufactured by Victaulic or to Victaulic specifications. All products
to be installed in accordance with current Victaulic installation/assembly instructions.
Victaulic reserves the right to change product specifications, designs and standard
equipment without notice and without incurring obligations.
Warranty
Refer to the Warranty section of the current Price List or contact Victaulic for details.
Trademarks
Victaulic and Zero-Flex are registered trademarks of Victaulic Company.
25.01 1687 Rev. J Updated 12/21013
victaulic.com
© 2013 Victaulic Company. All rights reserved.
5


