Installation Instructions
advertisement

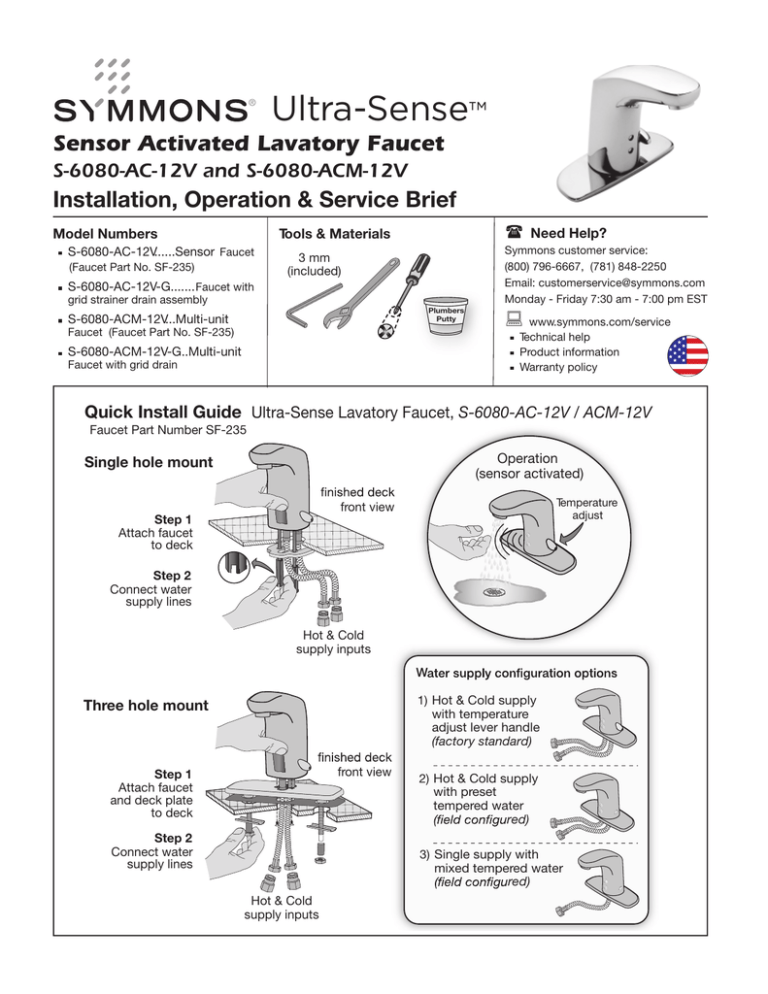
Ultra-Sense™ Sensor Activated Lavatory Faucet S-6080-AC-12V and S-6080-ACM-12V Installation, Operation & Service Brief Need Help? Tools & Materials Model Numbers S-6080-AC-12V......Sensor Faucet (Faucet Part No. SF-235) Symmons customer service: (800) 796-6667, (781) 848-2250 Email: customerservice@symmons.com Monday - Friday 7:30 am - 7:00 pm EST 3 mm (included) S-6080-AC-12V-G....... Faucet with grid strainer drain assembly Plumbers Putty S-6080-ACM-12V...Multi-unit Faucet (Faucet Part No. SF-235) S-6080-ACM-12V-G..Multi-unit Faucet with grid drain www.symmons.com/service Technical help Product information Warranty policy Quick Install Guide Ultra-Sense Lavatory Faucet, S-6080-AC-12V / ACM-12V Faucet Part Number SF-235 Operation (sensor activated) Single hole mount Temperature adjust front view Step 1 Attach faucet to deck Step 2 Connect water supply lines Hot & Cold supply inputs W 1) Hot & Cold supply with temperature adjust lever handle (factory standard) Three hole mount front view Step 1 Attach faucet and deck plate to deck Step 2 Connect water supply lines 2) Hot & Cold supply with preset tempered water red) 3) Single supply with mixed tempered water red) Hot & Cold supply inputs Installation Instructions Step 2 Connect water supply line Important! Prior to connecting the water supply, ensure malfunction. Excessive particles from supply lines may require Step 1 Attach faucet to deck (1 hole) Single hole mount without deck plate servicing strainer check strainer OFF OFF front view Step 3 Modify faucet for preset tempered hot cold supply Remove temperature control handle and limit stop. Re-insert handle to adjust supply temperature. Remove handle and replace with push plug. Step 1 Attach faucet to deck (3 hole) Step 4 Modify faucet for single supply with pre-mixed water Turn temperature control handle counter clockwise to the maximum cold position. Remove temperature control handle and replace with push in plug. Three hole mount with deck plate Screw plug in place of supply hose into base of faucet. Attach single cold supply hose to pre-mixed supply. Step 5 Test operation and check for leaks check strainers front view Page 2 Limiting water temperature Using Temperature adjustment handle Troubleshooting Sensor eye is blinking Indicates battery is weak and needs to be replaced. Remove temperature adjustment handle. Set maximum water temperature limit by turning handle limit stop clockwise (CW). Increase maximum water temperature by turning handle limit stop counter clockwise (CCW). Re-install temperature adjustment handle. Check water supply to the faucet. Clean around photo cell sensor area. Check for loose battery connections. Replace the solenoid valve. Replace the sensor. Adjusting preset water temperature Remove temperature adjustment handle plug. Adjust the maximum water temperature limit by inserting handle into faucet and turning counter clockwise (CCW). Increase temperature by turning handle clockwise (CW). Remove handle and re-install plug. W Water supply stops are not fully open. Clean aerator and check strainer on end of supply line(s). Excessive clogging may require installing of separate W rom spout fails to turn off Sensing range may be too low. Clean around photo cell sensor area. Clean solenoid valve membrane or replace solenoid valve. Water temperature can’t be adjusted Clean the check strainer on end of supply line(s). Clean or replace the mixer. Operation Faucet care Sensor recognition range is factory preset at 1/2 - 4 inches Block sensor with plastic cleaning cover to prevent faucet from turning on while cleaning. abrasive cleaner and then rinse immediately. A non- Auto shut-off time is factory preset at 1/2 to 1 second Remove hands, water will stop automatically within 1/2 to 1 second. Security OFF after 10 seconds Weak or dead battery Precautions Ensure sensor is not damaged through impact or scratches. Ensure sensor is not blocked or disturbed by any object with its detection range. Ensure that no strong light source is aimed directly at sensor or through a mirror. Risk of Freezing When installing the faucet in a location where the temperature may fall below freezing, the entire system must be drained of water to prevent damage in freezing weather. weak and should be replaced soon. Drain all parts and hoses of water. Page 3 Dimensions Ultra-Sense Lavatory Faucet, S-6080, S-6080-AC/ACM-12V Model S-6080, p/n SF-235 Model S-6080-AC/ACM-12V, p/n SF-244 Note: Dimensions subject to change without notice. 0 19 6" (152 mm) Hole diameter 1-9/16" - 1-3/8" (33 mm - 35 mm) 1/4"-20 UNC 4" (102 mm) 3/8" compression 5-7/64" (135 mm) 4-13/32" (112 mm) spacer 2-1/2" (64 mm) 1/2" (13 mm) with spacer 19" (483 mm) 1-1/8" (29 mm) without spacer Parts Assembly Ultra-Sense Lavatory Faucet, S-6080-12V, S-6080-ACM-12V Faucet Part Number SF-235 S-6080 Replacement Parts Part Number Item SF-240 Solenoid kit with membrane SF-239 Sensor kit with mounting brackets SF-186 SF-181 Check / strainer kit for copper tubing, (option -LST) SF-158 Single hole mounting kit SF-142 Deck plate (3 hole) mounting kit SF-125 Vandal protective aerator with removal tool #LL-60K 1.5 gpm (5.7 L/min) Vandal protective laminar LN-100 LN-217 with removal tool #LL-60K 0.5 gpm (1.9 L/min) 1.5 gpm (5.7 L/min) Symmons Industries, Inc. 31 Brooks Drive Braintree, MA 02184 (800)796-6667, (781)848-2250 Fax: (800)961-9621, (781)664-1300 ©2014 Symmons Industries, Inc. Printed in U.S.A. www.symmons.com c u st o me rse rv i c e @ sym m o ns . c o m Model# S- 6060- A C/ A CM P a rt # S F -2 35 Document #Z V-10 18 Re vD a t e 123014


