AVR32134: AVR32 UC3 3D Graphic Rendering
Application
32-bit
Features
Microcontrollers
• 3D Rotating Cube Application
• Graphical 3D Software Library Engine
• EVK1101 Extension-Board Schematics
–
–
–
–
Application Note
Graphical LCD Display
Audio Codec
DC-DC converter on power supply 5V to 7V
Low level Graphical LCD Display driver
1. Introduction
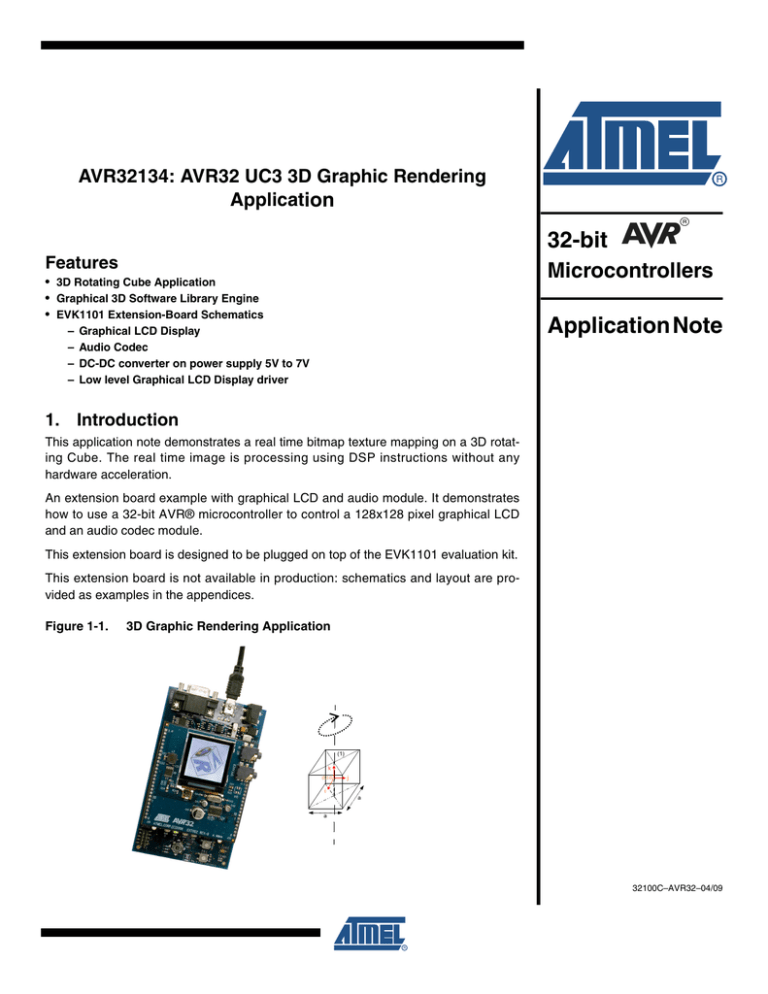
This application note demonstrates a real time bitmap texture mapping on a 3D rotating Cube. The real time image is processing using DSP instructions without any
hardware acceleration.
An extension board example with graphical LCD and audio module. It demonstrates
how to use a 32-bit AVR® microcontroller to control a 128x128 pixel graphical LCD
and an audio codec module.
This extension board is designed to be plugged on top of the EVK1101 evaluation kit.
This extension board is not available in production: schematics and layout are provided as examples in the appendices.
Figure 1-1.
3D Graphic Rendering Application
(1)
k
(0,0,0)
j
i
a
a
32100C–AVR32–04/09
2. EVK1101 Extension-Board Hardware
2.1
Feature Overview
The schematics and bill of materials can be found in the Appendix.
Table 2-1.
2.2
Package description
Type
Names
Description
Hardware Package
AVR32134/HW
Schematics
Layout files
Bill of Materials
LCD display
The EVK1101 Extension-Board features a Nokia® LCD Graphical Display, a 128x128 pixel
graphical LCD (4096 colors) interfaced with a serial controller Epson® S1D15G10 (in SPI mode).
2.3
Audio Codec Interface
The EVK1101 Extension-Board features an audio codec TLV320AIC23B with a serial mode for
configuration and I2S mode for data stream.
2.4
Power supply - battery
The EVK1101 Extension-Board is powered from the EVK1101 on which it is plugged. In order to
correctly power up the LCD, a 7V voltage DC-DC converter is required.
Table 2-2.
The EVK1101 Extension-Board connection
Pin
2
Net Name
Pin
Net Name
J1.1
VCC5
J2.1-J2.8
Not Connected
J1.2
GND
J2.9
VCC3
J1.3-J1.11
Not Connected
J2.10
GND
J1.12
/CS / PA9
J20.1
Not Connected
J1.13
/RESET / PA10
J20.2
SSC_RX / PB7
J1.14-J1.16
Not Connected
J20.3
SSC_SYNC_RX / PB8
J1.17
SDATA- TLV_MISO / PA14
J20.4
SSC_CLOCK_TX / PB9
J1.18
SCLK - TLV_CLK / PA15
J20.5
SSC_TX / PB10
J1.19
VCC3
J20.6
SSC_SYNC_TX / PB11
J1.20
GND
J19.1-J19.4
Not Connected
J19.5
TLV_CS / PB4
J19.6
Not Connected
AVR32134
32100C–AVR32–04/09
AVR32134
3. 3D Graphic Rendering Software
3.1
Package Description
Table 3-1.
3.1.1
3.1.1.1
Package description
Type
Names
Description
Firmware Package
AVR32134/SW
Source Code Package
for UC3B-ES (revB
only) and UC3B parts
Implementations Details
Compiler
The IAR® project is located here:
- AVR32134/SW/3D_CUBE_x.y.z/APPLICATIONS/EVK1101-3DDISPLAY/3D_CUBE/AT32UC3B0256xx/IAR
The GCC project is located here:
- AVR32134/SW/3D_CUBE_x.y.z/APPLICATIONS/EVK1101-3DDISPLAY/3D_CUBE/AT32UC3B0256xx/GCC
3.1.1.2
Application State Machine
The 3D cube application is based on two independent tasks. The first one responds to joystick
changes. When left/right button is pressed, the rotation axe of the 3D cube is changed. The second task responds to the accelerometer changes. When an up/down direction is detected, the
speed rotation of the 3D cube is changed. So rotation axes and speed are controlled on the fly.
3
32100C–AVR32–04/09
Figure 3-1.
. 3D Cube Application State Machine
Main()
Joystick_Task()
Accelerometer_Task()
Matrix Transformation
Object Transformation
Joystick_Task()
Accelerometer_Task()
Object Display
Yes
Left Button
Pressed ?
Yes
Right Button
Pressed ?
No
No
Change Rotation
Speed
Change Rotation Axes
3.1.1.3
Yes
Up Direction ?
Yes
Down Direction ?
No
No
Main ()
The Main project is located here:
AVR32134/SW/3D_CUBE_x.y.z/APPLICATIONS/EVK1101-3D-DISPLAY/3D_CUBE/
With:
• /CONF: configuration header files of demo modules:
– CPU settings
– Peripheral Clock settings
– Display settings
– Board Connection
• application.c is the main module of the demo. It contains the main () function and state
machine description.
4
AVR32134
32100C–AVR32–04/09
AVR32134
3.2
Drivers
All paths given in Table 3-3. Library file names3-2 are relatives to this path:
AVR32134/SW/3D_CUBE_x.y.z/APPLICATIONS/EVK1101-3D-DISPLAY/3D_CUBE/
Table 3-2.
3.2.1
Driver file names
Driver name
Source file
Header file
LCD Display Driver
lcd_nokia.c
lcd_nokia.h
Accelerometer Driver
dv_accelerometer.c
dv_accelerometer.h
Joystick Driver
dv_joystick.c
dv_joystick.h
LCD display
The LCD display driver contains useful interface functions to setup the LCD serial controller.
This driver delivers basic low level functions for applications for pixel manipulation _put_pixel()
and string manipulation _string(char *lcd_string,…)
3.2.2
Accelerometer
The accelerometer driver manages the 3-axis accelerometer and controls the cube rotation
speed
3.2.3
Joystick
The joystick controls the cube rotation axe.
.
5
32100C–AVR32–04/09
3.3
Library
All paths given in Table 3-3. Library file names3-3 are relative to this path:
AVR32134/SW/3D_CUBE_x.y.z/APPLICATIONS/EVK1101-3D-DISPLAY/3D_CUBE/
Table 3-3.
Library file names
Library name
Source file
Header file
3D Engine that computes 3D matrix
3D_engine.c
3D_engine.h
picture_objects.h
3D Objects that contains 3D objects
definition (3D cube, structural bitmap)
3.3.1
3.3.1.1
Basic principles
Matrix Transformation
A 3D transformation is based on matrix multiplications. One vector
(ir, rj , k ) could be expressed with its 3 coordinates:
r
⎡x ⎤
⎢ y ⎥ ir , rj , kr
⎢ ⎥
⎢⎣ z ⎥⎦
(
A rotation is expressed with an angle
base.
The vector
ϕ
)
(
r r r
r
i
N
and a rotation axe called
defined in the , j , k
)
r
N with its 3 coordinates is:
⎡nx ⎤
⎢ ⎥r r r
⎢n y ⎥ i , j , k
⎢n ⎥
⎣ z⎦
(
If
r
U in an orthogonal base
)
r
r
V is the transformed vector of U , the new coordinates could be expressed as:
⎡ x′ ⎤
⎡x ⎤
⎢ y′⎥ = [M ]⎢ y ⎥
⎢ ⎥
⎢ ⎥
⎢⎣ z ′ ⎥⎦
⎢⎣ z ⎥⎦
We will admit that M is expressed as:
⎡1
M = cos ϕ ⎢⎢0
⎢⎣0
6
0
1
0
⎡n x
0⎤
⎢
0⎥⎥ + (1 − cos ϕ ) ⎢nx n y
⎢
1⎥⎦
⎢⎣nx nz
2
nx n y
n2 y
n y nz
nx nz ⎤
− nz
⎡0
⎥
⎢
0
n y nz ⎥ + sin ϕ ⎢nz
⎥
⎢− n y
nx
n 2 z ⎥⎦
⎣
ny ⎤
⎥
− nx ⎥
0 ⎥⎦
AVR32134
32100C–AVR32–04/09
AVR32134
r
In order to normalize N vector during computation, we have chosen to scale
ponents on a signed 16bits variable.
(n
x
, n y , nz )
com-
So the data range is defined from 0x8000 (-1 value) to 0x7FFF (+1 value)
Picture Encoding
In order to optimize data encoding, some choices have been made to describe pictures.
For a 3D cube the landmark is centered in the middle of th cube.
Figure 3-2.
. 3D Cube representation
(1)
k
(0,0,0)
j
i
a
a
7
32100C–AVR32–04/09
Thus every face is encoded by its four vertexes as:
Table 3-4.
Vertex encoding
Face
Coordinate (i ,j, k)
(1)
(-a/2,+a/2,+a/2);
(-a/2,-a/2,+a/2);
(+a/2,-a/2,+a/2);
(+a/2,+a/2,+a/2);
(2)
(-a/2,+a/2,-a/2);
(-a/2,-a/2,-a/2);
(+a/2,-a/2,-a/2);
(+a/2,+a/2,-a/2);
(3)
(-a/2,+a/2,-a/2);
(-a/2,+a/2,+a/2);
(-a/2,-a/2,+a/2);
(-a/2,-a/2,-a/2);
(4)
(+a/2,+a/2,-a/2);
(+a/2,+a/2,+a/2);
(+a/2,-a/2,+a/2);
(+a/2,-a/2,-a/2);
(5)
(-a/2,+a/2,-a/2);
(-a/2,+a/2,+a/2);
(+a/2,+a/2,+a/2);
(+a/2,+a/2,-a/2);
(6)
(-a/2,-a/2,-a/2);
(-a/2,-a/2,+a/2);
(+a/2,-a/2,+a/2);
(+a/2,-a/2,-a/2);
With this information we are only able to describe vertices but one other information is necessary, the link between every vertex on one face.
If we encode the 4 vertices of one face with values (0,1,2,3) we can describe path from 0 to 1,
then 1 to 2, then 2 to 3 and 3 to 0 as (0,1,1,2,2,3,3,0)
Figure 3-3.
Face representation
1
4
2
3
Therefore the encoding solution could be:
– A first structure describing n*(x, y, z) coordinates for every face
– A second structure describing n*link for every vertex on one face.
8
AVR32134
32100C–AVR32–04/09
AVR32134
If we consider in a second time a 2D picture. This picture is encoded in (x,y) with a 8 bits resolution for every color: 3 bits for Red, 3 bits for Green and 2 bits for Blue.
The goal of the application is to display picture on one face of the 3D cube. This means that the
z coordinate is expressed as a value equal to –a/2 or + a/2.
Therefore the encoding solution could be:
– A first structure describing n*(x,y,z) coordinates for every face.
– A second structure describing n*color expressed.
Remarks:
For a 60x60 pixels picture, the size of the encoded picture with:
– 8 bits resolution for x
– 8 bits resolution for y
– 8 bits resolution for z
– 8 bits resolution for color
The total size is equal to 14.4ko
3.3.2
3.3.2.1
3D Usage Library
Matrix computation
As stated in Matrix Transformation, the rotation vector should be defined as an angle
ϕ
and a
r
N
rotation axes called . The combination of these two elements defines the matrix M.
We should respect that:
r
N = (x2 + y2 + z 2 ) = 1
With the encoding data solution chosen, the 1 value corresponds to the hexadecimal value
0x7fff.
For example:
In case we want to initialize M matrix with an ϕ
r
N
angle equal to 60 degrees and a
rotation axe
equal to:
⎡ 0 .5 ⎤
r ⎢ ⎥ r r r
N = ⎢ 0 .5 ⎥ ( i , j , k )
⎢⎣0.5⎥⎦
We can call specific function:
// N = (0.5,0.5,0.5) so x = y = z = 0x7000/sqrt(3) = 0x49E6
// Teta = 60°
mrot_C8_FULL_FFIX(MYTSFMATR, teta, 0x49E6, 0x49E6, 0x49E6);
9
32100C–AVR32–04/09
3.3.2.2
Maximum cube size
Figure 3-4.
. Maximum Display Size
3×a
a
a
The LCD Display screen gets 120x120 pixels. In order to be able to display a complete diagonal,
we need to take care that:
3 × amax = 120
3.3.2.3
So
amax ≈ 68 pixels.
Display Optimization
In order to optimize display, one solution is to calculate the center of each face.
Figure 3-5.
Face Coordinates
(x1,y1,z1)
(x4,y4,z4)
(x2,y2,z2)
(x3,y3,z3)
The principle of the optimization is if the next face to display has a center with a z value lower
than the current one, it means the next one is hidden. The algorithm is the following:
//! Preamble: zbuffer contains z values of the 6 centers
//! corresponding to the 6 faces of the 3D Cube
// 3D Cube faces Declaration, 6 faces
int Faces[6] = {0, 1, 2, 3, 4, 5};
int swap, temp, i;
do
{
swap = 0;
10
AVR32134
32100C–AVR32–04/09
AVR32134
// For the 6 faces of the Cube
for (i = 0; i < 5; i++)
// If Next Buffer to display has an z value higher than //
current one, swap current z with new z face value
if (zbuffer[Faces[i]] > zbuffer[Faces[i+1]])
{
temp = Faces[i];
Faces[i] = Faces[i+1];
Faces[i+1] = temp;
swap = 1;
}
}
while (swap);
Number_Face_to_print = 0;
// Display the 3 first one faces
for (i = 0; i < 3; i++)
{
Face_to_prints[i] = Faces[5-i];
if (zbuffer[Face_to_prints[i]]) Number_Face_to_print++;
else break;
}
4. Running the Application
The AVR32 UC3 ISP solution offers an easy way to download files into AVR32 products on
Atmel® Evaluation Kits through the JTAG link (via the JTAGICE mkII debugger tools) or the USB
bootloader.
Follow the steps below to build the application, load and run the code:
If you are using GCC with the AVR32 GNU Toolchain:
• Make sure the board is powered off.
• Plug power cable on EVK1101 and power it at 9V.
• In case you use a JTAG link
– Plug the JTAGICE mkII between the PC and the EVK1101 using the JTAG
connector.
– Open a shell, go to the APPLICATIONS/\EVK1101-3D-DISPLAY/3D_CUBE/AT32UC3B0256ES/
directory and type :
make rebuild program run
• In case you use USB bootloader:
– Plug the USB cable between the PC and the EVK1100 using the USB connector.
Open a shell, go to the APPLICATIONS/\EVK1101-3D-DISPLAY/3D_CUBE/AT32UC3B0256ES/GCC directory
and type:
make rebuild isp program run
11
32100C–AVR32–04/09
If you are using AVR32 Studio:
Place and extract the content of the AVR32134.zip file in D:\temp\
• Open AVR32Studio
• Click on File -> new -> AVR32 C Project
– New name: 3D
– Specify the target UC3B0256
• Right click on project -> import -> Archive File ->
– Select from archive D:\temp\AVR32134\SW\3D_CUBE_x.y.z.zip
– Into folder: select the created project 3D.
• Right click on project -> Build Project
If you are using IAREmbedded Workbench® for Atmel AVR32:
• Make sure the board is powered off.
• Plug the JTAGICE mkII between the PC and the EVK1100 using the JTAG connector. Plug
power cable on EVK1101 and power it at 9V.
• Open IAR and load the associated IAR project of this application (located in the directory:
APPLICATIONS/EVK1101-3D-DISPLAY/3D_CUBE/AT32UC3B0256ES/IAR).
• Press the “Debug” button at the top right of the IAR interface. The project should compile.
• Then the generated binary file is downloaded to the microcontroller to finally switch on the
debug mode.
• Click on the “Go” button in the “Debug” menu or press F5.
The code then starts running.
12
AVR32134
32100C–AVR32–04/09
AVR32134
5. Appendix
5.1
Schematics
Figure 5-1.
Expansion Headers
VCC5
J1
TSW-120-07-T-S
1
2
3
4
5
6
7
8
9
10
11
12
13
14
15
16
17
18
19
20
J2
PA9 PA9
4,5 PA10PA10
4,5
PA14
PA15
4,5
4,5
PA14
PA15
VCC3
VCC3
1
2
3
4
5
6
7
8
9
10
HEADER 1x10
J19
1
2
3
4
5
6
J20
PB7
PB8
PB4
PB4
4,5
PB9
PB10
PB11
PB7
PB8
PB9
PB10
PB11
1
2
3
4
5
6
PIN HEADER 1x6 PIP
PIN HEADER 1x6 PIP
<Variant Name>
ATMEL Nantes SA
La Chantrerie BP 70602
44306 Nantes Cedex 3
FRANCE
Title
Size
A4
Date:
EVK1101-EXTENSION-BOARD
Document Number
EXPANSION HEADERS
Monday, May 19, 2008
Sheet
Rev
A
1
of
4
13
32100C–AVR32–04/09
Figure 5-2.
Display Connection
D
D
VCC5
L3
LCD CONNECTOR
A916CY-100M
C
VLED
VCC3
C53
10u
J23
RESET_LCD
SDATA_LCD
SCLK_LCD
CS_LCD
1
2
3
4
5
DC-DC Converter
5V to 7V
10
9
8
7
6
VCC3
C51
100n
C52
100n
DS23C-10DS-0.5V
C
U9
1
2
3
4
5
6
7
8
RDY
FB
INTG
IN
GND
REF
FBP
FBN
TGND
LX
PGND
SUPP
DRVP
SUPN
DRVN
SHDN
16
15
14
13
12
11
10
9
VLED
D3
2
1
C54
1u
MBR0520L_NL
C55
100n
R31
100k
MAX1779EUE+
R32
22k
C56
100n
B
B
PA10
4,5
PA14
4,5
PA15
4,5
PA9
PA10
PA14
PA15
RESET_LCD
SDATA_LCD
SCLK_LCD
R24
<Variant Name>
PA9
CS_LCD
4,5
ATMEL Nantes SA
La Chantrerie BP 70602
44306 Nantes Cedex 3
FRANCE
0R
A
Title
A
EVK1101-EXTENSION-BOARD
Size Document Number
DISPLAY CONNECTION
A
Date: Monday, May 19, 2008
5
14
4
3
2
Rev
Sheet 2
of 3
1
AVR32134
32100C–AVR32–04/09
AVR32134
Figure 5-3.
Audio Codec
D
D
J25
J26
5
1
2
3
4
U11
161-3335-E
U12
Citizen SMD Microphone
TLV_CS
TLV_MOSI
VCC3 TLV_CLK
C57
20
19
18
17
LLINEIN
RLINEIN
MICIN
MICBIAS
21
23
24
22
_CS
SDIN
SCLK
MODE
GND
GND
GND
OUT 1
2
3
4
C
R33
2.2k 1u
4
5
6
7
3
SSC_TX
SSC_SYNC_TX
SSC_RX
SSC_SYNC_RX
SSC_CLOCK_TX
XC2
Q12.0-SMU4-30-30/30C43
22p
0
AUDIO CODEC
LOUT 12
ROUT 13
161-3335-E
LHPOUT 9
RHPOUT 10
VCC3
HPVDD 8
AVDD 14
DIN
LRCIN
DOUT
LRCOUT
BCLK
C
VMID 16
HPGND 11
AGND 15
25 XTI/MCLK
26 XTO
2 CLKOUT
C44
22p
5
1
2
3
4
C40
100n
+ C45
10uF/16V
VCC3
BVDD 1
DVDD 27
DGND 28
TLV320AIC23B
0
TLV_CS
CONFIGURATION LINES PB4
PA14
TLV_MOSI
PA15
TLV_CLK
PB10
SSC_TX
PB11
SSC_SYNC_TX
PB7
SSC_RX
PB8
SSC_SYNC_RX
PB9
SSC_CLOCK_TX
B
B
DATA LINES
VCC3
DECOUPLING
C36
100n
C37
100n
C38
100n
C39 + C42
100n 10uF/16V
+ C41
100uF/25V
<Variant Name>
ATMEL Nantes SA
La Chantrerie BP 70602
44306 Nantes Cedex 3
FRANCE
A
0
Title
A
EVK1101-EXTENSION-BOARD
Size Document Number
A
Rev
AUDIO CODEC
Date: Monday, May 19, 2008
5
4
3
2
Sheet 3
of 4
1
15
32100C–AVR32–04/09
5.2
Bill of Materials
Table 5-1.
Quantity
MPN/ brief
Bill of Materials for EVK1101-Extension-Board (rev A).
Manufacturer
Designator
Ceramic capacitor, SMD 0402, X7R, 16V, +/-10%
C36 C37
C38 C39
C40 C51
C52 C55
C56
9
100n
1
100uF/25V
SMD aluminium electrolytic capasitor Ø8mm, H10mm, 85degC, 16V,
Max rippel=0.180(@105degC, 120Hz), Tan=0.16
C41
2
10uF/16V
SMD aluminium electrolytic capacitor Ø4mm, H5.3mm, 85degC, 16V,
Max rippel=0.017(@85degC, 120Hz), Max ESR=26.52(@20 degC,
120Hz), Tan=0.16
C42 C45
2
10n
Ceramic capacitor, SMD 0603, NP0, 50V, ±5 %
C43 C44
1
10u
Ceramic capacitor, SMD 0805, Y5V, 10V, -20/+80 %
C53
1
1u
Ceramic capacitor, SMD 0805, X7R, 10V, ±10 %
C54
1
1u
Ceramic capacitor, SMD 0805, Y5V, 16V, +80/-20 %
C57
1
MBR0520L_NL
Fairchild
SMD Schottky diode, 0.5A 20V
D3
2
TSW-120-07-T-S
SAMTEC
1x20 pin header, 2.54 mm pitch THM
J1 J2
2
PIN HEADER 1x6 PIP
Freber
1x6 pin header, 2.54mm pitch, THM Pin-In-Paste
J19 J20
1
DS23C-10DS-0.5V
HIROSE
2x5 receptacle 0.5 mm pitch for LCD display
J23
2
161-3335-E
Mouser
SMD 3.5 mm stereo phone jack
J25 J26
1
A916CY-100M
TOKO
10uH SMT power inductor
L3
1
0R
Thick film resistor, SMD 0603, 1/10W, 1%
R24
1
100k
Thick film resistor, SMD 0603, 1/10W, 1%
R31
1
22k
Thick film resistor, SMD 0603, 1/10W, 1%
R32
1
2.2k
Thick film resistor, SMD 0603, 1/10W, 1%
R33
1
MAX1779EUE+
LCD Voltage Regulator
U9
1
TLV320AIC23B
Stereo Audio Codec
U11
1
Citizen SMD
Microphone
Citizen 4.2x4.2mm SMD electmic
U12
1
Q12.0-SMU4-3030/30-
12.0MHz crystal, SMD
XC2
16
Kemet®
Description
Kemet®
AVR32134
32100C–AVR32–04/09
Headquarters
International
Atmel Corporation
2325 Orchard Parkway
San Jose, CA 95131
USA
Tel: 1(408) 441-0311
Fax: 1(408) 487-2600
Atmel Asia
Unit 1-5 & 16, 19/F
BEA Tower, Millennium City 5
418 Kwun Tong Road
Kwun Tong, Kowloon
Hong Kong
Tel: (852) 2245-6100
Fax: (852) 2722-1369
Atmel Europe
Le Krebs
8, Rue Jean-Pierre Timbaud
BP 309
78054 Saint-Quentin-enYvelines Cedex
France
Tel: (33) 1-30-60-70-00
Fax: (33) 1-30-60-71-11
Atmel Japan
9F, Tonetsu Shinkawa Bldg.
1-24-8 Shinkawa
Chuo-ku, Tokyo 104-0033
Japan
Tel: (81) 3-3523-3551
Fax: (81) 3-3523-7581
Technical Support
avr32@atmel.com
Sales Contact
www.atmel.com/contacts
Product Contact
Web Site
www.atmel.com
Literature Requests
www.atmel.com/literature
Disclaimer: The information in this document is provided in connection with Atmel products. No license, express or implied, by estoppel or otherwise, to any
intellectual property right is granted by this document or in connection with the sale of Atmel products. EXCEPT AS SET FORTH IN ATMEL’S TERMS AND CONDITIONS OF SALE LOCATED ON ATMEL’S WEB SITE, ATMEL ASSUMES NO LIABILITY WHATSOEVER AND DISCLAIMS ANY EXPRESS, IMPLIED OR STATUTORY
WARRANTY RELATING TO ITS PRODUCTS INCLUDING, BUT NOT LIMITED TO, THE IMPLIED WARRANTY OF MERCHANTABILITY, FITNESS FOR A PARTICULAR
PURPOSE, OR NON-INFRINGEMENT. IN NO EVENT SHALL ATMEL BE LIABLE FOR ANY DIRECT, INDIRECT, CONSEQUENTIAL, PUNITIVE, SPECIAL OR INCIDENTAL DAMAGES (INCLUDING, WITHOUT LIMITATION, DAMAGES FOR LOSS OF PROFITS, BUSINESS INTERRUPTION, OR LOSS OF INFORMATION) ARISING OUT OF
THE USE OR INABILITY TO USE THIS DOCUMENT, EVEN IF ATMEL HAS BEEN ADVISED OF THE POSSIBILITY OF SUCH DAMAGES. Atmel makes no
representations or warranties with respect to the accuracy or completeness of the contents of this document and reserves the right to make changes to specifications
and product descriptions at any time without notice. Atmel does not make any commitment to update the information contained herein. Unless specifically provided
otherwise, Atmel products are not suitable for, and shall not be used in, automotive applications. Atmel’s products are not intended, authorized, or warranted for use
as components in applications intended to support or sustain life.
©2009 Atmel Corporation. All rights reserved. Atmel®, Atmel logo and combinations thereof, AVR ® and others are registered trademarks or
trademarks of Atmel Corporation or its subsidiaries. Other terms and product names may be trademarks of others.
32100C–AVR32–04/09


