Gemini Gourd Rack®-(G2)
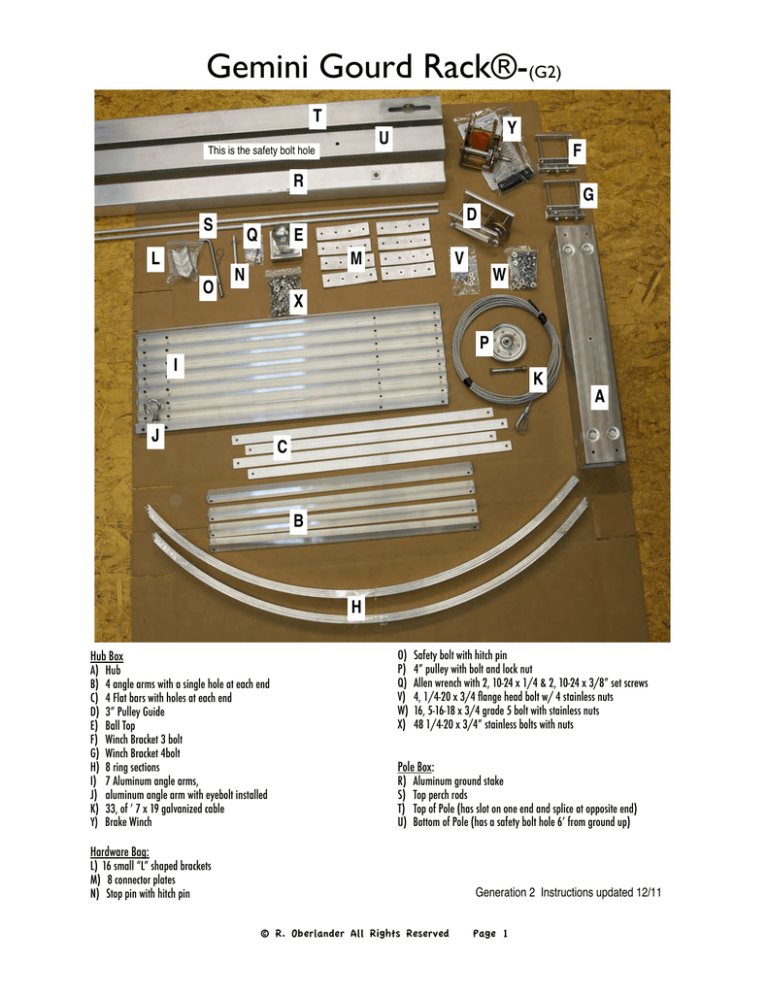
T
Y
U
This is the safety bolt hole
F
R
D
S
L
O
G
Q
E
M
N
V
W
X
P
I
K
J
A
C
B
H
Hub Box
A)
B)
C)
D)
E)
F)
G)
H)
I)
J)
K)
Hub
4 angle arms with a single hole at each end
4 Flat bars with holes at each end
3” Pulley Guide
Ball Top
Winch Bracket 3 bolt
Winch Bracket 4bolt
8 ring sections
7 Aluminum angle arms,
aluminum angle arm with eyebolt installed
33, of ’ 7 x 19 galvanized cable
Y) Brake Winch
O)
P)
Q)
V)
W)
X)
Safety bolt with hitch pin
4” pulley with bolt and lock nut
Allen wrench with 2, 10-24 x 1/4 & 2, 10-24 x 3/8” set screws
4, 1/4-20 x 3/4 flange head bolt w/ 4 stainless nuts
16, 5-16-18 x 3/4 grade 5 bolt with stainless nuts
48 1/4-20 x 3/4” stainless bolts with nuts
Pole Box:
R)
S)
T)
U)
Aluminum ground stake
Top perch rods
Top of Pole (has slot on one end and splice at opposite end)
Bottom of Pole (has a safety bolt hole 6’ from ground up)
Hardware Bag:
L) 16 small “L” shaped brackets
M) 8 connector plates
N) Stop pin with hitch pin
Generation 2 Instructions updated 12/11
© R. Oberlander All Rights Reserved
Page 1
Gemini Gourd Rack®-(G2)
The installation of a ground stake is as vital as
the foundation of your home. Both need to be
done correctly in order to support the housing.
Step 4) Empty contents of the Ready Mix into an
old wheel barrow. Mix and handle the concrete according to the directions on the bag.
Step 1) Installing the Ground Stake (R). Using a
post hole digger dig a hole with a minimum depth
of 32-36” by 12” in diameter. Poor soil conditions
may warrant a larger hole and more concrete.
Step 5) Place about 4
inches of gravel into the
hole.
Step 6) Fill your newly
dug hole with concrete,
right up to the top of
your hole.
Step 1
Step 2) Measure and mark your ground stake at
24” from the top down. This will help keep your
ground stake at the proper installed above ground
height. Note, place the end with the stop bolted
on into the ground.
Step 4
Step 7)
Holding your
ground stake vertically
Step 5
over the cement insert
your aluminum ground
stake into the concrete by
pushing downward and pulling upward in a firm
and steady motion. Stop inserting the stake when
your ground stakes 24 inch mark is level with the
cement. Did you remember to place the end with
the removable stop piece into the cement? Next
fill the hollow tube with your left over cement.
Compact the cement by using a piece of rebar
inside the tube and bring it up and down, compacting the cement. Wipe off any cement from the
exterior of the stake. Finish by sloping the concrete at the base of the stake. Check for level on
two sides of the stake. Let your cement harden at
least 2 days before you continue with the installation.
Step 2
Step 7
Step 3) You will need at least 5 bags of Ready to
Use Concrete Mix, 80 pounds each.
Step 3
Step 8) Assemble the pole. Take your bottom
section (U) and lay over an upturned 5 gallon
bucket or similar object. Lay the top pole piece
(T) next to it. Rotate the pole till you see 1 hole
facing upward on the bottom piece; 6 feet up from
the the bottom of the pole, and 2 holes facing
upward on the top piece Insert the top piece into
the bottom piece keeping the holes aligned. Lay
pole back down on bucket, holes facing up.
Step 9) You need to insert all the bolts into the
top, bottom and middle of hub. You will need
your (16) 5/16 x 3/4” bolts and 16 stainless steel
whiz nuts (W). Insert the bolt from the inside of
the hub and thread the whiz nut on. Do not
tighten. Do this to all 16 of the holes. Then using
the 4, 1/4-20 x 3/4 hex flange bolt and 4 stain-
© R. Oberlander All Rights Reserved
Page 2
Gemini Gourd Rack®-(G2)
at the top and bottom of hub. Note, it does not
matter which set of bolts you choose to start at.
Top Piece
Bottom Piece.
Step 8
Step 11) Align the holes on the angle arm to the
bolts, your eyebolt is facing upward and in the
center of the 2 bolts. Replace the two nuts onto
the bolts and lightly tighten. Using your small
speed square make sure your angle is square to
the hub and then tighten the nuts. It is best to
tighten the bolt head.
Tip! Spray WD 40 on
your splice, it will aid in
insertion.
Step 8
Step 11
Step 8
less whiz nuts (V) Insert the bolt
by inserting arm into the aluminum hub and push
the bolt thru the hole in the center of the hub, one
bolt for each of the 4 sides of the hub, and thread
the whiz nut on so your bolt wont fall off. Do not
tighten the nuts.
Step 11
Part W
Part V
Step 11
Part W
Step 10) Attaching the angle arm that has a the
eyebolt assembled on it (J). Take your hub and
remove one set of nuts from the bolts you placed
Step 12) You will need to slide the hub with the
one angle attached onto the pole. Rotate the pole
till you have the side up that has the pulley slot
facing you., then slide the hub, arm facing you
onto the pole.
Step 13) You will need your 4” pulley, bolt and
lock nut (P). Insert the pulley into the slot and
© R. Oberlander All Rights Reserved
Page 3
Gemini Gourd Rack®-(G2)
Step 12
hold it there while you take the bolt and insert it
the the hole on the pole, thru pulley and out the
opposite hole on the opposite side of the pole.
Place lock nut and tighten using 2, 9/16”
wrenches (one to hold the bolt, the other to
tighten)
Step 14
Step 15) Inset the stop pin (N). Remove 1 of the
hitch pins from the pre assembled stop pin, insert
into the hole below the pulley, place other hitch
pin in.
Step 16) Ball top (E) and top perch rods (S). Retrieve your (2) 10-24 x 1/4” set screws (Q) and (2)
10-24 x 3/8” set screws (Q) and allen wrench.
Use the longer set screws for the top perch rods.
Step 17) Insert the longer set set screws into the
drilled and tapped hole. Insert the lower top
perch rod (S) first into the ball top. Find the center at 36” and tighten set screw. Repeat for the
upper top perch
Step 13
Step 14) Slide your hub a few feet down the pole.
get your cable. Undo any wrapping on the cable
and straighten the cable out by laying it on the
ground at walking it the 33 feet remove any kinks
in the cable. Place the rounded end of the cable
which has a thimble installed onto the open end of
the eye bolt. Get the other end of cable (plain)
and slip the cable above the pulley, still inside the
slot. Flip the pole over. Take this plain end and
slide it down the pole and in between the glide
buttons of the hub. The cable MUST be between
the glide buttons of the hub and the pole. Let the
cable hang.
Step 14
Step 18) Place the ball cap on the top of your
pole. You may need to use a rubber mallet to
gently tap the ball top so that it is fully seated
onto the top of the pole. Tighten the
2 set
Step
17 screws
using the provided allen wrench.
Step 19) With the assistance of a helper, you
should slide the hub down the pole till it is about
3 1/2 to 4 feet from the ground up. Place a c
clamp under the hub. Stand your pole up and
with the assistance of your helper you will place
the entire pole, with hub and 1 attached arm over
the ground stake. The c clamp will hold the hub
in place while you finish the assembly.
Step 20) You have either purchased our DLB
350A brake winch or have provided one of your
© R. Oberlander All Rights Reserved
Page 4
Gemini Gourd Rack®-(G2)
Step 19
Step 20 C
own. Get your winch and the pre-assembled
winch mounting hardware kits (F&G). Remove the
bolt on the bracket (F) that is in the center hole
and align the bracket to the inner hole on the
winch. Insert the bolt from inside the winch and
attach nut. Tighten the nut. Get your other
bracket, (G) align the 2 outer holes of the winch
bracket to the winch, insert bolts from inside the
winch, and tighten nuts using your 1/2” wrench.
See photos Step 20 A, B, and C. You want your
brackets to have the open side face towards the
ground as seen in the photos 20 D.
Step 20 D
of pole and tighten whiz nuts. See photo Step 20
D.
Step 20 A
Step 22) Approximately 6 inches above the winch
you will want to place the 3 inch pulley assembly
(O). The 3 inch pulley assembly has been completely pre-assembled. Pull the entire assembly
apart. It should look like the photo step 22.
Step 20 B
Step 21) Assembling the winch to the pole. Your
winch bracket unit has a back plate pre assembled. Remove one whiz nut and bolt from the upper bracket and one from the lower bracket, same
side. Have your helper hold the winch at your desired height (approximately 19-23” above ground)
while you attach the back plates on the back side
Step 22
Remove the bolt and nut from the bolt furthest
from the pulley. Stand directly to the front of your
mounted brake winch and slide this entire unit so
that the brackets encase the pole. Replace the
bolt and nut, make sure the bracket is square to
© R. Oberlander All Rights Reserved
Page 5
Gemini Gourd Rack®-(G2)
Step 22
Step 22
Step 22
the pole and tighten the nuts. Find the end of
your cable and run it so that it falls behind the 3”
pulley and then drape the cable to the front of the
brake winch. Please read and follow the instructions that came with your winch. These
instructions will also explain how the cable should
be attached to the drum of winch. Once you have
attached the cable to the winch you can remove
the c clamp. Its time to finish the hub assembly.
Raise your hub to a comfortable working height.
You may need to pull down on the arm applying
weight to the hub in order to meet the minimum
weight load of the winch.
Step 23) Working clockwise from the arm that is
already on the hub. Remove the next set of nuts
attach angle arm (I) in the same manner you did in
Step 11. Make sure each angle arm is square to
hub before tightening bolts. Remember when
tightening the bolts its best to place one wrench
Step 23
inside hub to keep the bolt from rotating. Finish
the upper tier then do the lower tier of arms (I)
Step 24) You will need your 4 flat aluminum
pieces (C). Remove the nut from the center bolt
on your hub. Locate the hole on the ends of the
flat piece. Install the flat piece on first, (doesn’t
matter which end) Place one end of the flat piece
thru the center bolt found on one side of the hub
and bring it down towards the angle aligning it to
the flat side and the punched hole about 7” from
the end of the angle arm. Insert a ¼ x 20 x ¾ bolt
and add the nut. Do not tighten yet. Repeat for
all 4 of the flat pieces. Note that the center bolt
© R. Oberlander All Rights Reserved
Page 6
Gemini Gourd Rack®-(G2)
Step 24
Step 28) Adding the ring. The rings have a right
and wrong way (see photo). You want each of
your 4 sections per ring to have the pre-punched
hanging holes face toward the ground. Begin by
getting 2 of your ring sections (H) and 4 of the
connecting plates (M) and 16 1/4-20 bolts and
nuts (X). On 2 of the ring section you will want to
bolt the connecting plate on. Using one of your
1/4-20 x 3/4” bolt, (X) one of the connecting
on the hub we have not replaced the nut back on,
wait till you finish the next step.
Step 25) Next we will use the 4 angle pieces that
have a hole punched at each end (B). We will be
attaching this angle so that the corner of the angle
is facing the ground. Match the hole on the end
of the angle with the hole on one of the upper
angles about 7” in from the end. Insert a ¼ - 20 x
¾ bolt add the nut. Place the opposite end on top
of the flat bar that is being held in place by the
bolt at the center of the hub. Repeat for all 4 angles.
Angle
Step 26
plate (M) and one whiz nut (X) you want to bolt the
the connecting bracket on to the end of the ring
section. Notice that your connecting plate has 4
holes in it. Align the connector so that the 2 sets
of holes match the end of the ring section. Place
the bolt into the inner hole of the ring section,
with the connecting bracket to back side of the
ring, place on a whiz nut. DO NOT TIGHTEN the
bolts yet. You will want to repeat this process on
both ends of the ring section you are working on
as well as a second ring section.
Step 29 It’s time to mount the ring sections on to
the support arms. Using one of your rings you
Flat
Step 25
Step 26) Tighten all nuts and bolts that you have
used to this point.
Step 27) Attaching the rings. Place the small angle bracket pieces (L) on to the end of each of the
8 arms. You will need your brackets (L) and 4 14-20 bolts and nut (X). The small angle bracket
pieces have no right or wrong way, so simply align
the brackets so that one bracket goes left and one
right and sandwich the bracket pieces around the
end of the angle arm (where you still have an unused hole) Insert one of your bolts, being sure
that you bolt is facing the same direction as the
one that is used for the mitered arm. DO NOT
TIGHTEN THE BOLTS. Repeat the process till you
have all 8 arms done.
Step 27
just added the connecting plate, hold the ring
section up to the end of the angle arm which has
the small brackets attached loosely to it. Hold up
the ring section and align the the holes as seen in
© R. Oberlander All Rights Reserved
Correct
Page 7
Gemini Gourd Rack®-(G2)
the photo step 29. Insert 1 bolt next to the bolt
that holds the connecting plate on the ring thru
the corresponding hole of the small angle brackets. Thread on the nut. Repeat the process on
the other side of the ring section you just attached. DO NOT tighten the bolts just yet.
you should be able to place a minimum of 12
gourds per ring.
Thank you for purchasing this gourd rack. Should
you have any questions about the assembly of this
rack, please don’t hesitate to call.
Step 30 Go to the opposite side of the rack. Attach the other section of the ring that has the preassembled connecting plates. Assemble it onto
the the angle arms in the exact same manner you
just attached the first ring. Did you double check
to make sure your ring sections pre punched
holes are facing toward the ground? Next attach
the last two ring sections. The rings will attach to
the front of the connecting brackets. Align the
Step 28
holes from the ring to the connecting plates insert the bolts and thread on the
nut (X) Remember
not
to
tighten
the
bolts yet. Once
all the ring sections have been
attached
its
Step 29
time to tighten
ALL the bolts.
Do this by tightening the bolts at the bolt head.
Don’t forget to tighten the bolts that hold the
small angle pieces on too! When you have completed the upper ring repeat for the lower ring.
Step 30
A completed ring section
Step 31 Double check that all 48 of your bolts (X)
are nice and tight. Adding gourds. This rack has
holes pre-punched every two inches. You can use
either #12 copper wire (not included), or our optional gourd mounting arms are ideal to hang
gourds. Depending on the size of gourds you use
Bird Abodes
506 Erie Street (Pole Barn)
PO Box 756
Edinboro, PA 16412
info@supergourd.com
www.supergourd.com
© R. Oberlander All Rights Reserved
Page 8

