Installation - Watts Water Technologies
IOM-MS-ControlChek
Installation, Operation and Maintenance
Control-Chek
®
Combination Silent Check Valve, Balancing Valve and Shutoff Valve
721
Receiving, Handling and Inspection
1. Unpack and inspect the Control-Chek® valve for damage which may have occurred during shipping. Any damage should be reported to the carrier immediately. Store the valve in a dry, clean area until it is installed.
2. Remove shipping covers and inspect for any foreign matter that could be washed downstream when the valve is put into service.
3. Carefully check the pressure and temperature ratings on the valve body or nameplate to be sure that they are correct for the intended application.
Installation
1. Place the Control-Chek ® valve in the line so that the flow arrow on the side of the body points away from the pump outlet. DO NOT LIFT the valve by the yoke or valve stem. Use the hole in the web of the body or slings around the body or flanges.
2. Allow enough room around the valve for easy access to the valve stem.
3. When connecting the valve to the line, be sure that the flanges are the same, flat face to flat face. Flat face flanges require full-face gaskets. The specified face-to-face dimension of the valve is an approximate one due to machining tolerances. Allow adjustment in prefabricated piping or request certified dimensions.
4. Check to see that flange gaskets are properly positioned before tightening bolts. Tighten bolts in sequence, crossing to opposites.
Start Up
We suggest you “crack” the valve open before starting the pump.
Gradually adjust the stem until the proper flow rate is reached.
Packing Replacement
Repacking valve under pressure may cause serious bodily harm or death. Mueller Steam Specialty strongly discourages this practice.
Consult factory for procedures for repacking unpressurized valve.
722G
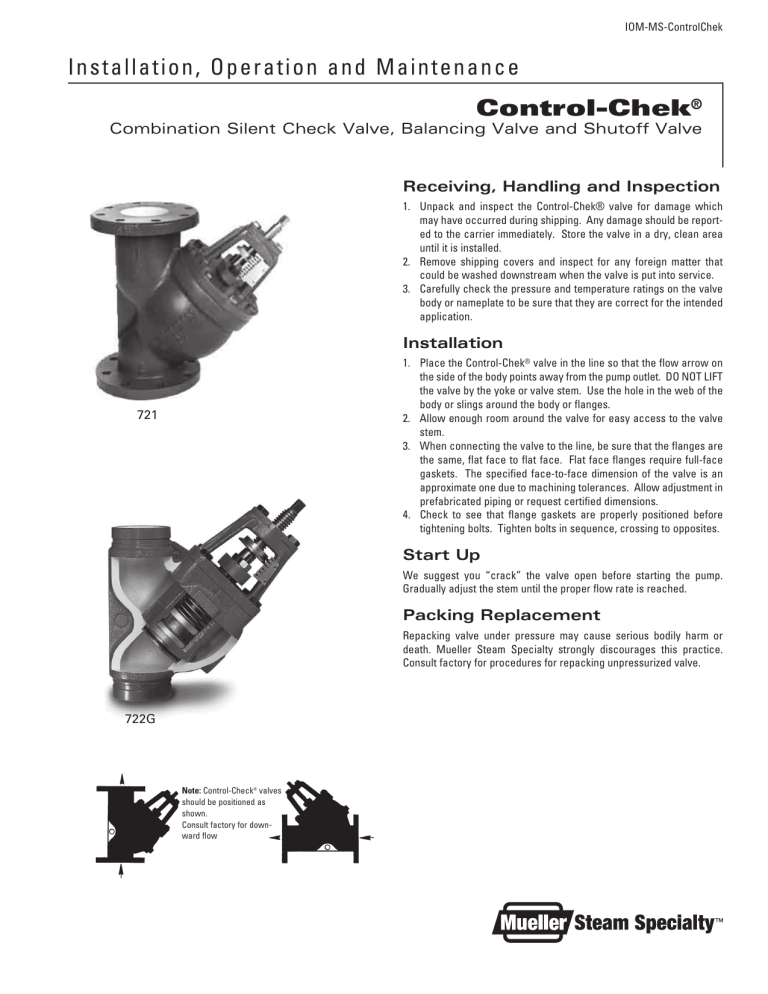
Note: Control-Check ® valves should be positioned as shown.
Consult factory for downward flow
Materials
Ref No. Description
1 Body – cast iron ASTM A126-B
2 Seat O-ring – EPDM
3 Seat Guide – cast bronze (81-3-7-9)
4 Disc O-ring – EPDM
5 Disc – cast iron
6 Spring – 302 stainless steel
7 Yoke Cover – cast iron ASTM A126-B
8 Gland Packing – graphite
9 Gland Flange – cast iron ASTM A126-B
10 Stud – alloy steel ASTM A307B
11 Nut – alloy steel ASTM A307B
12 Stem – bronze ASTM B21
13 Stem Guide – ductile iron ASTM A395
14 Hex Head Cap Screws – ASTM A307B or SAE J429-Gr 5
15 Cover Gasket – non-asbestos
16 Hex Head Cap Screws – ASTM A307B or SAE J429-Gr 5
17 NPT Plug – (See table below)
18 Stem O-ring – EPDM
O-Ring Replacement
Before starting make a note of the position of the stem indicator.
1. Shut down pump and close isolation valves.
2. Remove NPT plug (17) from body and allow to drain. Adjust stem to topmost position.
3. Loosen cap screws (16) from yoke cover (7) and remove yoke cover sub-assembly.
4. Remove spring (6), and disc (5), and seat guide (3).
5. Remove old O-rings from the disc and seat guide. Do not gouge the grooves with a sharp tool or the new O-rings may be damaged. Be sure O-ring grooves are clean and smooth. Use 200 grit “wet and dry” paper to remove any sharp edges.
6. Lightly grease O-rings. Press the disc O-ring (4) into the dovetail groove at the 12, 3, 6 and 9 o’clock positions and so on until the
O-ring is pressed in evenly. Install the seat guide O-ring (2). Carefully pass stem O-ring (18) over the threaded end until seated in groove.
7. Remove old cover gasket (15) (or O-ring) and clean flange face and yoke cover face. (If O-ring is used, see step 6 for proper installation.)
8. Replace the seat guide by firmly pressing it into the body counter bore. Replace the disc (with the O-ring facing down) into the seat guide. Replace spring.
9. Install new “Y” side cover gasket using proper dressing if required.
10. Reinstall yoke cover sub-assembly, tightening cap nuts by crossing to opposites.
11. Adjust the stem to its original position and restart system, slowly bringing it up to working pressure.
NPT PLUG SIZES
Valve Sizes
6
8
4
5
in.
2
2 1 /
2
3
10
12
14
100
125
150
200 mm
50
65
80
250
300
350
NPT Plug
1 /
2
" NPT
1 /
2
" NPT
1 /
2
" NPT
1 /
2
" NPT
3 /
4
" NPT
3 /
4
" NPT
3 /
4
" NPT
1" NPT
1" NPT
1" NPT
Limited Warranty: Mueller Steam Specialty warrants each product to be free from defects in material and workmanship under normal usage for a period of one year from the date of original shipment.
In the event of such defects within the warranty period, the Company will, at its option, replace or recondition the product without charge. This shall constitute the sole and exclusive remedy for breach of warranty, and the Company shall not be responsible for any incidental, special or consequential damages, including without limitation, lost profits or the cost of repairing or replacing other property which is damaged if this product does not work properly, other costs resulting from labor charges, delays, vandalism, negligence, fouling caused by foreign material, damage from adverse water conditions, chemical, or any other circumstances over which the Company has no control. This warranty shall be invalidated by any abuse, misuse, misapplication or improper installation of the product. THIS WARRANTY IS IN
LIEU OF ALL OTHER WARRANTIES, EXPRESS OR IMPLIED, INCLUDING ANY IMPLIED WARRANTIES OF MERCHANTABILITY OR FITNESS FOR A PARTICULAR PURPOSE.
Any implied warranties that are imposed by law are limited in duration to one year.
Some States do not allow limitations on how long an implied warranty lasts, and some States do not allow the exclusion or limitation of incidental or consequential damages. Therefore the above limitations may not apply to you. This Limited Warranty gives you specific legal rights, and you may have other rights that vary from State to State. You should consult applicable state laws to determine your rights.
A Watts Water Technologies Company
IOM-MS-ControlCheck 1020
USA: 1491 NC Hwy 20 West, St. Pauls, NC 28384; www.muellersteam.com
Tel: 910-865-8241 Fax: 910-865-6220
EDP#1915961
Toll Free Phone 1-800-334-6259 Toll Free Fax: 1-800-421-6772
© 2010 Mueller Steam Specialty
