Blossom Painted Cupcake Tutorial
advertisement

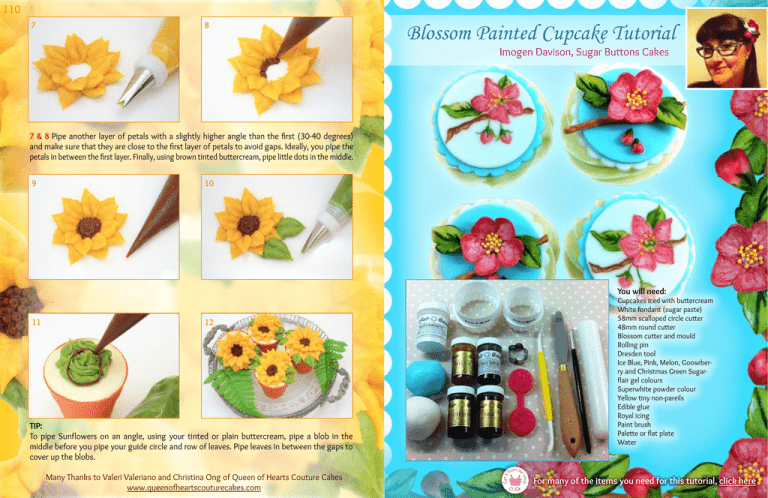
110 110 7 8 Blossom Painted Cupcake Tutorial 111 Imogen Davison, Sugar Buttons Cakes 7 & 8 Pipe another layer of petals with a slightly higher angle than the first (30-40 degrees) and make sure that they are close to the first layer of petals to avoid gaps. Ideally, you pipe the petals in between the first layer. Finally, using brown tinted buttercream, pipe little dots in the middle. 9 10 You will need: 11 Cupcakes iced with buttercream White fondant (sugar paste) 58mm scalloped circle cutter 48mm round cutter Blossom cutter and mould Rolling pin Dresden tool Ice Blue, Pink, Melon, Gooseberry and Christmas Green Sugarflair gel colours Superwhite powder colour Yellow tiny non-pareils Edible glue Royal icing Paint brush Palette or flat plate Water 12 m fro ou o r sh p Many Thanks to Valeri Valeriano and Christina Ong of Queen of Hearts Couture Cakes www.queenofheartscouturecakes.com Get it TIP: To pipe Sunflowers on an angle, using your tinted or plain buttercream, pipe a blob in the middle before you pipe your guide circle and row of leaves. Pipe leaves in between the gaps to cover up the blobs. CLICK For many of the items you need for this tutorial, click here 113 113 112 1 2 3 1 - 3 Colour a small ball of white fondant using ice blue gel colour. 10 11 12 10 Add two small bud shapes below the petals. 11 Mix a small amount of gooseberry green and pink together to make brown. 12 Paint in the branch behind the blossom. 4 5 6 13 14 15 4 Roll out the blue fondant to 2mm thick and cut out 3 scalloped circles using the 58mm cutter and 3 plain circles using the 48mm cutter. 5 Roll out the white fondant to 2mm thick and cut out 3 scalloped circles using the 58mm cutter and 3 plain circles using the 48mm cutter. 6 Attach the plain blue discs to the white scalloped circles. 13 Using gooseberry green, add leaves behind the blossom and thin stems and calyxes to the buds. 14 Remember to add the leaves and branch showing through the centre of the petals. 15 Add a little Christmas green to the gooseberry green on your palette. 7 8 9 16 17 18 7 Attach the white discs to the blue scalloped circles. 8 Put a small amount of pink gel colour onto a flat plate or paint palette. Water it down to create a very light pink. 9 Using the light pink colour, paint 5 separate petals to one side of one of the white discs. Make sure that they are not all exactly the same, they need to look natural. 16 Use the darker green to paint half of each leaf. 17 Using the Christmas green, undiluted, add thin veins and add a darker tone to one side of the buds to give definition. 18 Use a small amount of super white powder to the pink colour to make the colour more opaque. 115 115 114 19 20 21 28 29 30 19 Paint a layer of opaque pink onto the petals leaving several areas light. 20 Add more super white to some pink and add highlighted details to the petals. 21 Mix more pink into the paler pink and add final definition to the petals. Add the darker pink to the buds. 28 Using the raised part of the blossom mould, gently press the centre into the fondant flower to give detail. Leave your flower to dry in a corrugated foam tray. 29 To make the buds, take a small ball of fondant and use your fingers to roll it into a cone shape. Add a cross at the bottom using a thin knife. Make two buds per cupcake. 30 Take a small ball of fondant, flatten it and smooth it into a point. Use the end of a Dresden tool to add a few notches in one side. 22 23 24 31 32 33 22 Mix a small amount of melon yellow to some super white powder. 23 Dot on some small spots of yellow to the centre of the blossom. Make sure your pink layer is dry before adding the yellow. 24 Use a darker brown to add definition to the branch. 31 Add the centre seam and a few simple veins. Pinch the end of the leaf folding it slightly and discard any excess. 32 Make 2 leaves per cupcake. 33 To make the branches, roll out a thin, irregular strip making sure it’s not too neat. 25 26 27 34 35 36 25 Add thin stamen lines linking the dots to the centre of the blossom. Darken up the top line of the branch. 26 Roll out some white fondant and cut out some blossom shapes using the blossom cutter. 27 Use the Dresden tool (or ball tool) to soften the edges of the petals. Using your painted blossom as a guide, try to alter the shape of the petals so they look more natural. 34 Paint the branches brown and leave to dry. 35 To paint the blossom start by painting a dark pink, rough outline on all petals. 36 Use a lighter pink to fill in the rest of the petals. 117 117 116 37 38 39 46 37 Use lightest pink to add highlights. Use your brush to blend the colours lightly and give a natural effect. Paint the centre light pink. 38 Add final details using dark pink. 39 Add tiny yellow non-pareils to the centre of the blossom using a small amount of edible glue. 46 Place the painted toppers onto your iced cupcakes. Ta Da! 40 41 42 40 & 41 To paint the leaves, apply a base coat of gooseberry green. Mix in a little Christmas green and paint half the leaf. Use neat Christmas green to add detail such as outlines and veins. Paint all leaves in the same way. 42 Paint the berries with two shades of pink and finish with dark green calyxes. 43 44 45 43 Attach the branch to the blue disc using a small amount of royal icing. 44 Then the blossom… 45…Then the leaves… Many Thanks to Imogen Davison, Sugar Buttons Cakes Many Thanks to Imogen Davison of Sugar Buttons Cakes http://www.sugarbuttonscakes.com


