INSTRUCTION MANUAL
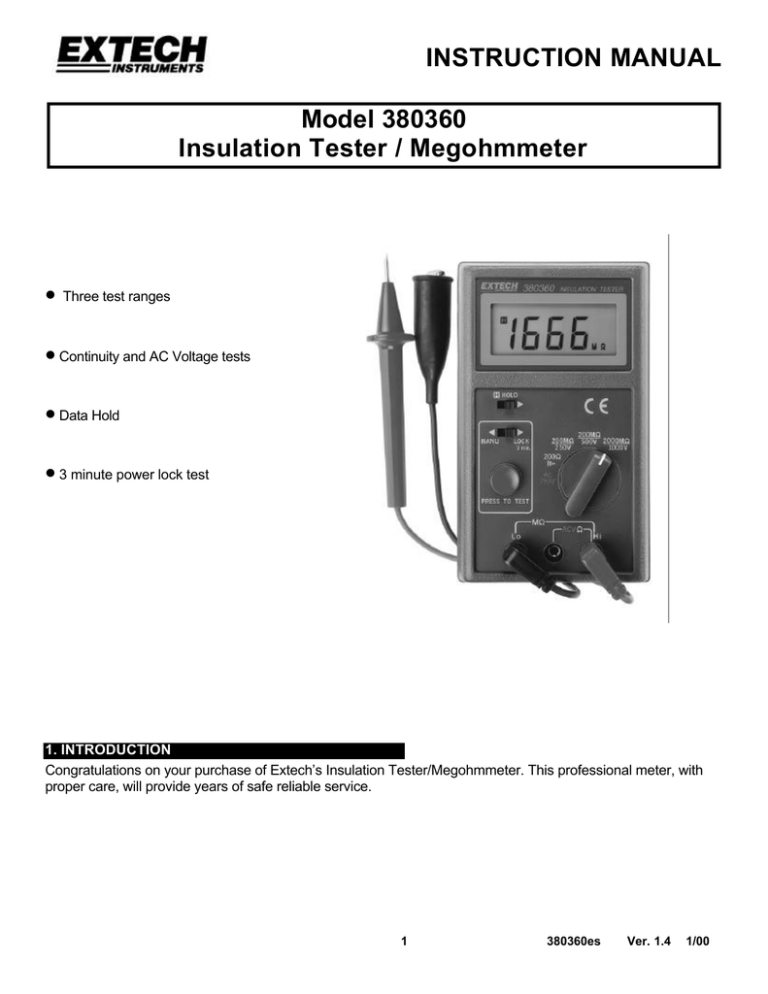
Model 380360
Insulation Tester / Megohmmeter
•
Three test ranges
• Continuity and AC Voltage tests
• Data Hold
• 3 minute power lock test
1. INTRODUCTION
Congratulations on your purchase of Extech’s Insulation Tester/Megohmmeter. This professional meter, with
proper care, will provide years of safe reliable service.
1
380360es
Ver. 1.4
1/00
2. SPECIFICATIONS
2.1 General specifications
Display
0.65” 3-1/2 digit (2000 count) LCD
Sampling
2.5 readings per second
rate
Test
2000MΩ/1000VDC, 200MΩ/500VDC,
ranges
200MΩ/250VDC
AC Voltage 600VAC
range
Resistance 200Ω
range
Over range “1____” displayed
indicator
Zero adjust Automatic
Low
BT symbol displayed when battery
battery
voltage is low
indicator
Power
Six 1.5 AA cells
source
Power
Ranges from 20 to 95mA depending upon
consumptio function
n
Operating
32 to 104oF (0 to 40oC); 80% RH
conditions
Dimension 6.5 x 3.9 x 2.2” (165 x 100 x 57mm)
s
Weight
1.1 lbs (500g)
2.2 Range Specifications
Accuracies are specified as % reading + digits at 23oC < 80% RH
RESISTANCE
Ran
Res.
ge
Accurac
y
0.1 Ω
±1% + 2d
200
Ω
CONTINUITY
Ran
Res.
ge
200
Ω
0.1Ω
AC VOLTAGE
Range Res
.
600VA
C
1V
Audible
tone
< 100Ω
Accurac
y
±0.8% +
3d
Max.
open
circuit
Volt
3.3V
Overload
Protect.
Max.
open
circuit
Volt
3.3V
Overload
Protect.
Input
impedan
ce
10MΩ
Overload
Protect.
500Vrms
500Vrms
750Vrms
2
380360es
Ver. 1.4
1/00
MEGOHMMETER RANGES
Range
Res. Accura
Terminal
cy
voltage
200MΩ / 250V 0.1M ±3% + 250V + 10% ~ Ω
5d
0%
200MΩ / 500V
500V + 10% ~ 0%
0 to
1MΩ
1000V + 10% ~
1000MΩ / 1000
-0%
V
1000 to
±5% +
2000MΩ / 1000
5d
V
Range
200MΩ / 250V
200MΩ / 500V
0 to
1000MΩ / 1000V
10002000MΩ / 1000V
Test Current /
Load
1m
250KΩ
A
500KΩ
1MΩ
Short circuit
I
< 1.5mA
3
380360es
Ver. 1.4
1/00
3. FRONT PANEL DESCRIPTION
1. LCD Display
2. Rotary function switch
3. Data hold switch
4. Test button
5. Manual / Lock select switch
6. HI input terminal
7. COM input terminal
8. LO input terminal
9. Positve test lead
10. Negative test lead
4. SAFETY
1. Do not measure signals which exceed the specified limits
2. Use extreme caution when working near bare conductors / bus bars
3. Accidental contact with conductor could result in electrical shock
4. Use caution when working near voltages above 60VDC or 30VACrms
5. Before taking resistance measurements, disconnect circuit under test from main power supply
International Safety Symbols
4
380360es
Ver. 1.4
1/00
5. OPERATION
5.1 Connecting Test Leads
For the MΩ range, connect the red test lead to the HI input terminal and the black test lead to the LO input
terminal. For the 200Ω and 600VAC functions, connect the red test lead to the HI terminal and the black lead
to the COM terminal.
5.2 Test Lead Check
Set the rotary switch to the 200Ω range. Short the test leads and press the red test button; the indicator
should read 0.00Ω. With the leads open (not shorted), the display should read infinity (over range “1----“). If
any readings are obtained other the readings outlined herein, the test leads should be considered faulty and
must be replaced before using the meter. Failure to do so could result in damage to equipment and/or
electrical shock to the user.
5.3 Insulation Resistance Measurements
5.3.1 200M Ω /250V, 200M Ω /500V Tests
This measurement range is most commonly used. After connecting the test leads as described above, turn
the rotary switch to the desired range, and press the TEST button. The LCD will become active and display
resistance. Refer to the specification or regulation being adhered to to find the allowable resistance
tolerances.
Note on large installations: In large wiring installations where the insulation of outlets is being tested,
more than one measurement may have be made to take into account parallel resistances. Divide large
systems into subgroups and test subgroups individually. Each of these subgrouped systems should not
have less than 50 outlets (switches, sockets, lighting points, etc.). Also, in large installations, the
capacitance of the insulation will be high thereby taking longer to charge when being tested. Care must be
taken not to finish a measurement until the insulation capacitance is fully charged (a steady, stable reading
is an indication that this is the case). The charge stored in the insulation after a test will be discharged
automatically when the test button is released. Be careful not to turn the range switch while the test button
is pressed.
5.3.2 2000M Ω /1000V Tests
Some specifications require testing at 1000V. Also, the 1000V range must be selected when the supply
voltage of the insulation is 500 to 1000V. Set the range switch to 1000V and proceed as described above
for 250/500V testing. Also, read the “Note on large installations” above along with the note that follows:
.
Note: Ensure that the circuit under test does not include components which can be damaged by 1000VDC.
Components which can be damaged include: power factor correction capacitors, low voltage mineral
insulated cables, electronic light dimmers, ballasts and starters for fluorescent lamps, etc.
5.4 Power Lock
For hands-free operation, the built-in Power Lock feature can be used. Set the MANU/LOCK switch to the
Lock position and press the red TEST button. A 3 minute continuous test will ensue. Press the red TEST
button again to abort the test.
5.5 Low Resistance (Continuity) Tests
1. Set the Rotary switch to the 200Ω
Ω audible continuity position.
2. Connect the red test lead to the HI input terminal and the black lead to the COM terminal.
3. Connect the tips of the test leads to both ends of the circuit under test. Press the red TEST button (or
set the MANU/LOCK switch to the LOCK position) and read the resistance on the LCD.
4. When the resistance of a circuit is less than 100Ω, an audible tone will be emitted.
5
380360es
Ver. 1.4
1/00
5.6 AC Voltage Tests
1. Set the Rotary switch to the ACV position.
2. Connect the red test lead to the ACV terminal and the black test lead to the COM terminal.
3. Connect the other end of the test leads IN PARALLEL to the circuit under test.
4. Read the voltage value on the LCD.
5.7 Measuring Power Tools and Small Appliances
This section applies to any device under test which uses a line cord. For double insulated power tools, the
megohmmeter lead should be connected to the device’s housing (chuck, blade, etc.). Refer to the diagram
below.
5.7.1 Testing Motors
AC Motors
Disconnect the motor from the line by 1. disconnecting the wires from the motor terminals or 2. opening the
main switch. If the main switch is opened, and the motor also has a motor-starter, then the starter must be
held in the ON position. With the main switch opened, the measured resistance will include the resistance
of the motor wire and all other components between the motor and the main switch. If a weakness is
indicated, the motor and other components should be checked individually. If the motor is disconnected at
the motor terminals, connect one megohmmeter lead to the grounded motor housing and the other lead to
one of the motor leads. Refer to diagram below at left.
DC Motors
Disconnect the motor from the line. To test the brush rigging, field coils and armature, connect one
megohmmeter lead to the grounded motor housing and the other lead to the brush on the commutator. If
the resistance measurement indicates a weakness, raise the brushes off of the commutator and separately
test the armature, field coils and brush rigging by connecting one megohmmeter lead to each individually,
leaving the other connected to the grounded motor housing. This also applies to DC Generators.
Cables
Disconnect the cable from the line. Also disconnect the cable’s opposite end to avoid errors due to leakage
from other equipment. Check each conductor to ground and/or lead sheath by connecting one
megohmmeter lead to ground and/or lead sheath and the other megohmmeter lead to each of the
conductors in turn. Check insulation resistance between conductors by connecting megohmmeter leads to
conductors in pairs. Refer to diagram above at right.
6
380360es
Ver. 1.4
1/00
In the diagram above at right, the three conductor cable has two wires shorted to the ground shield. This
two-wire/shield connection is then connected to one side of the meter. The remaining cable conductor is
connected to the other side of the meter.
6. MAINTENANCE
6.1 Battery Replacement: When the BT (low battery) symbol appears on the lower left side of the LCD the
six 1.5V AA batteries must be replaced. Set the MANU/LOCK switch to the MANU position and unfasten the
phillips head screw on the center rear of the meter. Replace the six AA batteries ensuring proper polarity,
affix the rear cover, and secure the rear screw.
6.2 Cleaning: Periodically wipe the case with a dry cloth. Do not use solvents or abrasives to clean this
instrument.
7. CALIBRATION / REPAIR SERVICES
Extech offers complete repair and calibration services for all of the products we sell. For periodic calibration,
NIST certification or repair of any Extech product, call customer service for details on services available.
Extech recommends that calibration be performed on an annual basis to insure calibration integrity.
8. WARRANTY
EXTECH INSTRUMENTS CORPORATION warrants this instrument to be free of defects in parts and workmanship for one year
from date of shipment (a six month limited warranty applies on sensors and cables). If it should become necessary to return the
instrument for service during or beyond the warranty period, contact the Customer Service Department at (781) 890-7440 extech
for authorization. A Return Authorization (RA) number must be issued before any product is returned to Extech. The sender is
responsible for shipping charges, freight, insurance and proper packaging to prevent damage in transit.
This warranty does not apply to defects resulting from action of the user such as misuse, improper wiring, operation outside of
specification, improper maintenance or repair, or unauthorized modification. Extech specifically disclaims any implied warranties or
merchantability or fitness for a specific purpose and will not be liable for any direct, indirect, incidental or consequential damages.
Extech's total liability is limited to repair or replacement of the product.
The warranty set forth above is inclusive and no other warranty, whether written or oral, is expressed or implied.
Copyright © 1999 Extech Instruments Corporation. All rights reserved including the right of
reproduction in whole or in part in any form.
(
Tech Support Hotlines
781-890-7440 ext. 200
extech@extech.com
7
380360es
Ver. 1.4
1/00


