Presenting Online:
The Toolbars
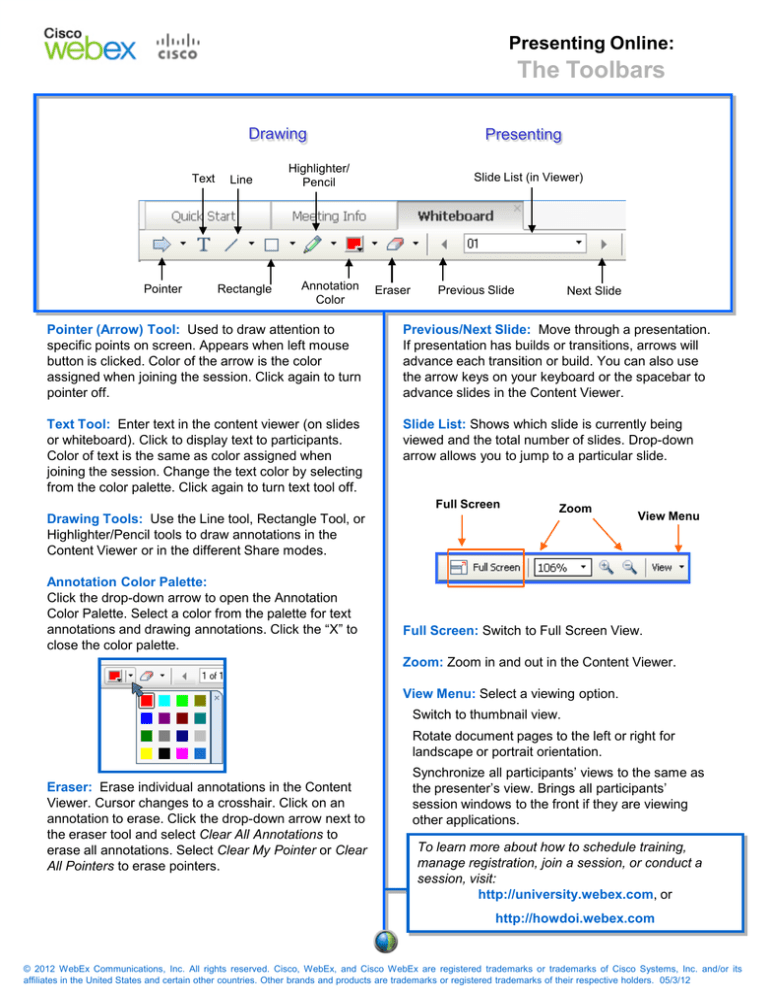
Drawing
Text
Pointer
Line
Rectangle
Presenting
Highlighter/
Pencil
Annotation
Color
Slide List (in Viewer)
Eraser
Previous Slide
Next Slide
Pointer (Arrow) Tool: Used to draw attention to
specific points on screen. Appears when left mouse
button is clicked. Color of the arrow is the color
assigned when joining the session. Click again to turn
pointer off.
Previous/Next Slide: Move through a presentation.
If presentation has builds or transitions, arrows will
advance each transition or build. You can also use
the arrow keys on your keyboard or the spacebar to
advance slides in the Content Viewer.
Text Tool: Enter text in the content viewer (on slides
or whiteboard). Click to display text to participants.
Color of text is the same as color assigned when
joining the session. Change the text color by selecting
from the color palette. Click again to turn text tool off.
Slide List: Shows which slide is currently being
viewed and the total number of slides. Drop-down
arrow allows you to jump to a particular slide.
Full Screen
Drawing Tools: Use the Line tool, Rectangle Tool, or
Highlighter/Pencil tools to draw annotations in the
Content Viewer or in the different Share modes.
Annotation Color Palette:
Click the drop-down arrow to open the Annotation
Color Palette. Select a color from the palette for text
annotations and drawing annotations. Click the “X” to
close the color palette.
Zoom
View Menu
Full Screen: Switch to Full Screen View.
Zoom: Zoom in and out in the Content Viewer.
View Menu: Select a viewing option.
Switch to thumbnail view.
Rotate document pages to the left or right for
landscape or portrait orientation.
Eraser: Erase individual annotations in the Content
Viewer. Cursor changes to a crosshair. Click on an
annotation to erase. Click the drop-down arrow next to
the eraser tool and select Clear All Annotations to
erase all annotations. Select Clear My Pointer or Clear
All Pointers to erase pointers.
Synchronize all participants’ views to the same as
the presenter’s view. Brings all participants’
session windows to the front if they are viewing
other applications.
To learn more about how to schedule training,
manage registration, join a session, or conduct a
session, visit:
http://university.webex.com, or
http://howdoi.webex.com
© 2012 WebEx Communications, Inc. All rights reserved. Cisco, WebEx, and Cisco WebEx are registered trademarks or trademarks of Cisco Systems, Inc. and/or its
affiliates in the United States and certain other countries. Other brands and products are trademarks or registered trademarks of their respective holders. 05/3/12
Presenting Online:
Sharing Features
The Share Menu
Sharing in Full-Screen Mode
The Toolbar contains icons for the most commonly
used Share modes, while the Share menu offers more
options. Click Share on the Menu bar and select one of
the following features:
When you share in full-screen mode, session controls
are available in a control panel.
Pause sharing
Assign privileges
Select menu
Mute
Stop sharing
Audio controls
Sharing menu
Panel icons
Note: The image above represents the presenter view.
Attendees will see a simplified view.
My Desktop: Share your computer desktop with
participants instantly. If you have multiple monitors
connected to your computer, select the monitor you
want to share.
File (Including Video): Locate the desired file and
click Open. The file content will be visible in the
Content Viewer.
Note: If notes have been added to a shared PowerPoint
presentation, they will be available to the presenter in the
PowerPoint Notes panel.
Application: Select an application from the list of
running applications and click Share.
Best Practice: Open the application before you share it. If
you don’t have the application open, click Other
Application, choose your application, click Share.
If you have multiple monitors connected to your system,
avoid sharing applications displayed on different monitors.
Whiteboard: Open a new whiteboard for annotation.
Web Content: Enter URL and click OK. The web
content opens in the Content Viewer, and participants
can navigate the site independently.
Web Browser: Enter URL and press Enter on your
keyboard. Participants can see the website in your
browser. You control what is displayed in the browser,
and participants follow along as you navigate the web.
Remote Computer: Select computer and click
Connect. Enables control of a remote computer.
Access Anywhere agent required.
My Session Window: Allows you to show your
session window.
Stop Sharing: Exit full-screen sharing mode and
return to the session window.
Pause Sharing: Freeze the participants’ view of a
shared application, web browser or desktop. For
example, if you are sharing your desktop, you can
pause sharing while you look at a confidential file
without attendees seeing it. To resume sharing, click
Pause again.
Sharing Menu: Access the sharing menu to switch
sharing modes instantly, without returning to the
session window.
Assign Privileges: Make another attendee the
presenter, pass remote control, or assign attendee
privileges. Note that if you change presenters while
sharing, sharing will stop and all attendees will be
returned to the session window.
Audio Controls: Access the audio controls without
returning to the session window.
Mute: Mute/un-mute yourself quickly without returning
to the session window. .
Panel Icons: Access session panels and view alerts
for panel activity. Only the first four panels you have
open appear minimized in the tray; you can reorder
panels by selecting Manage Panels from the menu
option at the end of the control panel, and then
selecting the four panels you want to view.
Select Menu: Manage panel layout, access audio
options, synchronize the full-screen view for all
session participants, invite or remind participants, or
end the session.
Click the arrows to access
drop-down menus with
more options.
© 2012 WebEx Communications, Inc. All rights reserved. Cisco, WebEx, and Cisco WebEx are registered trademarks or trademarks of Cisco Systems, Inc. and/or its
affiliates in the United States and certain other countries. Other brands and products are trademarks or registered trademarks of their respective holders. 05/03/12


