INSTRUCTION MANUAL
FASTMOUNT® SERIES
WEATHER-RESISTANT SPEAKERS
INTRODUCTION
• You can orient the speakers either horizontally or vertically
without affecting the sound quality.
Thank you for purchasing Sound Advance FastMount®
weather-resistant speakers. When properly installed, these
speakers will give you many years of outdoor entertainment
pleasure. To get the most out of your new speakers, please
read this manual thoroughly before you begin installation.
WIRE GAUGE
Extra resistance in the speaker wire can make a speaker sound
less dynamic and reduce definition of the bass frequencies. In
extreme cases, it can even attenuate high frequencies. Also,
amplifier power is wasted in wire with extra resistance, reducing your system’s maximum output level.
The directions in this manual apply to all of the following models:
FMS860B, FMS860W, FMS660B, FMS660W, FMS530B,
FMS530W
To prevent degrading sound quality, the total wire resistance
should be less than 10% of the speaker’s impedance. This
means that for an 8-ohm speaker, the total resistance of the
wire should be less than 0.8 ohms.
PARTS LIST
Your Sound Advance FastMount speakers include the following:
• (2) Sound Advance FastMount speakers
• (2) Grilles
• (2) Wiring terminal covers
Refer to the Wire Resistance table below when selecting the
proper wire gauge for your system:
• (2) Mounting brackets (attached to the speakers)
Wire resistance in Ohms vs. length of cable run
SPEAKER PLACEMENT
Distance in Feet
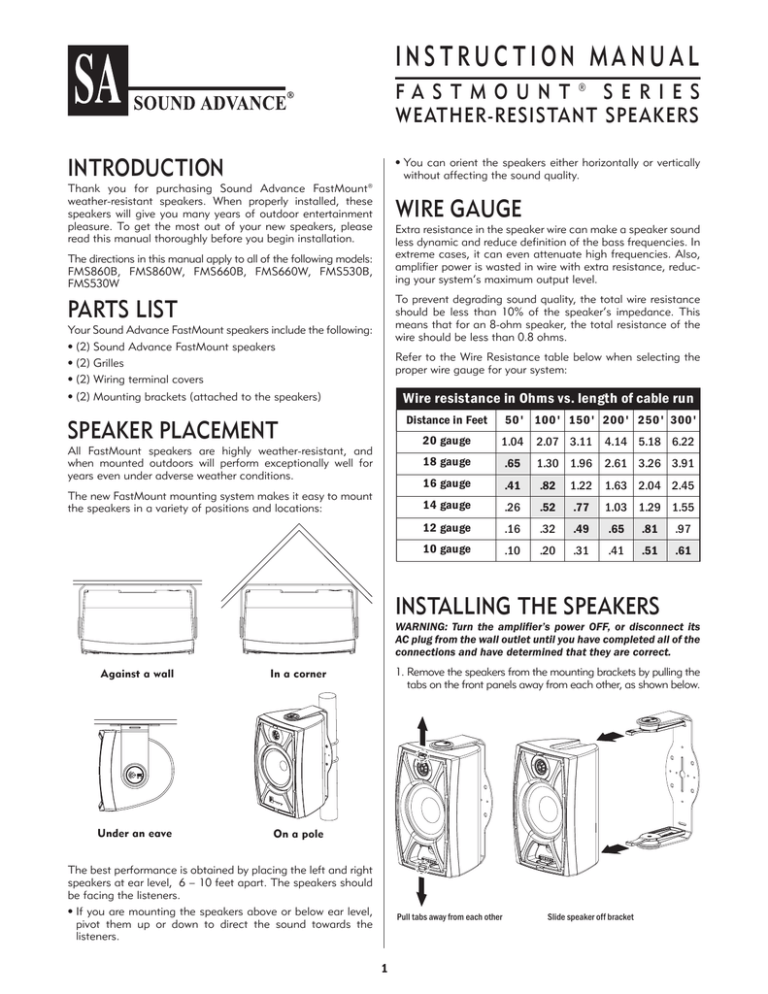
All FastMount speakers are highly weather-resistant, and
when mounted outdoors will perform exceptionally well for
years even under adverse weather conditions.
The new FastMount mounting system makes it easy to mount
the speakers in a variety of positions and locations:
50' 100' 150' 200' 250' 300'
20 gauge
1.04
2.07 3.11
4.14 5.18 6.22
18 gauge
.65
1.30 1.96
2.61 3.26 3.91
16 gauge
.41
.82
1.22
1.63 2.04 2.45
14 gauge
.26
.52
.77
1.03 1.29 1.55
12 gauge
.16
.32
.49
.65
.81
.97
10 gauge
.10
.20
.31
.41
.51
.61
INSTALLING THE SPEAKERS
WARNING: Turn the amplifier’s power OFF, or disconnect its
AC plug from the wall outlet until you have completed all of the
connections and have determined that they are correct.
Against a wall
In a corner
Under an eave
On a pole
1. Remove the speakers from the mounting brackets by pulling the
tabs on the front panels away from each other, as shown below.
The best performance is obtained by placing the left and right
speakers at ear level, 6 – 10 feet apart. The speakers should
be facing the listeners.
• If you are mounting the speakers above or below ear level,
pivot them up or down to direct the sound towards the
listeners.
Pull tabs away from each other
1
Slide speaker off bracket
INSTRUCTION MANUAL
FASTMOUNT® SERIES
WEATHER-RESISTANT SPEAKERS
2. Run the speaker wires from the amplifier to the speaker
locations and through the holes in the mounting brackets.
6. Attach speakers
to brackets
Note: To increase water resistance and make installation easier,
the speaker wire terminals are located on the FastMount speakers’
front panel. Be sure to leave enough wire at the speaker location
to feed through the tunnel in the speaker enclosure and connect to
the terminals on the front.
3. Attach the mounting bracket to the mounting surface using
hardware (not included) that is appropriate for the type of
surface.
3. Attach
bracket
• Pull enough wire through the front of the speaker to allow
connection to the terminals.
7. Connect the speaker wires to the speakers’ terminals:
a. Strip ¼” – ½” of insulation from each conductor and
twist the strands together.
b. Unscrew one of the “+” terminals and one of the “–”
terminals (see illustration, below). The two left-hand terminals are “+” and the two right-hand ones are “–”.
• If the installation requires
that the speakers be mounted in a corner, attach the
brackets with hardware
through the slots in the
angled corners as shown to
the right.
4. If the installation requires that
the speakers be mounted on
poles you can attach the
brackets to poles using 2½”
U-bolts (not included).
3. Corner
mounting
Connection
Terminal
c. Insert the wires behind the terminal screws and tighten
the screws to secure the wires.
IMPORTANT: Be sure not to let any stray ‘+’ and ‘–’ wires touch
each other. Touching wires can cause a short-circuit that
could damage your amplifier.
4. Attaching the
bracket to a pole
5. Feed the speaker wires from
the brackets into the wire
entry grommets on the backs
of the speakers, through the
wire tunnels and out the
openings on the speakers’
front panels.
• Double-check that you connected all of the wires properly
(amplifier ‘+’ to speaker ‘+’; amplifier ‘–’ to speaker ‘–’) at
all connections.
• There is an extra set of ”+” and “–” terminals that
allow you to daisy-chain multiple speakers from a single
amplifier connection.
8. Determine the proper wattage setting
for each speaker in the installation
and set each speaker’s transformer
tap selector (see illustration, right)
accordingly.
• The grommet forms a
water-resistant seal around
the speaker wire.
• Make sure there is
enough slack in the
wire to allow the
speaker to pivot on
the bracket.
5. Wire
entry
grommet
9. Fit the wiring terminal covers into the
recesses in the speakers’ front
panels (see illustration, next page).
The covers should fit tightly, but can be removed and
replaced if the speakers need to be disconnected.
6. Slide the speakers
onto the brackets until
the locks snap into place (see illustration, next column).
2
INSTRUCTION MANUAL
FASTMOUNT® SERIES
WEATHER-RESISTANT SPEAKERS
SPECIFICATIONS
10. Fit the grilles onto the speakers.
9. Attach the
connector cover
FMS860B / FMS860W
10. Attach
the grille
PAINTING THE SPEAKERS AND
GRILLES
All FastMount speakers feature a tough polypropylene
enclosure that can be painted. Sound Advance recommends
using a weather-resistant outdoor paint and a spray gun to
paint the FastMount speakers.
4. Paint the grille separately from the speaker using very thin paint
(5:1 ratio). Avoid plugging the grille holes with excess paint.
PIVOTING THE SPEAKERS
1. Unlock the slide locks on the speaker
pivots by moving them towards the rear
of the speaker.
2. Rotate the speakers to
the desired position.
1” (25mm) Polyurethane dome
Woofer:
8” (203mm) One-piece black
Polypropylene cone with a rubber
surround
Frequency Response:
45Hz – 20kHz ±3dB
Impedance:
6 ohms nominal; 4 ohms minimum
Power Handling:
5 watts minimum;
125 watts maximum
Sensitivity:
91dB SPL (2.83V/1 meter)
Grille Material:
Perforated aluminum
Dimensions (H x W x D):
14” x 9” x 9¼”
(356mm x 229mm x 235mm)
Net Weight:
13 lbs (6.0kg) each
FMS660B / FMS660W
1. If they have already been installed, remove the grilles from
the speakers.
2. To protect the speaker driver units during painting, place
the grilles on a piece of cardboard and trace around their
outlines. Then cut the cardboard just inside of the trace line
and fit these “paint plugs” into the speakers’ baffles. (Be
careful not to damage the driver components while fitting
the paint plugs.)
3. Paint the speakers the desired color according to the paint
manufacturer’s instructions. Remove the paint plugs after
the paint has thoroughly dried.
You can rotate the speaker in the bracket
to direct the sound towards the listeners.
Tweeter:
Tweeter:
1” (25mm) Polyurethane dome
Woofer:
6½” (165mm) One-piece black
Polypropylene cone with a rubber
surround
Frequency Response:
55Hz – 20kHz ±3dB
Impedance:
8 ohms nominal; 6 ohms minimum
Power Handling:
5 watts minimum;
80 watts maximum
Sensitivity:
89dB SPL (2.83V/1 meter)
Grille Material:
Perforated aluminum
Dimensions (H x W x D):
12” x 7½” x 71/8”
(305mm x 191mm x 181mm)
Net Weight:
9 lbs (4kg) each
FMS530B / FMS530W
UNLOCK
(towards rear
of speaker)
3. Lock the slide locks by
moving them towards
the front of the speaker.
LOCK
(towards front
of speaker)
3
Tweeter:
1” (25mm) Polyurethane dome
Woofer:
5¼” (133mm) One-piece black
Polypropylene cone with a rubber
surround
Frequency Response:
65Hz – 20kHz ±3dB
Impedance:
8 ohms nominal; 6 ohms minimum
Power Handling:
5 watts minimum;
70 watts maximum
Sensitivity:
88dB SPL (2.83V/1 meter)
Grille Material:
Perforated aluminum
Dimensions (H x W x D):
10¼” x 6½” x 6”
(260mm x 165mm x 153mm)
Net Weight:
7.5 lbs (3.5kg) each
INSTRUCTION MANUAL
FASTMOUNT® SERIES
WEATHER-RESISTANT SPEAKERS
Technical Assistance and Service
Limited Warranty:
The Technical Assistance Department at Sound Advance is
available at (800) 592-4644 or (949) 492-5449 to answer any
questions concerning the operation and installation of your
speakers between the hours of 7:00 AM and 5:00 PM Pacific
time, Monday through Friday, except holidays.
Sound Advance warrants this product to the original purchaser
to be free from defects in material and workmanship, under
normal use and conditions, for a period of five (5) years from
the date of original purchase as shown on the invoice.
In the event your unit should need repair or service, you may
return the unit to your authorized dealer or use the following
guidelines:
1. Be prepared to state the model number and / or serial number, date of purchase and dealer's name and address when
calling.
2. Contact Sound Advance directly at (800) 592-4644 or (949)
492-5449 or at www.soundadvance.com
3. If you are returning the product directly to Sound Advance,
call us to obtain a return authorization number before shipping.
YOU MUST HAVE PRIOR AUTHORIZATION TO
RETURN YOUR UNIT.
4. The original packaging must be used. If the original packaging is unavailable, replacements can be obtained from
Sound Advance for a small fee.
5. Ship the product via United Parcel Service, Federal Express,
or other package delivery service. Please do not use the
U.S.Postal Service.
6. Write the return authorization number on the outside of the
box.
7. Ship to:
Attn: Quality Assurance Department
Sound Advance
212 Avenida Fabricante
San Clemente, CA 92672
8. FREIGHT COLLECT SHIPMENTS WILL BE REFUSED!
The foregoing exclusive warranty gives you specific legal
rights, and you may have other rights, which vary from state
to state. This warranty applies exclusively to the original
purchaser.
The exclusive warranty does not apply and is ineffective if:
1. The invoice fails to establish that the product was
purchased from an authorized Sound Advance dealer or
distributor;
2. The product was subjected to misuse, neglect, accident, or
improper installation. [Damage to the product was caused
by accident, abuse, or misuse];
3. The product was modified, altered, or repaired by
unauthorized personnel; or
4. The unit was not used as described in the installation and
operating instructions.
Exclusive Remedy:
Sound Advance agrees, at its option during the five
(5) year warranty period, to repair any defect in material or
workmanship or to furnish an equal product in exchange
without charge to the purchaser, subject to verification of the
defect and proof of the date of purchase.
Warranty Exclusions and
Damage Limitations:
The exclusive warranty set forth above is in lieu of all other
warranties, express or implied, including without limitation the
implied warranties of merchantability and fitness for a
particular purpose, which are expressly disclaimed. In no
event, and under no circumstances or legal or equitable
theory, shall Sound Advance be liable or responsible for any
direct or indirect damages, consequential damages, loss, or
injury, including without limitation, personal injury, bodily
injury, property damage, emotional distress, death, real
property or personal property damage, business interruption,
costs of delay or lost profits arising from the product, whether
based upon warranty, contract, negligence, strict product
liability or other theory.
©2006 Sound Advance. All rights reserved.
Sound Advance and FastMount are registered trademarks of Dana Innovations.
Sound Advance • 212 Avenida Fabricante • San Clemente, CA 92672 USA • (800) 592-4644 or (949) 492-5449 • FAX: (949) 361-5151
www.sound advance.com
33-4283
05/07


