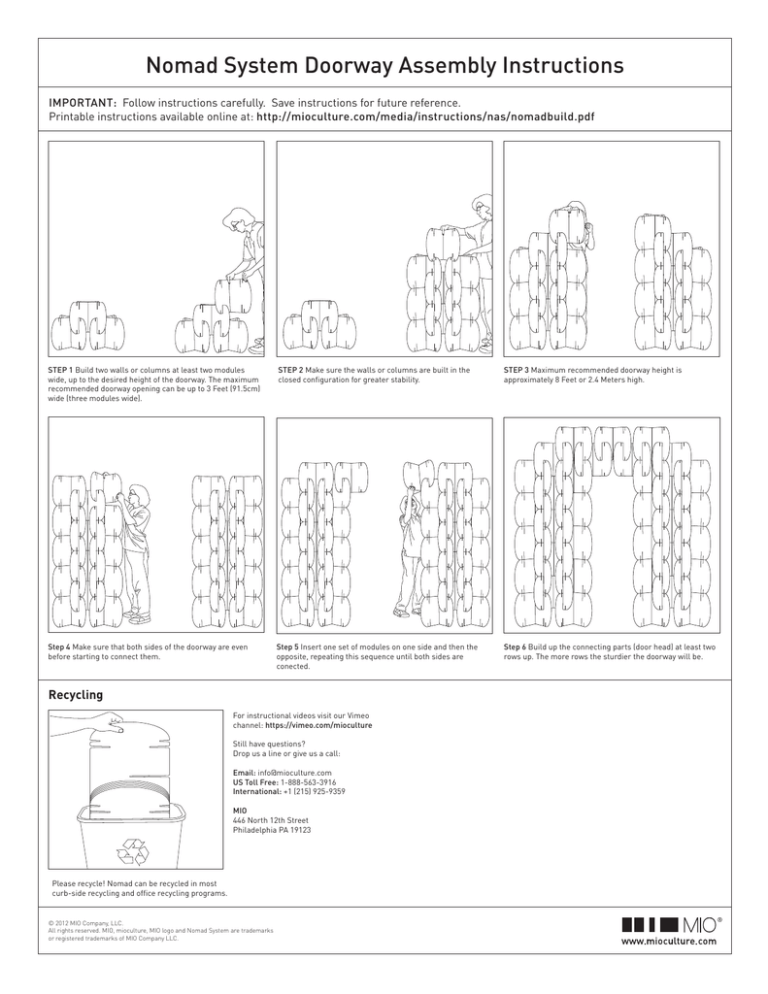
Nomad System Doorway Assembly Instructions
IMPORTANT: Follow instructions carefully. Save instructions for future reference.
Printable instructions available online at: http://mioculture.com/media/instructions/nas/nomadbuild.pdf
STEP 1 Build two walls or columns at least two modules
wide, up to the desired height of the doorway. The maximum
recommended doorway opening can be up to 3 Feet (91.5cm)
wide (three modules wide).
STEP 2 Make sure the walls or columns are built in the
closed configuration for greater stability.
STEP 3 Maximum recommended doorway height is
approximately 8 Feet or 2.4 Meters high.
Step 4 Make sure that both sides of the doorway are even
before starting to connect them.
Step 5 Insert one set of modules on one side and then the
opposite, repeating this sequence until both sides are
conected.
Step 6 Build up the connecting parts (door head) at least two
rows up. The more rows the sturdier the doorway will be.
Recycling
For instructional videos visit our Vimeo
channel: https://vimeo.com/mioculture
Still have questions?
Drop us a line or give us a call:
Email: info@mioculture.com
US Toll Free: 1-888-563-3916
International: +1 (215) 925-9359
MIO
446 North 12th Street
Philadelphia PA 19123
Please recycle! Nomad can be recycled in most
curb-side recycling and office recycling programs.
© 2012 MIO Company, LLC.
All rights reserved. MIO, mioculture, MIO logo and Nomad System are trademarks
or registered trademarks of MIO Company LLC.
Nomad System Port Hole Assembly Instructions
IMPORTANT: Follow instructions carefully. Save instructions for future reference.
Printable instructions available online at: http://mioculture.com/media/instructions/nas/nomadbuild.pdf
STEP 1 Build the desired wall at least two modules high, up
to the starting point of the port hole.
STEP 2 Build two walls or columns at least two modules
wide on the sides of the port hole. The maximum
recommended opening can be up to 3 Feet (91.5cm) wide
(three modules wide). Build the structure in the closed
configuration for greater stability.
STEP 3 Maximum recommended port hole height is
approximately 8 Feet or 2.4 Meters high.
Step 4 Make sure that both sides of the port hole are even
before starting to connect them.
Step 5 insert one set of modules on one side and then the
opposite, repeating this sequence until both sides are
conected.
Step 6 Build up the connecting parts at least two rows up.
The more rows the sturdier the opening will be.
For instructional videos visit our Vimeo
channel: https://vimeo.com/mioculture
Still have questions?
Drop us a line or give us a call:
Email: info@mioculture.com
US Toll Free: 1-888-563-3916
International: +1 (215) 925-9359
MIO
446 North 12th Street
Philadelphia PA 19123
Step 7 Multiple openings can be created in
each wall without compromising the
structure. Leave approximately three
modules between openings.
Please recycle! Nomad can be recycled in most
curb-side recycling and office recycling programs.
© 2012 MIO Company, LLC.
All rights reserved. MIO, mioculture, MIO logo and Nomad System are trademarks
or registered trademarks of MIO Company LLC.
Nomad System Corner Assembly Instructions
IMPORTANT: Follow instructions carefully. Save instructions for future reference.
Printable instructions available online at: http://mioculture.com/media/instructions/nas/nomadbuild.pdf
STEP 1 Outline the wall and corner desired with a single row of modules.
STEP 2 Connect corner modules with a second layer. Start with the corner modules.
STEP 3 Fill out the second row so that it is completely even. There will be an opening next to
the module that was used to connect the corner that cannot be filled in.
STEP 4 Add a third layer which will fill in the gap created by the connecting module and will
even out the whole structure.
Step 5 Connect the corner modules again by adding another layer. Start with the corner
module as in STEP 2 but connect the OPPOSITE side of the corner. Alternating the position of
the modules used to connect the walls will create a sturdier structure.
Step 6 Repeat Steps 3 through 5. Alternate the side of the corner that is being connected up
to the desired height.
© 2012 MIO Company, LLC.
All rights reserved. MIO, mioculture, MIO logo and Nomad System are trademarks
or registered trademarks of MIO Company LLC.
