Rev. C
Installation Instructions for
FSS-SMT Series Low Profile Force Sensor
OVERFORCE
50044164
SOLDERING
CAUTION
CAUTION
EXCEEDING PRODUCT OVERFORCE RATING
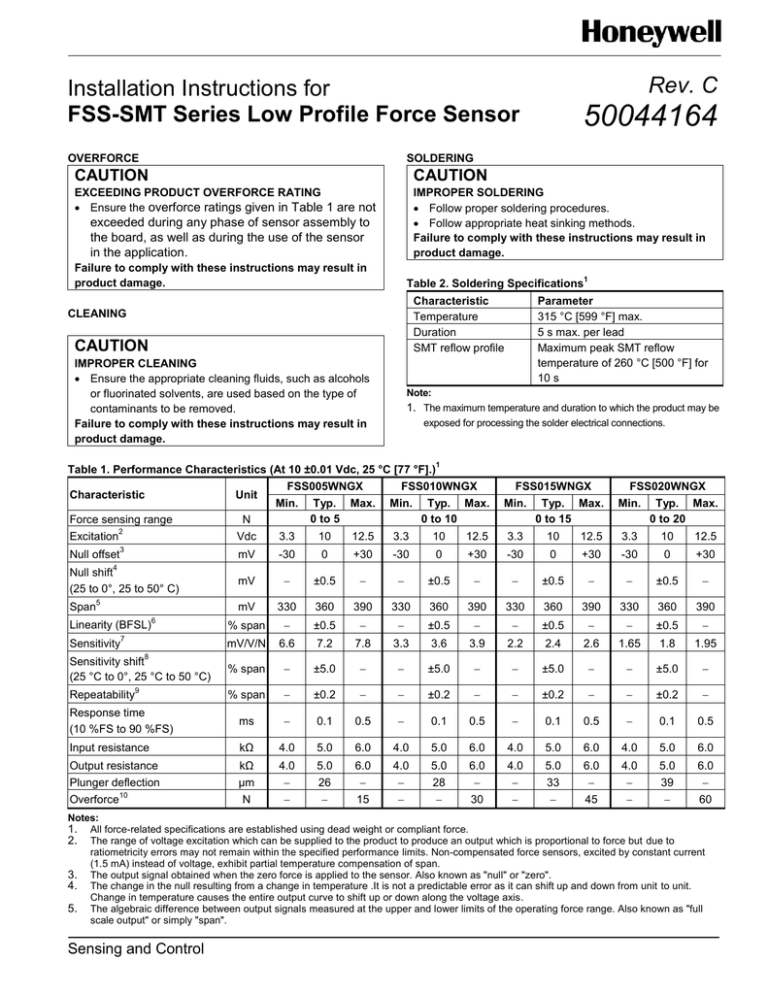
Ensure the overforce ratings given in Table 1 are not
IMPROPER SOLDERING
Follow proper soldering procedures.
Follow appropriate heat sinking methods.
Failure to comply with these instructions may result in
product damage.
exceeded during any phase of sensor assembly to
the board, as well as during the use of the sensor
in the application.
Failure to comply with these instructions may result in
product damage.
Table 2. Soldering Specifications
Characteristic
Temperature
Duration
SMT reflow profile
CLEANING
CAUTION
IMPROPER CLEANING
Ensure the appropriate cleaning fluids, such as alcohols
or fluorinated solvents, are used based on the type of
contaminants to be removed.
Failure to comply with these instructions may result in
product damage.
Unit
Force sensing range
2
Excitation
N
Vdc
3
Null offset
FSS005WNGX
Min. Typ. Max.
0 to 5
Parameter
315 °C [599 °F] max.
5 s max. per lead
Maximum peak SMT reflow
temperature of 260 °C [500 °F] for
10 s
Note:
1. The maximum temperature and duration to which the product may be
exposed for processing the solder electrical connections.
Table 1. Performance Characteristics (At 10 ±0.01 Vdc, 25 °C [77 °F].)
Characteristic
1
1
FSS010WNGX
Min. Typ. Max.
0 to 10
FSS015WNGX
Min. Typ. Max.
0 to 15
FSS020WNGX
Min. Typ. Max.
0 to 20
3.3
10
12.5
3.3
10
12.5
3.3
10
12.5
3.3
10
12.5
mV
-30
0
+30
-30
0
+30
-30
0
+30
-30
0
+30
mV
±0.5
±0.5
±0.5
±0.5
mV
330
360
390
330
360
390
330
360
390
330
360
390
% span
±0.5
±0.5
±0.5
±0.5
mV/V/N
6.6
7.2
7.8
3.3
3.6
3.9
2.2
2.4
2.6
1.65
1.8
1.95
% span
±5.0
±5.0
±5.0
±5.0
4
Null shift
(25 to 0°, 25 to 50° C)
Span
5
Linearity (BFSL)
Sensitivity
6
7
8
Sensitivity shift
(25 °C to 0°, 25 °C to 50 °C)
% span
±0.2
±0.2
±0.2
±0.2
Response time
(10 %FS to 90 %FS)
ms
0.1
0.5
0.1
0.5
0.1
0.5
0.1
0.5
Input resistance
kΩ
4.0
5.0
6.0
4.0
5.0
6.0
4.0
5.0
6.0
4.0
5.0
6.0
Output resistance
kΩ
4.0
5.0
6.0
4.0
5.0
6.0
4.0
5.0
6.0
4.0
5.0
6.0
Plunger deflection
10
Overforce
µm
N
26
15
28
30
33
45
39
60
Repeatability
9
Notes:
1. All force-related specifications are established using dead weight or compliant force.
2. The range of voltage excitation which can be supplied to the product to produce an output which is proportional to force but due to
ratiometricity errors may not remain within the specified performance limits. Non-compensated force sensors, excited by constant current
(1.5 mA) instead of voltage, exhibit partial temperature compensation of span.
3. The output signal obtained when the zero force is applied to the sensor. Also known as "null" or "zero".
4. The change in the null resulting from a change in temperature .It is not a predictable error as it can shift up and down from unit to unit.
Change in temperature causes the entire output curve to shift up or down along the voltage axis.
5. The algebraic difference between output signals measured at the upper and lower limits of the operating force range. Also known as "full
scale output" or simply "span".
Sensing and Control
FSS-SMT Series Low Profile Force Sensor
Rev. C
50044164
6.
The maximum deviation of product output from a straight line fitted to output measured over the operating force range. It is also the
straight line through a set of points which minimizes the sum of the square of the deviations of each of the points from the straight line.
7. The ratio of output signal change to the corresponding input force change. Sensitivity is determined by computing the ratio of span to the
specified operating force range multiplied by the supply voltage being used.
8. The maximum deviation in sensitivity due to changes in temperature over the operating temperature range, relative to sensitivity
measured at 25 °C.
9. The maximum difference between output readings when the same force is applied consecutively, under the same operating conditions,
with force approaching from the same direction within the operating force range.
10. The maximum force which may safely be applied to the product for it to remain in specification once force is returned to the operating
force range. Exposure to higher forces may cause permanent damage to the product. Unless otherwise specified this applies to all
temperatures within the operating temperature range.
Table 3. Environmental Specifications
Characteristic
1
Operating temperature
Shock
Vibration
2
MCTF (Mean Cycles To Failure)
Output ratiometric
Parameter
-40 °C to 85 °C [-40 °F to 185 °F]
qualification tested to 150 g
qualification tested to 0 to 2 kHz, 20 g sine
20 million at 25 °C [77 °F]
within supply range
Notes:
1. The temperature range over which the product may safely be exposed without excitation or force applied. Under these conditions the
product will remain in specification after excursion to any temperatures in this range. Exposure to temperatures beyond this range may cause
permanent damage to the product.
2. MCTF is a basic measure of reliability for a non-repairable device. It is the mean number of cycles to maximum operating force over
which a sensor can be expected to operate until failure. The mean value is determined statistically from a probability distribution for
failures based upon test data. MCTF may vary depending on the specific application in which a sensor is utilized.
1
Table 4. Absolute Maximum Ratings
Characteristic
Parameter
2
Storage temperature
-40 °C to 100 °C [-40 °F to 212 °F]
ESD
meets ESD sensitivity classification level 3B
Notes:
1. The extreme limits that the product can withstand without damage to the product.
2. The temperature range over which the product may safely be exposed without excitation or force applied. Under these conditions the
product will remain in specification after excursion to any temperatures in this range. Exposure to temperatures beyond this range may cause
permanent damage to the product.
Figure 1. Excitation Schematic (Excitation 5 Vdc Typ., 6 Vdc max.)
1. Circled numbers refer to sensor terminals (pins).
Pin 1 = Supply Vs (+), Pin 2 = Output Vo (+), Pin 3 = Ground Vg (-), Pin 4 = Output Vo (-)
1
2. The force sensor may be powered by voltage or current. Maximum supply voltage is
+
not to exceed 6 V. Maximum supply current is not to exceed 1.2 mA. Power is applied
Vs
+ Vo 2
4
across Pin 1 and Pin 3.
3. The sensor output should be measured as a differential voltage across Pin 2 and
Pin 4 (Vo = Vo(+)-Vo(-)). The output is ratiometric to the supply voltage. Shifts in
3
supply voltage will cause shifts in output. Neither Pin 2 nor Pin 4 should be tied to
ground or voltage supply.
2 Honeywell Sensing and Control
Rev. C
FSS-SMT Series Low Profile Force Sensor
Figure 2. Sensor Mounting Diagram (For reference only: mm/[in].
FSS005WNGX, FSS010WNGX, FSS015WNGX, FSS020WNGX
50044164
Suggested Land Pattern
1,90
[0.074]
1,60
[0.063]
3,80
[0.150]
11,40
[0.449]
15,25
[0.600]
Force Sensing Range
0 N to 5 N
0 N to 10 N
0 N to 15 N
0 N to 20 N
Ball (Actuator) Height
0.375 ±0.10 mm [0.0148 ±0.0039 in]
0.452 ±0.10 mm [0. 0178 ±0.0039 in]
0.504 ±0.10 mm [0.01984 ±0.0039 in]
0.562 ±0.10 mm [0.0221 ±0.0039 in]
Figure 3. Packaging Dimensions (For reference only.)
Short Tube: 43,9 mm
Tape and Reel (mm)
[1.73 in] long, 5 units/tube
Standard Tube: 584 mm
[22.99 in] long, 100 units/
tube
3 Honeywell Sensing and Control
1. Pocket position
relative to sprocket
hole measured as
true position of
pocket, not pocket
hole.
2. 10 sprocket hole
pitch cumulative
tolerance is ±0.2
mm.
Camber is in
compliance with EIA
481.
Ao and Bo are
calculated on a
plane at a distance
“R” above the
bottom of the
pocket.
FSS-SMT Series Low Profile Force Sensor
WARNING
PERSONAL INJURY
DO NOT USE these products as safety or emergency
stop devices or in any other application where failure of
the product could result in personal injury.
Failure to comply with these instructions could result in
death or serious injury.
WARRANTY/REMEDY
Honeywell warrants goods of its manufacture as being free of
defective materials and faulty workmanship. Honeywell’s
standard product warranty applies unless agreed to otherwise
by Honeywell in writing; please refer to your order
acknowledgement or consult your local sales office for specific
warranty details. If warranted goods are returned to Honeywell
during the period of coverage, Honeywell will repair or replace,
at its option, without charge those items it finds defective. The
foregoing is buyer’s sole remedy and is in lieu of all other
warranties, expressed or implied, including those of
merchantability and fitness for a particular purpose. In no
event shall Honeywell be liable for consequential, special,
or indirect damages.
E-mail: info.sc@honeywell.com
Internet: sensing.honeywell.com
Phone and Fax:
Asia Pacific
+65 6355-2828
+65 6445-3033 Fax
Europe
+44 (0) 1698 481481
+44 (0) 1698 481676 Fax
Latin America
+1-305-805-8188
+1-305-883-8257 Fax
USA/Canada
+1-800-537-6945
+1-815-235-6847
+1-815-235-6545 Fax
Specifications may change without notice. The information we
supply is believed to be accurate and reliable as of this printing.
However, we assume no responsibility for its use.
Sensing and Control
Honeywell
1985 Douglas Drive North
sensing.honeywell.com
50044164
SALES AND SERVICE
Honeywell serves its customers through a worldwide network
of sales offices, representatives and distributors. For
application assistance, current specifications, pricing or name
of the nearest Authorized Distributor, contact your local sales
office or:
While we provide application assistance personally, through
our literature and the Honeywell web site, it is up to the
customer to determine the suitability of the product in the
application.
Golden Valley, MN 55422
Rev. C
50044164 Rev.C-EN
April 2014
Copyright © 2014 Honeywell International Inc. All rights reserved.
