installation instructions
advertisement

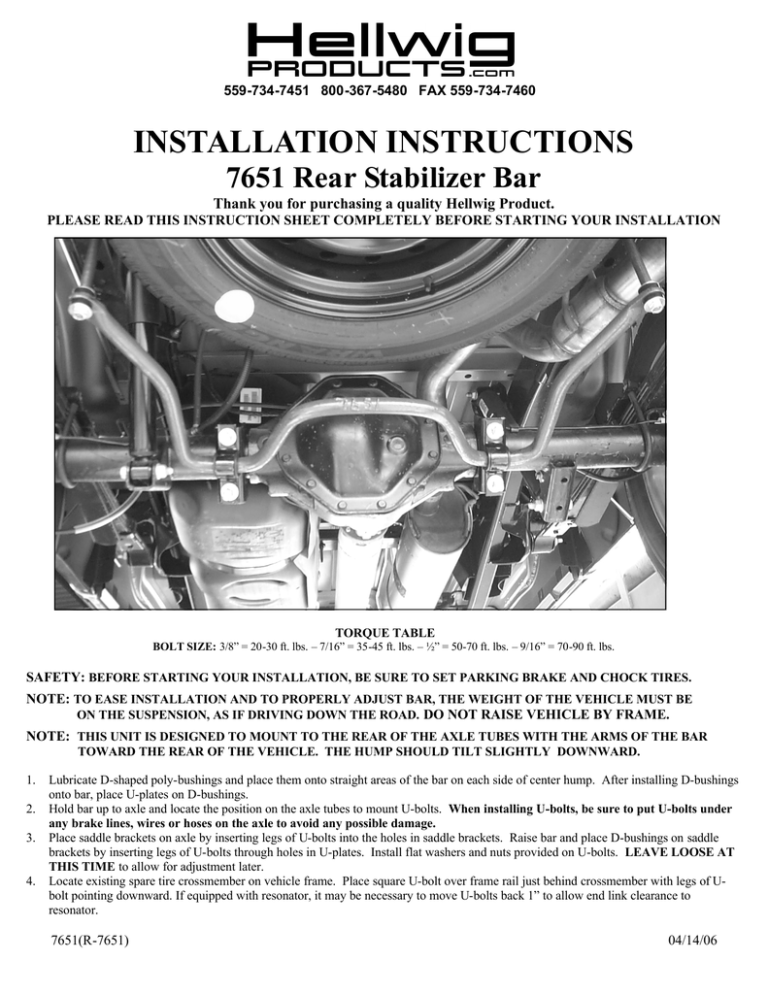
559-734-7451 800-367-5480 FAX 559-734-7460 INSTALLATION INSTRUCTIONS 7651 Rear Stabilizer Bar Thank you for purchasing a quality Hellwig Product. PLEASE READ THIS INSTRUCTION SHEET COMPLETELY BEFORE STARTING YOUR INSTALLATION TORQUE TABLE BOLT SIZE: 3/8” = 20-30 ft. lbs. – 7/16” = 35-45 ft. lbs. – ½” = 50-70 ft. lbs. – 9/16” = 70-90 ft. lbs. SAFETY: BEFORE STARTING YOUR INSTALLATION, BE SURE TO SET PARKING BRAKE AND CHOCK TIRES. NOTE: TO EASE INSTALLATION AND TO PROPERLY ADJUST BAR, THE WEIGHT OF THE VEHICLE MUST BE ON THE SUSPENSION, AS IF DRIVING DOWN THE ROAD. DO NOT RAISE VEHICLE BY FRAME. NOTE: THIS UNIT IS DESIGNED TO MOUNT TO THE REAR OF THE AXLE TUBES WITH THE ARMS OF THE BAR TOWARD THE REAR OF THE VEHICLE. THE HUMP SHOULD TILT SLIGHTLY DOWNWARD. 1. 2. 3. 4. Lubricate D-shaped poly-bushings and place them onto straight areas of the bar on each side of center hump. After installing D-bushings onto bar, place U-plates on D-bushings. Hold bar up to axle and locate the position on the axle tubes to mount U-bolts. When installing U-bolts, be sure to put U-bolts under any brake lines, wires or hoses on the axle to avoid any possible damage. Place saddle brackets on axle by inserting legs of U-bolts into the holes in saddle brackets. Raise bar and place D-bushings on saddle brackets by inserting legs of U-bolts through holes in U-plates. Install flat washers and nuts provided on U-bolts. LEAVE LOOSE AT THIS TIME to allow for adjustment later. Locate existing spare tire crossmember on vehicle frame. Place square U-bolt over frame rail just behind crossmember with legs of Ubolt pointing downward. If equipped with resonator, it may be necessary to move U-bolts back 1” to allow end link clearance to resonator. 7651(R-7651) 04/14/06 559-734-7451 800-367-5480 FAX 559-734-7460 5. Insert legs of U-bolt into slotted holes of the 3-hole plate. Install 3-hole plate with third hole inboard of frame rail and toward front of vehicle. The welded spacer tab on the 3-hole plate must contact the bottom of the frame. When installed properly, the 3-hole plate will contact the bottom of the crossmember with the welded tab contacting the frame rail. Install washers and nuts provided. LEAVE LOOSE for adjustment later. On some models, the rear portion of the crossmember does not extend under the frame causing the plate to rest at an angle due to the spacer tab. On these models, flip the plates over so that the spacer tab is exposed and swap the plates side to side to install as shown in photo. 6. Install spacer tube on 7/16” X 12” threaded rod. Place a washer and poly bushing on each end of spacer tube and insert end of rod through end-link hole in 3-hole plate. Then install poly bushing, washer and locknut on each end of rod as shown in picture. 7. With sway bar loosely mounted, work bar back and forth in D-shaped poly bushing to center bar. Tighten frame U-bolts to the torque spec in torque table. 8. Tighten end link nuts until poly bushings start to bulge slightly. DO NOT OVERTIGHTEN 9. Tighten axle U-bolts to 50 ft-lb. Place second nut on U-bolt and tighten against primary nut to lock in place. 10. Recheck your installation, looking for clearance on any undercarriage components, such as gas lines, exhaust pipes, brake lines, wiring, etc. 11. Drive vehicle for a few miles, then recheck for position and tightness, readjust and retorque as needed. Then recheck periodically thereafter. ATTENTION INSTALLER: PLEASE MAKE SURE CUSTOMER RECEIVES THIS INSTRUCTION SHEET, ALL IMPORTANT NOTE CARDS, WARNING CARDS AND THE WARRANTY FORM 7651(R-7651) 04/14/06 559-734-7451 800-367-5480 FAX 559-734-7460 PARTS LIST RSB # 7651 PART # QTY 20217651 1 1-1/8” SWAY BAR 20800663 1 LH FRAME BRACKET 20800664 1 RH FRAME BRACKET 20800378 2 U-PLATE 111000486 2 1-1/8” POLY BUSHING 118000651 2 1/2” X 3” X 7-3/8” SQUARE U-BOLT 10090312 2 7/16” X 12” END LINK 20800871 2 SADDLE BRACKET 118020366 2 1/2” X 3-5/8” X 5” ROUND U-BOLT 20800224 2 END LINK SPACER 125030336 1 SMALL PARTS BAG # BG-336 111000389 8 END LINK BUSHING 125000651 1 SMALL PARTS BAG # BG-651 102520043 8 1/2” FLAT WASHER 105521044 8 1/2” HEX NUT 107521044 4 1/2” LOCK NUT 107401042 4 7/16” LOCK NUT 102420041 8 7/16” FLAT WASHER 135007651 1 INSTRUCTION SHEET R-7651 7651(R-7651) DESCRIPTION 03/23/04


