Four-Row Pinpoint Seeder
Assembly and Use
955 Benton Ave., Winslow, ME 04901 Phone: 1-877-564-6697 Fax: 1-800-738-6314
Email: service@johnnyseeds.com Web Site: Johnnyseeds.com
Materials Included:
Seeder body
Two wheels
Shaft
Oiled ashwood handle
Self-tapping #4 x ½-inch round-head
woodscrew
Additional Materials:
#1 Phillips screwdriver
Round-jaw pliers
ASSEMBLY INSTRUCTIONS
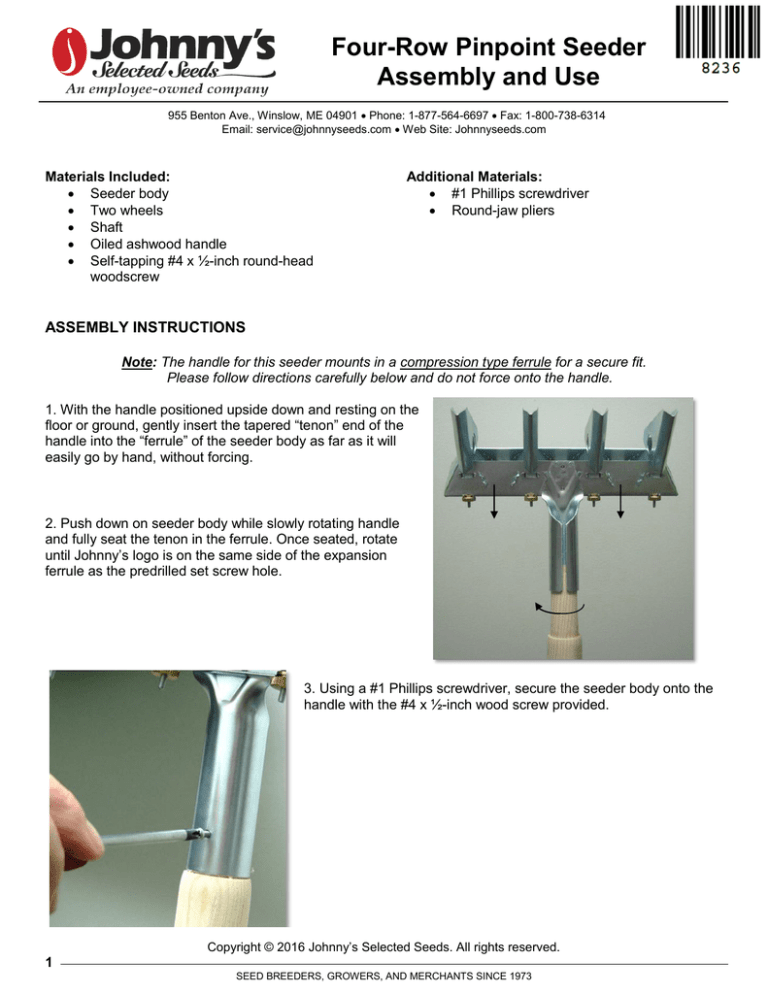
Note: The handle for this seeder mounts in a compression type ferrule for a secure fit.
Please follow directions carefully below and do not force onto the handle.
1. With the handle positioned upside down and resting on the
floor or ground, gently insert the tapered “tenon” end of the
handle into the “ferrule” of the seeder body as far as it will
easily go by hand, without forcing.
2. Push down on seeder body while slowly rotating handle
and fully seat the tenon in the ferrule. Once seated, rotate
until Johnny’s logo is on the same side of the expansion
ferrule as the predrilled set screw hole.
3. Using a #1 Phillips screwdriver, secure the seeder body onto the
handle with the #4 x ½-inch wood screw provided.
Copyright © 2016 Johnny’s Selected Seeds. All rights reserved.
1
SEED BREEDERS, GROWERS, AND MERCHANTS SINCE 1973
4. Somewhat forcefully, insert seeder shaft into the ferrule of one
wheel at a slight angle as shown to the right, so that the
compression ferrule expands to receive the shaft.
5. Slide the shaft into the seeder body.
6. Repeat step 4 to install the second wheel onto the opposite end
of the shaft.
7. For proper operation, the wheel ferrules must grip the
shaft firmly without slippage. Also, a slight gap between the
wheel ferrules and the body of the seeder must be present
so the wheels and axle will turn freely without friction.
If wheel ferrules do not grip tightly enough, they may be
“tuned” by gently compressing with a pair of round-jaw pliers
until the ferrule hole becomes slightly smaller than the shaft.
Be careful to not over-compress.
8. Adjust as described below.
Using the Four-Row Pinpoint Seeder – One Grower’s Experience, by Eliot Coleman
These are extremely accurate and precise seeders. They are tools; however, not machines. The effectiveness
of a tool depends on the care taken by the tool user. Here are some suggestions from my experience.
I store the seeders in a closet at my house. I do that not only to keep them dry and prevent rust, but also
because I want them dry and clean when I need to use them. If the seeder surfaces are wet, seeds will stick,
and the seeder won’t work properly.
The seeder has one axle with a choice of four hole sizes. The axle should be positioned so the desired seed
hole size is centered under the hopper. When you slide the wheels back on to hold the axle in place, leave a
slight gap between them and the body of the seeder so the wheels and axle will turn easily without friction.
Spend some time before sowing any seed to determine the ideal hole size and brush setting. I use a letter
code to identify the hole sizes, A to D with A being the smallest hole and D being the largest. Another letter
code, T – tight, N – normal, L – loose identifies the brush setting. For example, I fill one hopper and turn the
wheel one turn a number of times, counting how many seeds to drop per turn. Since the rolling circumference
of the wheel is about 9 inches, and there are 9 holes for each turn of the axle for sizes A, B and C, an ideal
match will drop one seed per inch. When you find what works best, write it on the seed packet and/or in a
notebook.
Copyright © 2016 Johnny’s Selected Seeds. All rights reserved.
2
SEED BREEDERS, GROWERS, AND MERCHANTS SINCE 1973
The table below gives some suggested hole sizes; some experimentation will be necessary to determine the
correct hole size for each seed lot. The designation “heavy” indicates the hole is too big for ideal sowing. You
will want to determine the brush setting yourself based on the specific cultivar.
HOLE SIZE GUIDELINES:
A (small) - 9 holes; B (med) - 9 holes; C (large) - 9 holes; D (largest) - 7 holes
Seed spacing: A thru C = 1”; D = 1-1/4” between drops
Arugula
A
Minutina
A (heavy)
Carrot
C (pelleted), A (raw)
Radicchio
A
Claytonia
A (heavy)
Radish
C
Endive
A
Scallion
B
Lettuce
C (pelleted), A (raw)
Spinach
D
Mache
A or B (@ 2 seeds per)
Sylvetta
A (heavy)
These seeders are precision tools and should be used in finely
prepared soil. Rocks, chunks of not yet decomposed manure and
compost, or stringy weed and root residues will give you fits. The
extra production per square foot that you will gain with precision
seeding more than justifies the extra care in seed bed preparation.
This seeder is designed to be pulled. I use a bed system and walk
either forward or backward down the path next to the bed I am
sowing in order to watch the seeder operation as I pull it along. If for
some reason the wheels are not turning and/or the seeds are not
dropping, I want to know immediately so I can fix whatever is amiss.
If there is an occasional rock or clump of compost that might knock
the seeder off line or gum up the furrow openers, I can stop and
remove it.
The seed beds can’t be too “fluffy” and need to be firmed. Freshly
rototilled ground needs to be lightly firmed to ensure proper
operation of the seeder.
The depth of sowing is adjusted by changing the angle of the
handle to the ground. Lowering the handle plants the seeds more
deeply; raising the handle plants seeds more shallowly. With
practice this becomes second nature, but you need to think about
whether a new depth is required each time you change to a
different seed.
The furrow openers are designed so the soil falls back quickly following the seed drop. Irrigation after sowing
will wash slightly more soil over the seeds if you wish. Or, you can tamp the bed lightly with the back of a rake
to firm the seeds. I use a lightweight mesh roller for firming after sowing because it also creates a smooth soil
surface which facilitates the close cutting of mesclun salad crops at harvest.
The tooth marks left by the seeder wheels are useful for lining up the next row. There is 2¼ inch spacing
between each row. The wheel tooth marks are 2¼ inches beyond the outside rows. Thus when sowing
multiple sets of four rows, the wheel teeth will run directly over a previously sown row when you space the
next four rows at an even spacing from the previous four. I have never found that to be a problem. This
seeder will plant 12 rows on a 30 inch wide bed and 20 on a 48 inch bed. The 2¼ inch row spacing may seem
close but it is common for intensive planting in European greenhouses, not only of baby leaf salad crops but
also of radishes at 2 square inch per plant and carrots at four square inches.
Emptying the remaining seeds from the hopper is simple. I tip the seeds from all four hoppers into a 9 inch
wide baking pan and then I can pour them back into the seed packet. If you use the seeder with the brushes
set down tightly, return them to a loose setting before storing the seeder so they will not become deformed.
Copyright © 2016 Johnny’s Selected Seeds. All rights reserved.
3
SEED BREEDERS, GROWERS, AND MERCHANTS SINCE 1973
REPLACEMENT PARTS:
8
7
6.1
2
3
4
5
1
1.
2.
3.
4.
5.
6.
7.
8.
9.
9285.400
9284.200
9285.100
9285.300
9285.200
9285.700
9281
9861
6
Standard Shaft
Wheel (and attached Wheel Ferrule)
9
Brush
Knurl Brush Adjustment Nut
Brush Clamp
Seeder Body Frame (and 6.1 Exp. Ferrule)
Set Screw (#4 x ½-inch round head)
Oiled Ashwood Handle
Extended Range Shaft (optional) – 2 smaller and 2 larger seed hole sizes
extend the seeder’s range of operation.
REV 04/10/2016 RC, MN
Copyright © 2016 Johnny’s Selected Seeds. All rights reserved.
4
SEED BREEDERS, GROWERS, AND MERCHANTS SINCE 1973


