®
PowerMatic Door Control Accessory
Installation and Wiring Instructions
80-9366-1960-020 (01-09)
Model 660 Without handicapped Symbol
Model 661 With Handicapped Symbol
Push Plate Activated Switches
SWITCH INFORMATION
• MOMENTARY CONTACT (N.O.) CONTACTS USED
• RATED 15 AMPS @ 250 VOLTS
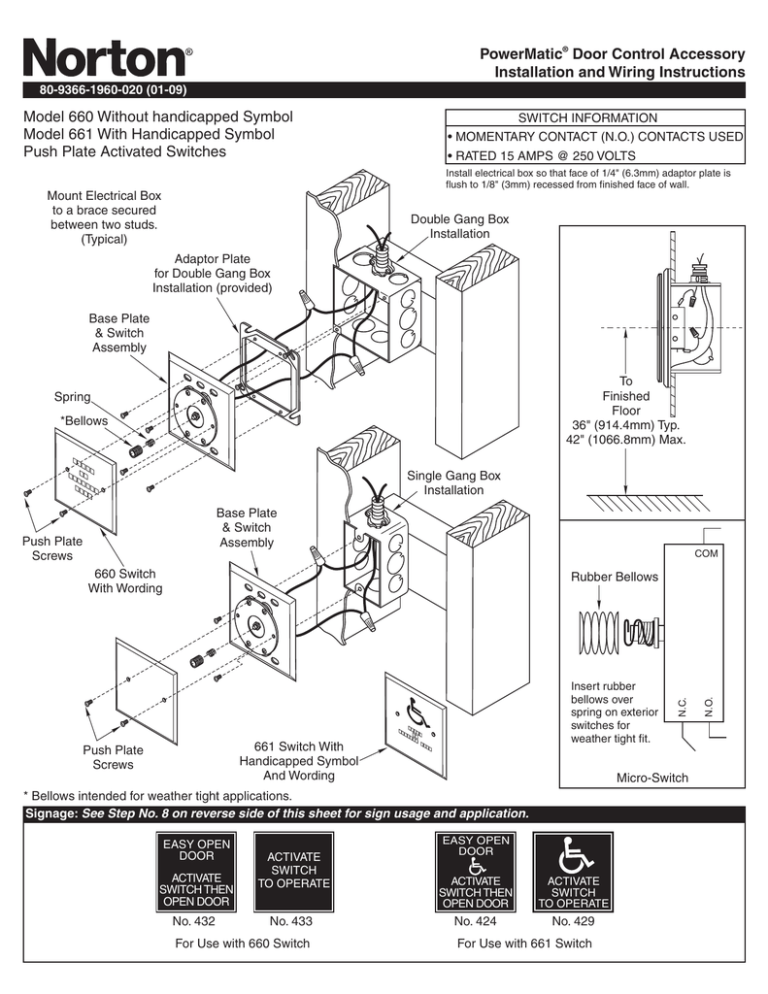
Install electrical box so that face of 1/4" (6.3mm) adaptor plate is
flush to 1/8" (3mm) recessed from finished face of wall.
Mount Electrical Box
to a brace secured
between two studs.
(Typical)
Double Gang Box
Installation
Adaptor Plate
for Double Gang Box
Installation (provided)
Base Plate
& Switch
Assembly
To
Finished
Floor
36" (914.4mm) Typ.
42" (1066.8mm) Max.
Spring
*Bellows
PR
ES
S
OP TO
ER
DO ATE
OR
Single Gang Box
Installation
Base Plate
& Switch
Assembly
Push Plate
Screws
COM
660 Switch
With Wording
PR
E
ER TOSS
AT
E
DO
OP
661 Switch With
Handicapped Symbol
And Wording
Push Plate
Screws
OR
Micro-Switch
* Bellows intended for weather tight applications.
Signage: See Step No. 8 on reverse side of this sheet for sign usage and application.
EASY OPEN
DOOR
ACTIVATE
SWITCH THEN
OPEN DOOR
No. 432
ACTIVATE
SWITCH
TO OPERATE
No. 433
For Use with 660 Switch
EASY OPEN
DOOR
ACTIVATE
SWITCH THEN
OPEN DOOR
ACTIVATE
SWITCH
TO OPERATE
No. 424
No. 429
For Use with 661 Switch
N.O.
Insert rubber
bellows over
spring on exterior
switches for
weather tight fit.
N.C.
Rubber Bellows
80-9366-1960-020 (01-09)
COMPONENTS
2- Wire Nuts (not supplied)
2- Face Plate Mounting Screws (assembled)
1- Push Plate (assembled)
1- Base Plate and Switch Assembly
2- Spade Connectors
4- 6-32 Base Plate Attaching Screws
1- Adaptor Plate for 2 Gang Electrical Box
1- Two Gang Electrical Box (with 2 adaptor plate fastening screws)
2- Signs (Wall or Door)
1- Sign 429 (661) or 433 (660): For use when unit is
configured for Power Operator Function (POR)
1- Sign 424 (661) or 432 (660): For use when unit is
configured for Power Assist
DETERMINE TYPE OF SWITCH APPLICATION
Flush Wall Mount:
- Two Gang Electrical Box Provided
- Other Two Gang Electrical Box (by others) with a vertical
distance of 3-1/4" (82.5mm) on center between mounting
holes for Base Plate and Switch Assembly, or 4-3/4"
(120.6mm) diagonal distance on center for use of Adaptor
Plate (provided).
Important:
120VAC POWER INPUT to PowerMatic circuit
board must be turned OFF while making switch
connections to the circuit boards terminal strip.
!
Surface Wall Mount:
- Interior use, Two Gang "Wiremold" Electrical Box (by others).
- Exterior use, Two Gang "Bell" Electrical Box (by others).
WIRING INFORMATION
7 8
JP4
CO2 NC2
!
1
N.O. (+) AUX. 2
COM (-) GND
SECONDARY
N.O. (+) AUX. 2
COM (-) GND
PRIMARY
COM (-) GND
N.O. (+) AUX. 1
2. Remove (2) push plate mounting screws and set push plate
aside.
3. Fasten adaptor plate to double gang box using (2) screws
provided with gang box. †
5. Cut (2) 16AWG switch wires approximately 5"-6" (127-152.4mm)
in length. Strip both ends of wires. Crimp spade connectors on
one end of each wire. Slide (1) spade connector onto the NO
spade and (1) spade connector onto the COM spade of switch
assembly. Make final connection of switch wire to unit wiring
with wire nuts.
!
Caution: These are dry contact leads. No power
permitted or damage to PC board will occur.
6. Fasten base plate and switch assembly to adapter plate with (4)
6-32 screws provided. †
7. Install bellows over switch assembly spring (for weather tight
applications). Reassemble push plate to base plate and switch
assembly with (2) flat head machine screws.
8. Install the correct self-adhesive sign(s) for high visibility on the
door surface or wall surface.
• Surface to which sign is applied should be clean, hard, flat and
nonporous.
• Peel off backing to expose surface adhesive and apply sign to
appropriate door or wall surface.
661 Wall Switch:
Sign 429 for use when unit is configured for Power Operator
Function (POR) Sign 424 for use when unit is configured for
Power Assist Function (PAS)
JP1
4. Route (2) wires from electrical box to JP1 terminal on main
board of operator. Strip ends of wires on both ends 1/4" (6mm).
See wiring information at right.
NOTES
1. Any number of wall switches in parallel with terminals on
PowerMatic unit's printed circuit board.
• Use terminals JP1-14 and JP1-13 on PowerMatic circuit board
for connection of a single switch or a set of switches that are
run in parallel.
• Use terminals JP1-3 and JP1-4 or JP1-10 and JP1-11 on
PowerMatic circuit board for connection of a second switch or
second set of switches that are run in parallel.
2. Vestibule Function - Refer to Wiring Instructions 80-9369-0901020 packed with PowerMatic unit for details of this function.
3. PowerMatic instruction sheets available for download at:
www.nortondoorcontrols.com
† Installation using SINGLE gang electrical box:
Skip step 3. The adaptor plate will not be used. In step 6,
CONNECT base plate and switch assembly directly to the
single gang electrical box with only (2) 6-32 screws provided
after completing steps 4 and 5.
660 Wall Switch:
Sign 433 for use when unit is configured for Power Operator
Function (POR) Sign 432 for use when unit is configured for
Power Assist Function (PAS)
(See page 1 of PowerMatic Operator's Installation Instructions for function definition)
Norton ® is a registered trademark of Yale Security Inc., an ASSA ABLOY Group company.
Copyright © 2006, 2009 Yale Security Inc., an ASSA ABLOY Group company. All rights reserved.
Reproduction in whole or in part without the express written permission of Yale Security Inc. is prohibited.
020
SECONDARY
C12+ C9 +
1. Install electrical box (at a safe distance from door swing if
installed on the pull side of the door). See reverse side of this
sheet for height location from finished floor.
1 2 3 4 5 6 7 8
9 10 11 12 13 14
0/0 RES1 AUX2 GND INV OUTV GND RFT GND AUX2 GND PDET GND AUX1
INSTALLATION INSTRUCTIONS
ASSA ABLOY
3000 Highway 74 East • Monroe, NC 28112
Tel: (877)-974-2255 • Fax: (800)-338-0965
www.nor tondoorcontrols.com


