Getting Started with Milestones Professional:
Explore the workspace
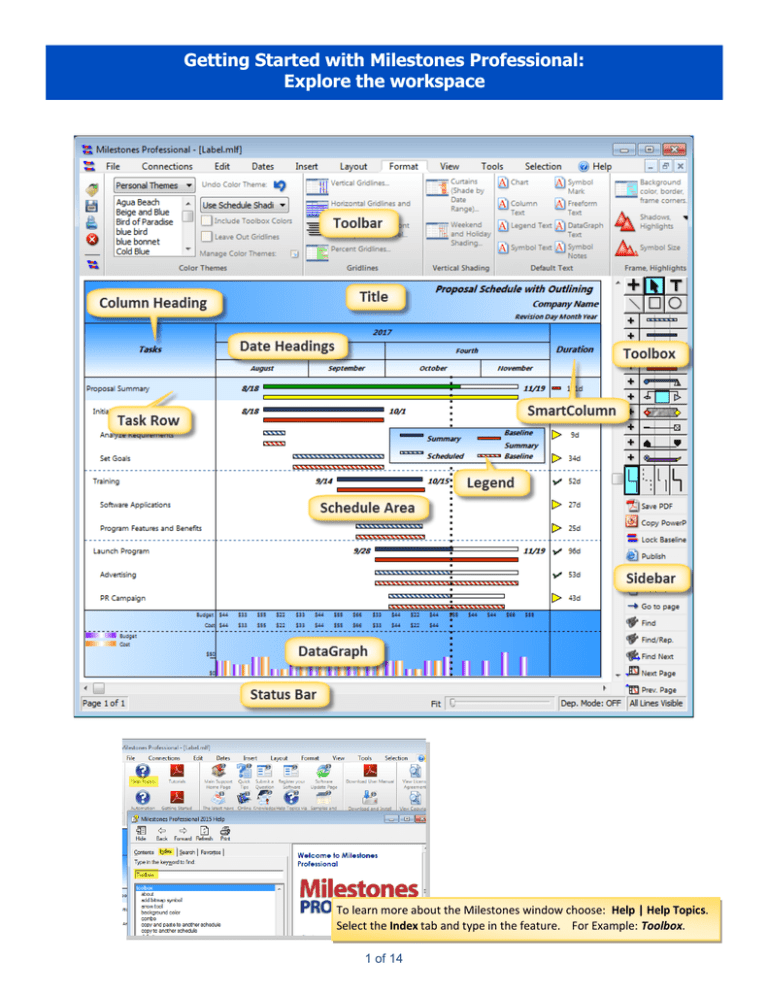
To learn more about the Milestones window choose: Help | Help Topics.
Select the Index tab and type in the feature. For Example: Toolbox.
1 of 14
Getting Started with Milestones Professional:
Set the date range and more with the Dates tab
CHOOSE THE DATES TAB TO:
1. Set the schedule’s Date Range.
6. Have Symbols & Bars Fill to Status Date.
2. Set the Current Date.
7. Choose Four-Digit Years.
3. Display the Current Date.
4. Display the Current Date Line.
8. Set the Symbol Date Format.
9. Set the schedule’s Date Headings.
5. Display the Status Line.
Choose the
for a feature.
Full Dialog button to find more options
Make sure to press the
changes to the schedule.
2 of 14
APPLY button to apply
Getting Started with Milestones Professional:
Set the chart size and more with the Layout Tab
CHOOSE THE LAYOUT TAB TO:
1. Set the Chart Size.
6. Set the three possible DataGraph heights.
2. Set the Margins.
7. Set up Summary Bars.
3. Set the Rows per Page.
8. Set up Baseline.
4. Set the Orientation.
9. Set Duration options.
5. Set the Legend Height.
10. Change the global Symbol Size.
Choose the
Full Dialog button to find more options for a feature.
Make sure to press
the APPLY button to apply
any settings which have been made.
To learn more about a feature choose: Help | Help Topics |
Select the Index tab and type in the feature. For Example Baseline.
3 of 14
Getting Started with Milestones Professional:
Add a title, legend, page and more with the Insert tab
CHOOSE THE INSERT TAB TO:
1. Insert a Chart Title.
8. Insert a Legend Entry.
2. Insert a Page.
9. Insert a Vertical Link.
3. Insert a Page Break.
10. Insert a Recurring Tasks.
4. Insert a Task Row.
11. Insert or Remove Baseline.
5. Insert more Rows per Page
12. Insert a DataGraph.
6. Insert a New Column.
13. Insert a ValueSet.
7. Insert a Picture from File
4 of 14
The Insert tab includes links to key components
of a schedule. Use the Insert tab to add tasks,
columns, chart title, and more.
Getting Started with Milestones Professional:
Apply a color theme, add grid lines and more with the Format tab
CHOOSE THE FORMAT TAB TO:
1. Apply a Color Theme.
5. Add Holiday Shading.
9. Change the global Symbol Size.
2. Add Vertical Gridlines.
6. Change Default Text.
10. Set International Number and Currency.
3. Add Horizontal Gridlines.
7. Change Background Color, Border,
and Frame Corners.
11. Set Gridline Properties for Outline Levels
4. Add Curtains.
8. Clear Shadows, Highlights.
11. Assign features to tasks based on their outline level using the
option: GRIDLINE, SHADING, FONT SIZES BY OUTLINE LEVEL.
5 of 14
Getting Started with Milestones Professional:
The ToolBox
Arrow Tool - Use to select, change or move
objects on the schedule.
Plus Tool - Use to add
Text Tool - Use to add text
information to the schedule.
anywhere on the schedule.
Small Plus - Select to add the
Drawing Tools - Use to draw lines,
corresponding symbol, bar, symbol combination to the schedule.
circles or squares.
Horizontal Bar - select to add between
symbols on the schedule.
Symbol - select to add to
schedule.
Right click the TOOLBOX to
change its characteristics.
Set up a toolbox to your standards . Then copy and
paste it to another schedule. Both schedules must
be opened in the same instance of Milestones.
Vertical Link - select to add a
Set up a row in the toolbox that then can be copied
and pasted to another row in the toolbox or another schedule’s toolbox. Both schedules must be
opened in the same instance of Milestones.
link between symbols on different task rows, to show a dependency.
Double click any Symbol, Horizontal Bar or Vertical Link in the toolbox to change its characteristics: (Shape, Type, Size, Color, Markings, Position, Text and Date display.)
6 of 14
Getting Started with Milestones Professional:
Add information to the schedule
Add a single Symbol
1. In the toolbox, select the Large Plus tool.
2. Select a symbol in the toolbox.
3. Move the cursor to the schedule area.
4. Click and drag horizontally.
5. Let go of the mouse button at the selected symbol date.
To see the date next to the cursor, Tooltips in the Schedule area need to be
turned on. Tool | Help| uncheck No Tooltips in the Schedule area.
Add a Horizontal Bar with a start and end symbol
1. In the toolbox, select the Small Plus at
the beginning of a row.
2. The entire row in the toolbox will be
highlighted in blue.
3. Move the cursor to the schedule area.
4. Click on the start date and drag horizontally.
5. Release the mouse button on the end date.
Add a Horizontal Bar
1. In the toolbox, select the Small Plus at
the beginning of a row with null symbols
and a horizontal bar.
2. The entire row in the toolbox will be
highlighted in blue.
3. Move the cursor to the schedule area.
4. Click on the start date and drag horizontally.
5. Release the mouse button on the end date.
To set up a horizontal bar in the toolbox first set the symbols on the right and left side of a toolbox row to Symbol Shape 28
(null symbol). For the bar, use Bar Type 2, 5 or 7.
Add a Bar and Symbol to a symbol already on the schedule
1. In the toolbox, select the Large Plus
tool.
2. Select a symbol in the toolbox.
3. Select a connector in the toolbox.
4. Move the cursor to the schedule area and
click on the already existing symbol.
5. Continue to hold the mouse button and
drag horizontally.
6. Let go of the mouse button at the desired date.
7 of 14
Getting Started with Milestones Professional:
Add information to the schedule
Add a Horizontal Bar between two symbols on the schedule
1. In the toolbox, select the Large Plus tool.
2. In the schedule area, click once on the Symbol
from which you want the horizontal bar to
begin.
3. In the toolbox, click once on a Horizontal Bar.
4. In the schedule area, click once on the Symbol
which completes the horizontal link.
Add a Vertical Link between symbols on the scheduled
1. In the toolbox, select the large Plus tool.
2. In the schedule area, click once on the
symbol from which you want the vertical
link to begin.
3. In the toolbox, click once on the Vertical
Link to be used.
4. In the schedule area, click once on the symbol which completes the
vertical link. (Must be on a lower or higher task row)
Add Column Text (1)
Add Symbol Text (2)
1. In the toolbox, select the Text
tool.
1. With the arrow tool, click the symbol on the schedule. The toolbar will
change to the Selection tab.
2. Click in the column on the schedule and start to type.
2. Choose the Text tab.
3. In the Text section, enter up to 3 lines of text in the Text Line 1, 2, or 3.
4. Click the APPLY TEXT CHANGES button.
5. In the TEXT PLACEMENT section, select
the positioning of the text.
Add Symbol Notes (4)
Add Freeform Text (3)
1. In the toolbox, select the Text tool:
2. Click anywhere on the schedule and
start to type.
3. Select the freeform text with the
Arrow tool. The toolbar changes
to the Selection tab.
4. In the toolbar make changes to the
freeform text’s attributes.
1. With the arrow tool, click the symbol
on the schedule. The toolbar will
change to the Selection tab.
2. Choose the Notes tab.
3. In the Symbol Note section, type in
your notes.
4. Click the Apply Text Changes button.
5. Select from the variety of formatting options.
6. Use the directional pad to reposition the symbol note or use the Arrow tool to
drag the symbol note on the schedule to a location.
8 of 14
Getting Started with Milestones Professional
Change information on the schedule
Change a Symbol on the schedule
1. In the toolbox, select the Arrow tool.
2. In the schedule area, click once on a Symbol that you want to change.
3. In the toolbox, click once on a different Symbol.
Using the shift key you can select
a group of symbols to change.
Change a Bar on the schedule
1. In the toolbox, select the Arrow tool.
2. In the schedule area, click once on the Symbol which begins the Horizontal Bar to
be changed.
3. In the toolbox, click once on a different Horizontal Bar.
Change a Vertical Link on the schedule
1. In the toolbox, select the Arrow tool.
2. In the schedule area, click once on the Symbol with the Vertical link that you want
to change.
3. In the toolbox, click once on a different vertical Link.
Change the properties of an individual Symbol on the schedule
1. Using the toolbox arrow tool, select the symbol.
2. The toolbar will change to the Selection tab for that
symbol.
3. Select the Text tab to change the text, size color font
attributes, date format and/or the position of the text
or date.
4. Select the Size/Color tab to change the symbol’s color,
size, vertical position on the task row.
5. Select the Summary/Mark tab to change the Symbol Mark and its color.
6. Select the Notes tab to add notes to the symbol and change the characteristics of the note.
7. Select the Vertical Links tab to override the vertical link’s color.
9 of 14
Getting Started with Milestones Professional:
Change information on the schedule
Override the color of a Bar on the schedule
1. Using the toolbox arrow tool, select the starting symbol of symbol, bar, symbol combination on the schedule. The toolbar will
change to the Selection tab for the starting symbol.
2. Select the Size/Color tab.
3. In the Override Symbol and Bars Colors section click on the rectangle box next to 1st Bar Color to display the color
palette.
4. Choose the new color.
Override the color and or line type of a Vertical Link on the schedule
1. Using the toolbox arrow tool, select the starting symbol of
the vertical link. The toolbar will change to the Selection
tab for the starting symbol.
2. Select the Vertical Links tab.
3. In the Vertical Links from the Current Symbol section click
on the rectangle box to display the color palette. Click the
down arrow to display the line pattern list for the
Link (1 through 5) to be changed.
4. Choose the new color and/or line pattern.
Change an existing Column’s type
1. In the toolbox, select the toolbox Arrow tool.
2. Click the column heading of the column you want to change. The toolbar will change to the Selection tab.
3. Click the Switch to Column icon.
4. In the Column Type and Format section choose the
down arrow next to the Properties button. Pick from
the available column types.
Move a Column
1. In the toolbox, select the Arrow tool.
2. Move the cursor to the top of the column heading's border. The cursor changes
to the Column Move cursor.
3. Click and drag to the new location, as shown by the Insertion cursor.
10 of 14
Getting Started with Milestones Professional:
Change information on the schedule
Shift all Schedule Dates by a number of days
1. On the toolbar, click the Dates tab.
2. In the Date Range Tools section click the Shift all task dates icon. The Shift all dates for Schedule
dialog box displays.
3. Enter the number of days. Choose Forward or Backward.
Hide/show all Symbol Dates and/or Symbol Text
1. On the toolbar, click the View tab.
2. In the Other section, click Override Symbol Text and Symbol Date Display.
Convert Symbol Text to Symbol Notes
1. On the Format tab choose Symbol Notes to first set up default symbol note
settings.
2. Choose the Tools tab. In the Other Tools section, choose Convert symbol Text
to Note Text...
3. Select symbols to convert.
4. Select how to convert.
11 of 14
Getting Started with Milestones Professional
Interface with other products using the Connections tab
CHOOSE THE CONNECTIONS TAB TO:
1. Copy Metafile (picture) to the Clipboard
Milestones is placed into another application as a picture.
2. Copy Schedule to the Clipboard
Milestones is placed into another application as a picture,
text or object (can be linked and will update when the
actual Milestone file is changed).
9. Copy all Pages to PowerPoint
Pictures of all pages of a schedule will be copied to a new
or existing PowerPoint document.
10. Copy PowerPoint Slides from Project
The Project to Milestones Wizard will open. A Milestones
schedule is generated based on wizard selections. It is
then copied to PowerPoint.
3. Create Report from Project
6. Save Custom Project Template
Pick this option to save a customized Milestones Professional schedule as a custom template and include it in the
import wizard. Learn more Help | Help Topics.
4. Create Report from Project Server
The Project to Milestones Wizard will open. A
Milestones Professional schedule will be created
using selections made in the wizard.
Learn more Help | Help Topics.
7. Manage Custom Project Templates
Choose this option to view and manage Custom Project
Templates. Learn more Help | Help Topics.
5. Refresh Previously Imported Project
Refresh a Milestones schedule from one or more Microsoft Project, Project Server or XML files.
If refreshing from multiple schedules, build a refresh list
first. Learn more Help | Help Topics.
8. Export to Project
Choose this option to create a Microsoft Project schedule
from a Milestones Professional schedule. Learn more Help
| Help Topics.
12 of 14
Getting Started with Milestones Professional
Interface with other products using the Connections tab.
14. Export Schedule to XML file
11. Import Outlook Tasks or Calendar
The Outlook information is imported into a set Milestones
templates which can be modified after the import.
Choose from a variety of export options.
15. Import Schedule to XML file
Generate a schedule from a Primavera saved XML:MS
Project schema file with the XML Project to Milestones
Import Wizard.
Choose from other XML import options.
12. Export Tasks to Outlook
Pick the column of information from your Milestones
schedule to import as the description for the dates that
will be placed into your Outlook Task List.
13. Internet Publishing Wizard
Choose to create schedule graphics and HTML pagesready for your web site.
If a schedule has links to other schedules or documents
then hotspots will be created. Also, any Milestones schedules which are linked will also be published as HTML.
If a schedule is outlined, then a set of HTML pages
called a “tiered hierarchy” can be created,
with multiple HTML pages for each outline level.
13 of 14
Getting Started with Milestones Professional
Work with files and more using the File tab
CHOOSE THE FILE TAB TO:
1. New
2. Wizard
New Empty Schedule : Choose
to create a new schedule with
the “default” template.
Clone Current Schedule: create
a new schedule from an existing
schedule.
The wizard will guideGuides you through setting
up a schedule using Step
by Step or a Predesigned
Template.
6. Save As
3. Open
Save as CHART to
save a schedule’s
dates, column entries and structure.
Choose to open an existing Chart, Sample
Chart, or Lesson Chart
(associated with the tutorials available on the Help
tab).
Choose to open a Template over currently
opened schedule. Standard templates have been
predesigned. Personal
Templates are ones you
design.
Open a Microsoft Project File to have the import wizard start
-up. See page 12 for information about the Project to Milestones Wizard.
Save as TEMPLATE
to save just the
structure of a
schedule. Templates do not include any dates or
column entries.
Save as PDF for easy sharing of a schedule.
Save as HTML to have the Internet Publishing Wizard startup. Learn more about the wizard under Help | Help Topics.
4. Open a Recently Used File
Choose from the list of
previously used files.
Edit the list by selecting
Edit this list.
This list also appears in
the Milestones Professional Startup Choices
dialog box.
7. Save As PDF
Save as PDF for easy sharing of
your schedule.
8. Import and Export options
5. Password
Apply up to a 20 character password to lock a file or to allow
the file to be opened as Read-Only without the password.
14 of 14
Choose from a variety of import and export options. Learn
more about these under Help | Help Topics.
Getting Started with Milestones Professional
Work with files and more using the File tab
11. Microsoft Project Refresh
9. Master Schedule
Refresh a file imported from, or tagged to, a Microsoft Project or Microsoft Project server file or files.
Build a refresh list for a Milestones files tagged to
multiple Microsoft Project or Microsoft Project Server files.
Learn more about importing from Microsoft Project
under Help | Help Topics.
Choose to combine multiple Milestones schedules.
10. Update Master Schedule, Linked Symbols
Choose Master Schedule to update a Master Schedule with
lower level schedules.
Symbols can be linked between Milestones charts. To have
linked symbols update choose Linked Symbols.
Learn more about master schedules and linked symbols
under Help | Help Topics.
12. Printing
Choose Printing Options to change the output size, print a specified date range, or exclude columns.
©Copyright KIDASA Software, Inc. 2015 All Rights Reserved 1114 Lost Creek Blvd., Suite 300, Austin, TX 78746 512-328-0167 sales@kidasa.com
15 of 14


