Application Note 1613
Author: Don LaFontaine
From SPICE Netlist to Allegro Design Sub-circuit
Introduction
Intersil provides a SPICE model for all our new precision
Opamps. The SPICE model netlist is included in the data sheet,
along with simulation vs characterization curves. Reference
application note AN1556 for details on the making of the
SPICE models.
This application note will walk the user through the process of
taking the netlist from the data sheet and creating a
sub-circuit to drop into a Cadence Allegro Design simulator.
Copying the SPICE Netlist
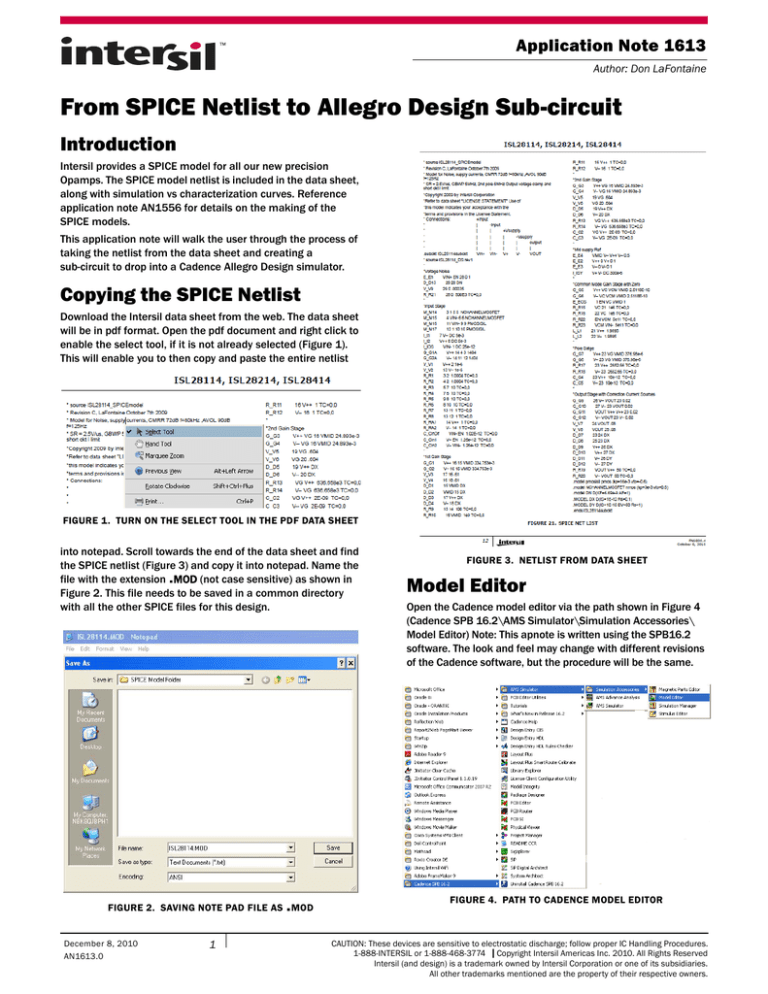
Download the Intersil data sheet from the web. The data sheet
will be in pdf format. Open the pdf document and right click to
enable the select tool, if it is not already selected (Figure 1).
This will enable you to then copy and paste the entire netlist
FIGURE 1. TURN ON THE SELECT TOOL IN THE PDF DATA SHEET
into notepad. Scroll towards the end of the data sheet and find
the SPICE netlist (Figure 3) and copy it into notepad. Name the
file with the extension .MOD (not case sensitive) as shown in
Figure 2. This file needs to be saved in a common directory
with all the other SPICE files for this design.
.
FIGURE 2. SAVING NOTE PAD FILE AS MOD
December 8, 2010
AN1613.0
1
FIGURE 3. NETLIST FROM DATA SHEET
Model Editor
Open the Cadence model editor via the path shown in Figure 4
(Cadence SPB 16.2\AMS Simulator\Simulation Accessories\
Model Editor) Note: This apnote is written using the SPB16.2
software. The look and feel may change with different revisions
of the Cadence software, but the procedure will be the same.
FIGURE 4. PATH TO CADENCE MODEL EDITOR
CAUTION: These devices are sensitive to electrostatic discharge; follow proper IC Handling Procedures.
1-888-INTERSIL or 1-888-468-3774 | Copyright Intersil Americas Inc. 2010. All Rights Reserved
Intersil (and design) is a trademark owned by Intersil Corporation or one of its subsidiaries.
All other trademarks mentioned are the property of their respective owners.
Application Note 1613
After selecting the Model Editor, the screen in Figure 5 will open
up. Select Capture and click DONE.
FIGURE 5. SELECT DESIGN ENTRY TOOL
Click on File in the tool bar and select New. Figure 6 will appear.
FIGURE 8. NETLIST LOADED INTO MODEL EDITOR
Click on File in the tool bar and select Save As. Then type the part
name as the file name in Figure 9 and click Save. The file with
the complete netlist is now saved as a .lib library file.
FIGURE 6. BEGINNING OF NEW MODEL
Click on Model in the tool bar and select Import. Then browse to
the folder where you put the .MOD file. Figure 7 will appear.
Select the desired .MOD file and click Open.
.
FIGURE 9. FILE SAVED AS lib
Click on File in the tool bar and select Export to Capture Part
Library. The Input Model Library path and the Output Part Library
path will automatically be loaded as shown in Figure 10.
.
FIGURE 7. SELECT MOD NETLIST
This will load the netlist into the Model editor tool as shown in
Figure 8.
FIGURE 10. LIBRARY CREATION
Verify that the files paths are the same with the only difference
being the .lib and .olb extensions.
2
AN1613.0
December 8, 2010
Application Note 1613
Click OK and verify no Error messages or Warning messages as
shown in Figure 11. Click OK.
When selecting your symbol, all that matters is the pin count. The
numbers assigned to the symbol pins can be changed later. Just
scroll through the list to find a symbol that matches a desired
pinout and pin count of your device. In this example, we selected
the TLC2201. Click Next.
FIGURE 11. SCHEMATIC TO CAPTURE TRANSLATOR CHECK
Click on File in the tool bar and select Import Wizard [Capture].
Like before, both path names will load automatically and should
have the same file paths with the only difference being the .lib
and .olb extensions as shown in Figure 12.
FIGURE 14. ASSOCIATE OP AMP SYMBOL WITH MODEL
Then click on the row under the Symbol Pin column to activate
pull down menu box under the symbol column. Now pick the
associated pin to match the Model Terminal function in the
model terminal column. As shown in Figure 15.
FIGURE 12. ASSOCIATE SYMBOL WITH SPICE MODEL
Click Next and the screen shown in Figure 13 will appear. This is
the screen in which we will associate the pins of our SPICE model
to the pins of the sub-circuit model. The symbol shown is a
generic 5 pin device. We want our Opamp symbol to look like an
Opamp. To do this click on the Replace Symbol button and select
from the list of symbols provided with the Cadence program. This
list is located at the following location on your C drive.
C:\Cadence\SPB.16.2\tools\capture\libary\OPAmp.olb
FIGURE 15. DEFINE PINS OF SYMBOL TO PINS OF MODEL
Repeat for all Model Terminal pins as shown in Figure 16.
FIGURE 13. REPLACE GENERIC SYMBOL
If the location of your Cadence software was loaded in a different
location, then search for Cadence\SPB.
3
FIGURE 16. ALL PINS ASSOCIATED TO SYMBOL
AN1613.0
December 8, 2010
Application Note 1613
Click Save Symbol and Figure 17 will appear. Verify no Error
messages or Warning messages. Click OK and then close the
Model Editor.
Figure 19 shows the Cadence Product Choices. Select Allegro
Design Entry CIS and Click OK.
FIGURE 19. CADENCE PRODUCT CHOICES
Click on File in the tool bar and select New, and then Project. The
screen shown in Figure 20 will appear. Type in the name of the
project and select Analog of Mixed A/D button. Browse to where
you saved the Netlist in the common directory (you must have all
the files located in the same directory) and click OK.
FIGURE 17. MODEL IMPORT WIZARD CHECK
Using the New Sub-circuit to Run
Simulations
Open the Cadence Software. Figure 18 shows the path to select
the Design Entry CIS.
FIGURE 20. SCREEN TO SETUP NEW PROJECT
The screen shown in Figure 21 will appear. The user can select to
base their new project on an existing project or start a new one.
Selecting to base upon an existing project will carry over the
existing project with all the simulation profiles and schematics.
This can be a real time saver if the new project is very similar to an
old project. In this example, we will chose to create a new project.
FIGURE 18. PATH TO DESIGN ENTRY CIS
FIGURE 21. CREATING A NEW PROJECT OPTIONS
4
AN1613.0
December 8, 2010
Application Note 1613
Click OK and the screen in Figure 22 will appear. Click on the
SCHEMATIC1 to open the Page tab and then Click on the page
tab to open the Schematic1 page. This is where the new
sub-circuit will be placed to run the simulations.
file path name being the location of the common directory. Click
the Apply button.
FIGURE 24. CONFIGURATION FILE TO ADD LIBRARY
FIGURE 22. SIMULATION SCHEMATIC PAGE
Now click the analysis tab and configure the simulation as shown
in Figure 25. The analysis selected for this example is an AC
Sweep/Noise. Other types of analysis are: Time Domain
(Transient), DC Sweep and Bias Point. Just click the down arrow
in the analysis type section to access the different Analysis
options. When done, click OK.
Before we can place the new sub-circuit model and run a
simulation, we need to set-up the simulation profile and add the
library. Click on PSpice in the tool bar and select New Simulation
Profile. Figure 23 will appear. Then type in any name that will
help you keep track of the different simulations. Then click
Create and Figure 24 will appear.
FIGURE 23. NAMING SIMULATION PROFILE
Click the Configuration Files tab. Then click on Library in the
Category field (highlighted in blue). Browse to where to saved the
Library file. Then click the Add to Design button. The Simulation
Settings screen should look like that shown in Figure 24 with the
FIGURE 25. SCREEN TO SET-UP THE ANALYSIS PROFILE
CONFIGURED
The user will need to add the Library .olb to the simulator. To do
this, click on Place in the tool bar and select Part. This will bring
up the part placement tool at the far right of the simulator as
shown in Figure 26.
Intersil Corporation reserves the right to make changes in circuit design, software and/or specifications at any time without notice. Accordingly, the reader is
cautioned to verify that the Application Note or Technical Brief is current before proceeding.
For information regarding Intersil Corporation and its products, see www.intersil.com
5
AN1613.0
December 8, 2010
Application Note 1613
To add the library, click on the tab where the arrow is pointing to
in Figure 26.
FIGURE 28. ADDING SUB-CIRCUIT TO SIMULATION SCHEMATIC
FIGURE 26. PART PLACEMENT TOOL
This will bring up the screen shown in Figure 27. Browse to where
you saved the Netlist in the common directory and click Open.
Figure 29 shows sub-circuit in a basic non-inverting application
circuit. The simulation result showing AVOL (green trace) and
Phase (pink) are shown in Figure 30.
FIGURE 29. SIMULATION SCHEMATIC
FIGURE 27. CONNECTING THE SYMBOL LIBRARY TO SIMULATOR
Now you are ready to add the sub-circuit to your simulation
schematic and start your simulations.
Adding the Sub-circuit to Your
Simulation Schematic
With the .lib file added to the simulation profile and the .olb file
added to the Part placement tool, your are now ready to place
the Opamp sub-circuit into your simulation schematic. Figure 28
shows the part placement tool after the .olb has been added to
it. Under the Libraries section, find the new .olb symbol you
added in the previous step (highlighted in blue). Double click on
the file to add the sub-circuit to the Part list section (also
highlighted in blue). Double click on the Part in the part list
section to add the sub-circuit to the simulation schematic.
6
FIGURE 30. AVOL GAIN/PHASE SIMULATION RESULTS
AN1613.0
December 8, 2010


