Surface Finish Definitions
advertisement
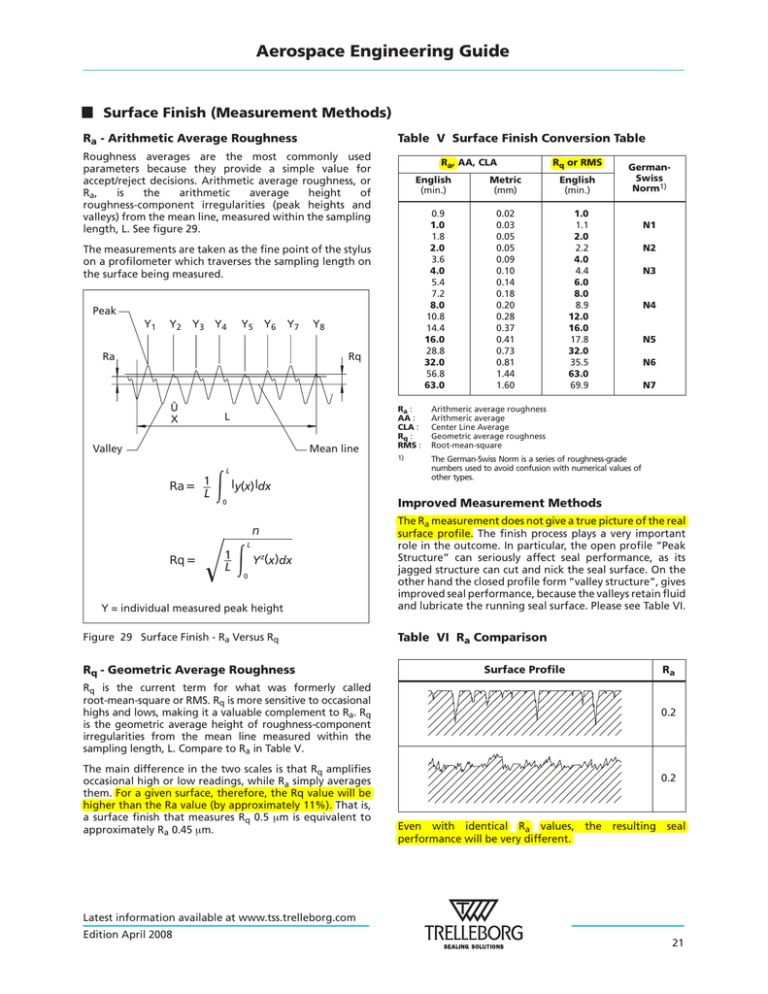
Aerospace Engineering Guide Surface Finish (Measurement Methods) Ra - Arithmetic Average Roughness Table V Surface Finish Conversion Table Roughness averages are the most commonly used parameters because they provide a simple value for accept/reject decisions. Arithmetic average roughness, or is the arithmetic average height of Ra, roughness-component irregularities (peak heights and valleys) from the mean line, measured within the sampling length, L. See figure 29. Ra, AA, CLA Metric (mm) English (min.) 0.9 1.0 1.8 2.0 3.6 4.0 5.4 7.2 8.0 10.8 14.4 16.0 28.8 32.0 56.8 63.0 0.02 0.03 0.05 0.05 0.09 0.10 0.14 0.18 0.20 0.28 0.37 0.41 0.73 0.81 1.44 1.60 1.0 1.1 2.0 2.2 4.0 4.4 6.0 8.0 8.9 12.0 16.0 17.8 32.0 35.5 63.0 69.9 The measurements are taken as the fine point of the stylus on a profilometer which traverses the sampling length on the surface being measured. Peak Y1 Y2 Y3 Y4 Y5 Y6 Y7 Ra Y8 Rq Û X L Valley Mean line L Ra = 1 L Rq = q |y(x) |dx GermanSwiss Norm1) N1 N2 N3 N4 N5 N6 N7 Ra : AA : CLA : Rq : RMS : Arithmeric average roughness Arithmeric average Center Line Average Geometric average roughness Root-mean-square 1) The German-Swiss Norm is a series of roughness-grade numbers used to avoid confusion with numerical values of other types. Improved Measurement Methods 0 ¯q 1 L Rq or RMS English (min.) n L Y z(x )dx 0 Y = individual measured peak height Figure 29 Surface Finish - Ra Versus Rq Rq - Geometric Average Roughness The Ra measurement does not give a true picture of the real surface profile. The finish process plays a very important role in the outcome. In particular, the open profile ”Peak Structure” can seriously affect seal performance, as its jagged structure can cut and nick the seal surface. On the other hand the closed profile form ”valley structure”, gives improved seal performance, because the valleys retain fluid and lubricate the running seal surface. Please see Table VI. Table VI Ra Comparison Surface Profile Ra Rq is the current term for what was formerly called root-mean-square or RMS. Rq is more sensitive to occasional highs and lows, making it a valuable complement to Ra. Rq is the geometric average height of roughness-component irregularities from the mean line measured within the sampling length, L. Compare to Ra in Table V. The main difference in the two scales is that Rq amplifies occasional high or low readings, while Ra simply averages them. For a given surface, therefore, the Rq value will be higher than the Ra value (by approximately 11%). That is, a surface finish that measures Rq 0.5 Pm is equivalent to approximately Ra 0.45 Pm. 0.2 0.2 Even with identical Ra values, performance will be very different. the resulting seal Latest information available at www.tss.trelleborg.com Edition April 2008 21 Aerospace Engineering Guide RPK An improved surface measurement method is described in the new ISO 13565-1 / -2 / -3, including the peak, valley and material ratios as described below. RVK RK Equivalent straight line 0 20 40 60 Mr1 80 100 % Mr2 Material ratio Mr Figure 30 Abbot Curve (Core Roughness) Rk The core roughness depth is the depth of the roughness core profile. Mr (Material Ratio) Rvk (Reduced valley depth) The reduced valley depth Rvk is the average depth of the profile valleys projecting through the roughness core profile. Mr1 in % The material portion Mr1 is determined by the intersecting line which separates the protruding peaks from the roughness core profile. The harder the material the more important it is to reduce the peak height Rpk. If mating surface is ceramic, the Rpk value must be down to 0.05 Pmm because the hard peaks will cut into the seal surface. Mr2 in % The material portion Mr2 is determined by the intersecting line which separates the valleys from the roughness core profile. Other surface parameters are skewnesss and kurtosis, which give a more detailed picture of the surface. For explanation see Figure 31 below. Rpk (Reduced peak height) The reduced peak height Rpk is the average height of the protruding peaks above the roughness core profile. Profile Distribution Negative skew Positive skew Leptokurtic (>3) Platykurtic (<3) Figure 31 Surface Measurement Visualized Latest information available at www.tss.trelleborg.com 22 Edition April 2008
