A Jewelry Artists Guide to Liver of Sulfur Patinas &
Finishes
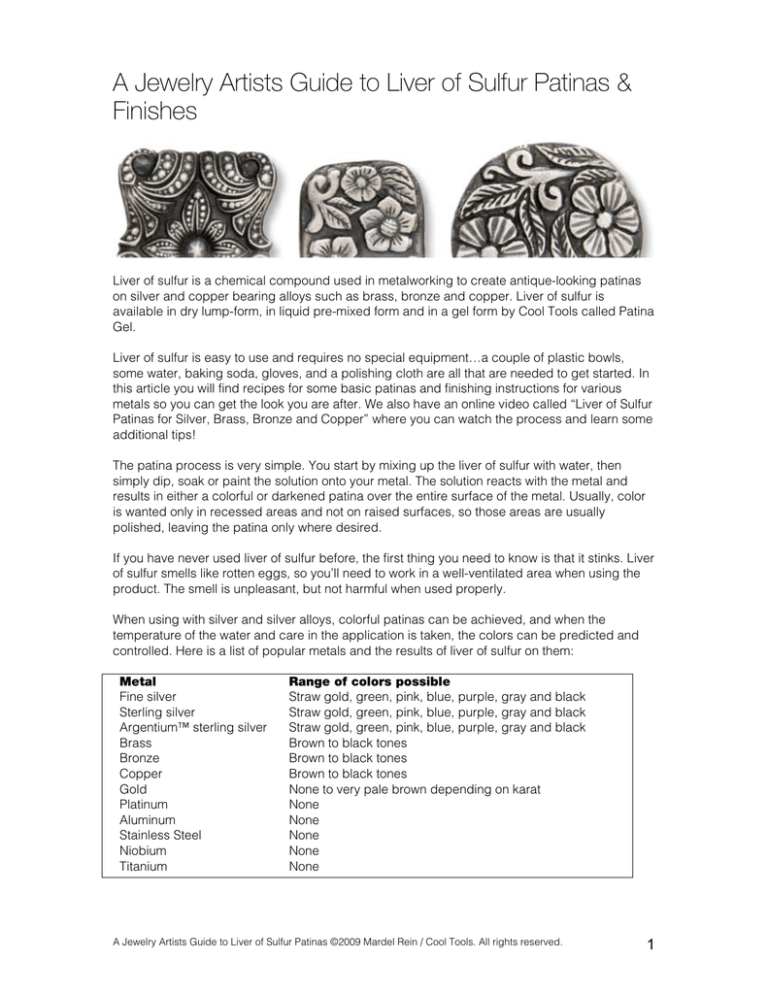
Liver of sulfur is a chemical compound used in metalworking to create antique-looking patinas
on silver and copper bearing alloys such as brass, bronze and copper. Liver of sulfur is
available in dry lump-form, in liquid pre-mixed form and in a gel form by Cool Tools called Patina
Gel.
Liver of sulfur is easy to use and requires no special equipment…a couple of plastic bowls,
some water, baking soda, gloves, and a polishing cloth are all that are needed to get started. In
this article you will find recipes for some basic patinas and finishing instructions for various
metals so you can get the look you are after. We also have an online video called “Liver of Sulfur
Patinas for Silver, Brass, Bronze and Copper” where you can watch the process and learn some
additional tips!
The patina process is very simple. You start by mixing up the liver of sulfur with water, then
simply dip, soak or paint the solution onto your metal. The solution reacts with the metal and
results in either a colorful or darkened patina over the entire surface of the metal. Usually, color
is wanted only in recessed areas and not on raised surfaces, so those areas are usually
polished, leaving the patina only where desired.
If you have never used liver of sulfur before, the first thing you need to know is that it stinks. Liver
of sulfur smells like rotten eggs, so you’ll need to work in a well-ventilated area when using the
product. The smell is unpleasant, but not harmful when used properly.
When using with silver and silver alloys, colorful patinas can be achieved, and when the
temperature of the water and care in the application is taken, the colors can be predicted and
controlled. Here is a list of popular metals and the results of liver of sulfur on them:
Metal
Fine silver
Sterling silver
Argentium™ sterling silver
Brass
Bronze
Copper
Gold
Platinum
Aluminum
Stainless Steel
Niobium
Titanium
Range of colors possible
Straw gold, green, pink, blue, purple, gray and black
Straw gold, green, pink, blue, purple, gray and black
Straw gold, green, pink, blue, purple, gray and black
Brown to black tones
Brown to black tones
Brown to black tones
None to very pale brown depending on karat
None
None
None
None
None
A Jewelry Artists Guide to Liver of Sulfur Patinas ©2009 Mardel Rein / Cool Tools. All rights reserved.
1
Patina Work Area
Choose a work place in a well-ventilated area. Kitchens are popular choices for patina stations
because they have stoves, sinks and usually vent hoods---all of which come in handy when
working with liver of sulfur. I use a tray to carry my work from the stovetop to the sink, which
allows me to rinse and clean pieces more easily.
The metal you intend to patina can be pre-polished or can be polished after patination. See our
guides, “Liver of Sulfur Effects” at the end of this article for a list of wonderful finishes and effects
that can be had with liver of sulfur, and most importantly, how to achieve them.
Tools Needed
Cool Tools Patina Gel (stabilized liver of sulfur)
2 to 3 plastic or glass containers
water
ammonia
salt
liquid dish soap
toothbrush
baking soda
waterproof gloves
shop rags or paper towels
polishing kit
You’ll need one container for the patina solution and one for a neutralizing bath. The neutralizing
bath stops the liver of sulfur reaction so the process stops. It’s important to have baking soda in
the water because the liver of sulfur can continue reacting with the metal for several minutes
after dipping. If you do not neutralize it, the metal can continue to darken even after your piece
has been polished, causing you to have to re-polish the piece a second time and/or lose the
coloring you had hoped to achieve.
Start with Clean Metal
Before you begin, clean your metal pieces thoroughly. They should be free from polishing
compound, wax, grease, fingerprints, etc. A soapy ammonia solution works best for this. In a
bowl of hot water add a squirt of liquid dish soap and a splash of ammonia (a whole sink-full of
water is a waste, make only enough to clean your metal items). Wear gloves so you do not add
new fingerprints to the clean metal. Use an old toothbrush to scrub the metal with the solution.
Rinse in clean water and set the pieces on paper towels or shop rags to drain while you set up
your patina station.
Patina Recipes
Basic Black or Antique Patina Recipe
The most basic patina and most popular patina is a dark gray to black in the recesses with the
raised areas polished to a high shine or matte finish. The temperature of the patina solution
should be cool to lukewarm for this.
To 2 cups of room temperature water, add about ¼ teaspoon of Patina Gel and stir. The color
should be a pale yellow. The darker the color, the stronger the solution and the faster a rich,
deep black can be achieved. However, a more durable patina is created when the process is
done slowly, so using cooler water is better for a good dark patina.
Dip your cleaned metal into the patina solution and then remove it. Look at the result. Depending
on the temperature of the water, the item may be only slightly darkened, or it may be dark gray.
A Jewelry Artists Guide to Liver of Sulfur Patinas ©2009 Mardel Rein / Cool Tools. All rights reserved.
2
As you continue to hold the piece, the color will continue to develop. Dip it again and check the
color. Continue dipping and checking until you are satisfied with the color, then, put the piece in
the neutralizing bath and allow it to sit for several minutes so the liver of sulfur is completely
neutralized.
Since most people don’t want an item that is completely blackened, you will now need to remove
the color from the high spots. Fingers and baking soda make great tools for this. I dip my wet
fingers into my baking soda and then rub the patina away from the high spots, then rinse and
polish the item as desired.
Basic Rainbow or Iridescent Patina Recipe
A rainbow patina, or more accurately, an iridescent patina can be applied to silver and silver
alloys. The colors can be solid or mottled, depending on how the item is oriented in the
container while dipping. This recipe, like the one for the basic black patina also uses cool water,
rather than warm or hot to develop the desired colors. I prefer a colorful patina on broad, flat
areas rather than on areas with a lot of texture. This is personal preference. I just feel it looks too
busy to have a lot of texture and then on top of that a pattern of color that seems to wash out the
detail. Try an iridescent patina on different surfaces to learn what you prefer.
Mix up your neutralizing bath, then prepare the patina solution with 2 cups of room temperature
water. Add to that about 1 tablespoon of ammonia. The ammonia creates more vibrant, lustrous
colors on silver than the liver of sulfur alone does.
Dip your cleaned piece into the solution, remove and immediately rinse in the neutralizing bath.
Check the color. If you like what you see, you can just leave the item in the neutralizing bath. If
you want more color, dip again.
Colors develop one after the other: gold, green, pink, blues, purples, grays and finally black. If
the water is warm or the metal is warm, the process is greatly speeded up. When you are trying
to achieve a specific color, the cooler the water, the more likely you are to lock in the color you
wanted.
The way an item is dipped will also make a difference. If an item is dipped sideways, the colors
will be streaked. If an item is dipped face down, more vibrant colors will appear there than on
the other side. If an item is turned over and viewed after dipping, (but before neutralizing) the
colors will continue to develop and often will pool in places, leaving a mottled appearance.
Finishing Options
After adding a patina, the work can take on very different looks depending on the finish the
metal is given. The following section details how to achieve a specific finish that you are after.
The methods listed here are just some of the ways to achieve the finish described. There are
other ways of approaching the job and other tools that could be used. The purpose here is to
provide simple instructions for obtaining some classic finishes with the most commonly used
and popular polishing supplies.
Silver and Silver Alloy Finishes
These are finishes that can be applied to silver clay, both PMC and Art Clay Silver, any fine
silver, sterling silver, and coin silver.
Take a good close look at your metal before finishing. Look for scratches, pits or any other
imperfections that would detract from the beauty of the piece. Remove small scratches using
files, sandpapers or equivalent rotary tools, or make repairs and re-fire. Then, sand if needed up
A Jewelry Artists Guide to Liver of Sulfur Patinas ©2009 Mardel Rein / Cool Tools. All rights reserved.
3
to 400 grit. Clean the metal with a toothbrush in soapy ammonia water. A flat surface can be
rubbed with a paste of baking soda and water to remove fine scratches.
Soapy Ammonia Water: mix 1 tablespoon household ammonia and 1 teaspoon liquid dish soap
per cup of hot water. Use a toothbrush to scrub the metal. Dry on a shop rag and do not touch
again with your bare fingers.
Mirror finish with black patina on silver
Polish the surface to a mirror shine by hand with polishing papers or pads, with a
flexible shaft machine or in a tumbler using stainless steel burnishing media. In a rotary
tumbler, run for up to 2 hours, in a vibratory tumbler, run up to 1 hour. Use warm patina
solution and a cool to cold neutralizing bath. Dip and rinse a few times to develop color.
To re-polish, first rub with metal with a paste of baking soda and water using your
thumbs, rinse, dry, then use an Ultra Polish pad, polishing papers or equivalent rotary
tools to buff the high spots to a mirror shine or tumble with stainless steel shot for up to
an hour. Start with clean tumbler water, then check after 30 minutes. Change the water
if it is gray. Use 1 drop of liquid dish soap as a burnishing fluid. No finish preservative is
necessary. Buff with a polishing cloth as needed to maintain shine.
Matte finish with black patina on silver
Polish the metal surface to about 400 grit using a flexible shaft with 3M Bristle Discs, polishing
points or satin finishing wheel. By hand try polishing papers to 400 grit or
use a fine Scotchbrite pad. The piece can also be tumble-polished. It will come out shiny, which
will not hurt the process. Use warm to hot patina solution and a cool to
cold neutralizing bath. Rinse and dry before polishing. To polish, first rub the piece with
a baking soda paste using your thumbs, rinse, dry, then use a fine (red) Scotchbrite pad
to apply a uniform matte finish to the surface. Go in one direction only. Use a bit of
pressure, but do not scrub. No finish preservative is necessary. Buff with a fine
Scotchbrite pad, in one direction to remove tarnish from day to day wear.
Oxidized Brushed Finish on silver
Polish the metal to about 400 grit using a flexible shaft with 3M Bristle Discs, polishing
points, satin finishing wheel, by hand with polishing papers, or use a fine Scotchbrite
pad. Use warm to hot patina solution and a cool neutralizing bath. To finish, use a stainless steel
pen style scratch brush. Set the bristle length to about 1/8th inch (about 4mm). With some
pressure, scratch across the metal in a methodical top to bottom, left to right pattern, one stroke
only and one direction only. A hand brush can also be used, but the bristles must be hard
enough and thick enough to give a scratch finish and not just a matte finish. The idea is to limit
the strokes so the surface has some patina between the scratches. No finish preservative is
necessary.
Polish the surface to a mirror shine by hand with polishing papers or pads, with a flexible shaft
machine or in a tumbler using stainless steel burnishing media. In a rotary tumbler, run for up to
2 hours, in a vibratory tumbler, run up to 1 hour. Use room temperature to lukewarm patina
solution and a cool to cold neutralizing bath.
Option: Add 1 tablespoon ammonia to the patina solution to bring up very vibrant colors with
extra luster. Very durable.
Option: Add 1/4 teaspoon salt & 1 tablespoon ammonia to the patina solution to achieve a solid
color. Experiment with different types of salt, (kosher, sea salt, table salt, French salt) to see
various effects as different salts have different strengths.
A Jewelry Artists Guide to Liver of Sulfur Patinas ©2009 Mardel Rein / Cool Tools. All rights reserved.
4
Dip the item in the solution, the immediately rinse in the cold neutralizing bath. Check the color.
Dip again until desired color is achieved. How items are dipped affects the outcome. Try face
down, face up, sideways, painting on, etc to see the various results. The surface texture affects
the outcome. Change the neutralizing bath when it becomes dark. A finishing wax can be used
to preserve the coloring but will darken the colors. Look at the piece wet to see if you would like
it with wax applied.
Oxidized Scratch Finish on silver
Polish the surface to about 400 grit using a flexible shaft with 3M Bristle Discs, polishing
points or satin finishing wheel, by hand with polishing papers to 400 grit or use a fine
Scotchbrite pad. Use cool to hot patina solution and a cool to cold neutralizing bath. Use a
brass pen-style brush for a light finish or a stainless steel pen style brush for a heavier scratch
finish. Be careful to go in one direction only, and go over each spot only once. You'll need
confidence in your strokes. The idea is to leave scratches and in between the scratches, some
color that shows through, so be careful not to clean all the color off.
Brass, Bronze, Copper and Copper Alloy Finishes
This includes COPPRclay, BRONZclay, brass, brass stampings, bronze and copper. Remove
small scratches and other imperfections using files, sandpapers or equivalent rotary tools, or
make repairs and re-fire metal clays if necessary. Sand, if needed up to 200 grit. Clean the metal
with a toothbrush in soapy ammonia water. The metal can be rubbed with a paste of baking
soda and water to remove fine scratches, then apply a satin finish to the metal with a Scotchbrite
pad (Fine for COPPRclay, Medium for Brass, Bronze, BRONZclay and copper).
If the metal surface is in good shape (such as when using raw brass stampings), start by
cleaning, then dry and apply a matte finish with the Scotchbrite pad in the appropriate grit for
the metal. Then follow the instructions given below from this point.
The coloring of liver of sulfur on copper bearing metals is limited to browns and blacks. The
methods listed here are just some of the ways to achieve the finishes described. There are other
ways of approaching the job and other tools that could be used. Copper-bearing alloys can also
be patinated with other household chemicals and even with controlled heating.
Mirror finish with brown or black patina on copper and alloys
Polish the surface to a mirror shine by hand with polishing papers or pads, with a flexible shaft
machine or in a tumbler using stainless steel burnishing media. In a rotary tumbler, run for up to
2 hours, in a vibratory tumbler, run up to 1 hour. Use warm patina solution and cool to cold
neutralizing bath. Dip and rinse a few times to develop color. To re-polish, first rub with metal
with a paste of baking soda and water using your thumbs, rinse, dry, then use an Ultra Polish
pad, polishing papers or equivalent rotary tools to buff the high spots back to a mirror shine or
tumble with stainless steel shot for up to an hour. Start with clean tumbler water, then check after
30 minutes. Change the water if it is gray. Use 1 drop of liquid dish soap as a burnishing fluid. I
recommend a wax finish on copper and COPPRclay to discourage oxidation. Buff regularly with
a polishing cloth as needed to maintain shine.
Matte finish with brown or black patina on copper and alloys
Polish the metal surface to about 400 grit using a flexible shaft with 3M Bristle Discs,
polishing points or satin finishing wheel. By hand use polishing papers to 400 grit or use a fine
Scotchbrite pad. The piece can also be tumble polished. It will come out shiny, which will not
hurt the process. Use warm patina solution and a cool to cold neutralizing bath. Rinse and dry
before polishing. To polish, first rub the piece with a baking soda paste using your thumbs,
rinse, dry, then use a Scotchbrite pad to apply a soft matte finish to the surface (Fine for copper
and COPPRclay, Medium for brass, bronze and BRONZclay. Go in one direction only. Use light
A Jewelry Artists Guide to Liver of Sulfur Patinas ©2009 Mardel Rein / Cool Tools. All rights reserved.
5
pressure, but do not scrub. I recommend a wax finish on copper and COPPRclay to discourage
oxidation.
Scratch finish with brown or black patina on copper and alloys
Use a Scotchbrite pad to apply a soft matte finish to the surface (Fine for copper and
COPPRclay, Medium for brass, bronze and BRONZclay). Use warm to hot patina solution and a
cool neutralizing bath. To finish copper, use a stainless steel pen-style scratch brush. Set the
bristle length to about 1/8th inch (about 4mm). With some pressure, scratch across the metal in
a methodical top to bottom, left to right pattern, one stroke only and one direction only. A hand
brush can also be used, but the bristles must be hard enough and heavy enough to give a
scratch finish and not just a matte finish. Use only steel or stainless steel bristles on these hard
metals, not brass. The number of strokes should be limited so the surface has some patina
between the scratches. I recommend a wax finish on copper and COPPRclay to discourage
oxidation.
Removing Patina
Patina is easy to remove from silver and silver alloys and from copper, but a little trickier on
brass, bronze and copper alloys.
Fine Silver
Depending on the item, you may be able to polish the patina away. The color can be burned off
with a torch (bring to salmon pink), which is the fastest, easier way to go, or a kiln could be used
(fast ramp to 1200F, no hold). I don’t pickle pieces to remove the color unless there is an
embeddable that is heat-sensitive. The darker the patina, the heavier the silver sulfide layer is
and the longer it will take to dissolve in pickle. The silver can also be dipped in a liquid tarnish
remover, which won’t hurt any fire-able stones, but might hurt you since it’s toxic. A slow, but
natural way to remove the patina is described below in the baking soda and foil method.
Sterling Silver
This includes Argentium, .950 silver, .925 sterling silver and 90% coin silver. Depending on the
item, you may be able to polish the patina away. You could also dip the article in a tarnish
remover or pickle it off using boiling Silver Prep (natural, non-toxic) or sodium bisulfate (toxic,
but effective). You could also try the baking soda and foil method. Line a pan with aluminum,
add 4 cups water and bring to boil. Add ¼ cup baking soda and stir. Add your silver to the pan
using tongs. Make sure the silver contacts the aluminum foil. Allow it to continue boiling. Add a
sprinkle of baking soda to the water every few minutes. If the patina was very dark, it may take
more than one bath.
Brass
Depending on the item, you may be able to polish the patina away. You could also dip the article
in a tarnish remover or pickle it off using boiling Silver Prep (natural, non-toxic) or sodium
bisulfate (toxic, but effective).
Bronze
This includes all forms of bronze; castings and clays, both lump and powder. Depending on the
item, you may be able to polish the patina away. You could also dip the article in a tarnish
remover. Bronze should not be pickled to remove the patina because the pickle will deplete the
tin from the surface and leave the piece copper gilded (it looks copper plated).
Copper
This includes all forms of 100% pure copper. COPPRclay and powdered clays are pure copper.
Depending on the item, you may be able to polish the patina away. You could also dip the article
in a tarnish remover or pickle it off using boiling Silver Prep (natural, non-toxic) or sodium
bisulfate (toxic, but effective).
A Jewelry Artists Guide to Liver of Sulfur Patinas ©2009 Mardel Rein / Cool Tools. All rights reserved.
6


