Excel 15 W7760C
EPROM REPLACEMENT
DESCRIPTION
This EPROM Replacement procedure outlines the
process to upgrade the Excel 15 W7760C Controller to
the latest firmware release.
Firmware replacement kit: Part # 32004159-003
Procedure will apply to future firmware as released.
Material Needed
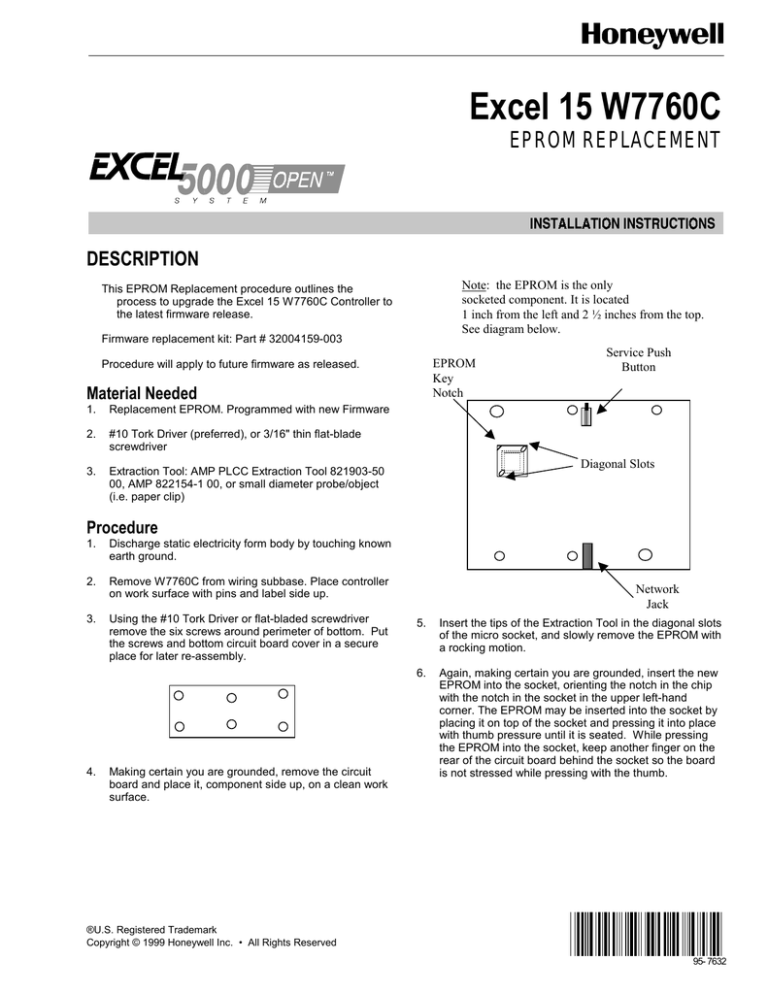
Note: the EPROM is the only
socketed component. It is located
1 inch from the left and 2 ½ inches from the top.
See diagram below.
EPROM
Key
Notch
Service Push
Button
1. Replacement EPROM. Programmed with new Firmware
2. #10 Tork Driver (preferred), or 3/16" thin flat-blade
screwdriver
3. Extraction Tool: AMP PLCC Extraction Tool 821903-50
00, AMP 822154-1 00, or small diameter probe/object
(i.e. paper clip)
Diagonal Slots
Procedure
1. Discharge static electricity form body by touching known
earth ground.
2. Remove W7760C from wiring subbase. Place controller
on work surface with pins and label side up.
3. Using the #10 Tork Driver or flat-bladed screwdriver
remove the six screws around perimeter of bottom. Put
the screws and bottom circuit board cover in a secure
place for later re-assembly.
4. Making certain you are grounded, remove the circuit
board and place it, component side up, on a clean work
surface.
Network
Jack
5. Insert the tips of the Extraction Tool in the diagonal slots
of the micro socket, and slowly remove the EPROM with
a rocking motion.
6. Again, making certain you are grounded, insert the new
EPROM into the socket, orienting the notch in the chip
with the notch in the socket in the upper left-hand
corner. The EPROM may be inserted into the socket by
placing it on top of the socket and pressing it into place
with thumb pressure until it is seated. While pressing
the EPROM into the socket, keep another finger on the
rear of the circuit board behind the socket so the board
is not stressed while pressing with the thumb.
®U.S. Registered Trademark
Copyright © 1999 Honeywell Inc. • All Rights Reserved
95- 7632
Excel 15 W7760C EPROM Replacement
REPLACEMENT
7. Turn the circuit board upside down again and orient it on the cover. Two of the six holes in the circuit board are larger to fit
over the two plastic mounting posts
8. Replace the circuit board cover (note the two larger holes), and reinsert the six screws with the #10 Tork Driver or
screwdriver.
9. Keep EPROM in a safe place until system operation is confirmed.
10. Make a record of the W7760C as being updated. It is good idea to make a mark on the controller to that effect as well.
11. Reinstall the W7760C on its subbase.
Home and Building Control
Honeywell Inc.
Honeywell Plaza
P.O. Box 524
Minneapolis, MN 55408-0524
95-7632 D.B. 12-99
Home and Building Control
Honeywell Limited-Honeywell Limitee
155 Gordon Baker Road
North York Ontario
M2H 3N7
Home and Building Control Products
Honeywell AG
Böblinger Straße 17
D-71101 Schönaich
Phone (49-7031) 637-01
Fax (49-7031) 637-493
Printed in U.S.A. on recycled
paper containing at least 10%
post-consumer paper fibers.
www.honeywell.com


