iMapBC Quick Reference Guide - Basic
advertisement

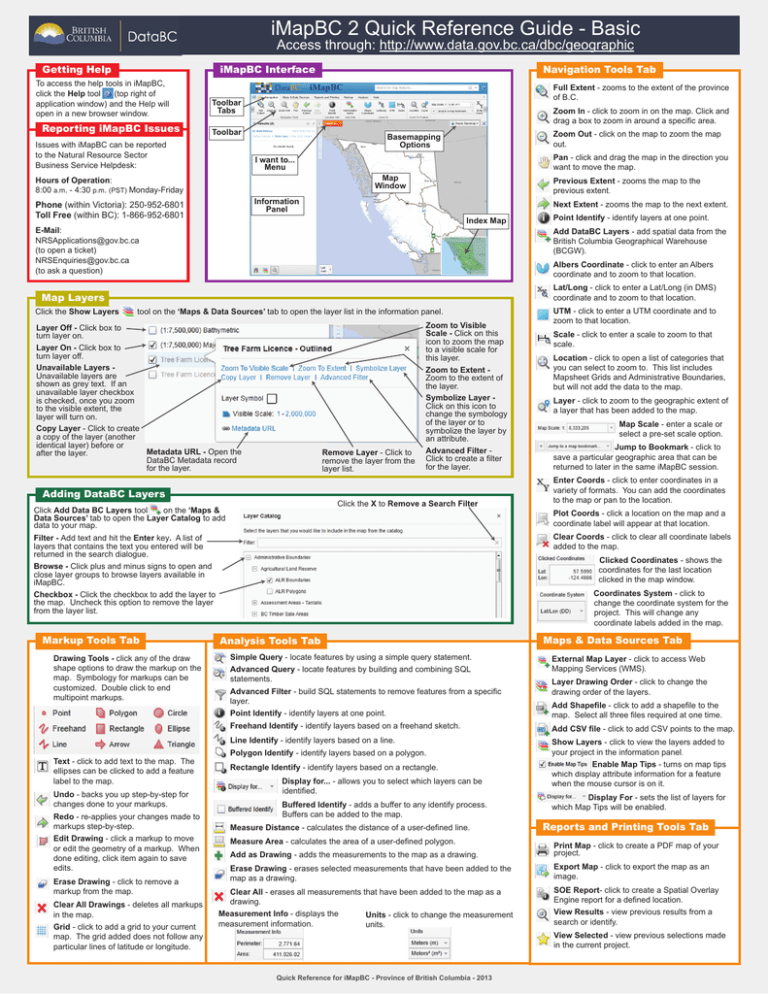
iMapBC 2 Quick Reference Guide - Basic Access through: http://www.data.gov.bc.ca/dbc/geographic Navigation Tools Tab iMapBC Interface Getting Help To access the help tools in iMapBC, click the Help tool (top right of application window) and the Help will open in a new browser window. Reporting iMapBC Issues Full Extent - zooms to the extent of the province of B.C. Toolbar Tabs Zoom In - click to zoom in on the map. Click and drag a box to zoom in around a specific area. Toolbar Issues with iMapBC can be reported to the Natural Resource Sector Business Service Helpdesk: Zoom Out - click on the map to zoom the map out. Basemapping Options I want to... Menu Pan - click and drag the map in the direction you want to move the map. Map Window Hours of Operation: 8:00 a.m. - 4:30 p.m. (PST) Monday-Friday Previous Extent - zooms the map to the previous extent. Information Panel Phone (within Victoria): 250-952-6801 Toll Free (within BC): 1-866-952-6801 Next Extent - zooms the map to the next extent. Index Map E-Mail: NRSApplications@gov.bc.ca (to open a ticket) NRSEnquiries@gov.bc.ca (to ask a question) Add DataBC Layers - add spatial data from the British Columbia Geographical Warehouse (BCGW). Albers Coordinate - click to enter an Albers coordinate and to zoom to that location. Lat/Long - click to enter a Lat/Long (in DMS) coordinate and to zoom to that location. Map Layers Click the Show Layers Point Identify - identify layers at one point. tool on the ‘Maps & Data Sources’ tab to open the layer list in the information panel. Layer Off - Click box to turn layer on. Layer On - Click box to turn layer off. Unavailable Layers Unavailable layers are shown as grey text. If an unavailable layer checkbox is checked, once you zoom to the visible extent, the layer will turn on. Copy Layer - Click to create a copy of the layer (another identical layer) before or Metadata URL - Open the after the layer. DataBC Metadata record for the layer. Remove Layer - Click to remove the layer from the layer list. Adding DataBC Layers Zoom to Visible Scale - Click on this icon to zoom the map to a visible scale for this layer. Zoom to Extent Zoom to the extent of the layer. Symbolize Layer Click on this icon to change the symbology of the layer or to symbolize the layer by an attribute. Advanced Filter Click to create a filter for the layer. Click the X to Remove a Search Filter Click Add Data BC Layers tool on the ‘Maps & Data Sources’ tab to open the Layer Catalog to add data to your map. Drawing Tools - click any of the draw shape options to draw the markup on the map. Symbology for markups can be customized. Double click to end multipoint markups. Edit Drawing - click a markup to move or edit the geometry of a markup. When done editing, click item again to save edits. Erase Drawing - click to remove a markup from the map. Clear All Drawings - deletes all markups in the map. Grid - click to add a grid to your current map. The grid added does not follow any particular lines of latitude or longitude. Map Scale - enter a scale or select a pre-set scale option. Jump to Bookmark - click to save a particular geographic area that can be returned to later in the same iMapBC session. Enter Coords - click to enter coordinates in a variety of formats. You can add the coordinates to the map or pan to the location. Plot Coords - click a location on the map and a coordinate label will appear at that location. Maps & Data Sources Tab Analysis Tools Tab Simple Query - locate features by using a simple query statement. Advanced Query - locate features by building and combining SQL statements. Advanced Filter - build SQL statements to remove features from a specific layer. Line Identify - identify layers based on a line. Redo - re-applies your changes made to markups step-by-step. Layer - click to zoom to the geographic extent of a layer that has been added to the map. Coordinates System - click to change the coordinate system for the project. This will change any coordinate labels added in the map. Freehand Identify - identify layers based on a freehand sketch. Undo - backs you up step-by-step for changes done to your markups. Location - click to open a list of categories that you can select to zoom to. This list includes Mapsheet Grids and Administrative Boundaries, but will not add the data to the map. Clicked Coordinates - shows the coordinates for the last location clicked in the map window. Point Identify - identify layers at one point. Text - click to add text to the map. The ellipses can be clicked to add a feature label to the map. Scale - click to enter a scale to zoom to that scale. Clear Coords - click to clear all coordinate labels added to the map. Filter - Add text and hit the Enter key. A list of layers that contains the text you entered will be returned in the search dialogue. Browse - Click plus and minus signs to open and close layer groups to browse layers available in iMapBC. Checkbox - Click the checkbox to add the layer to the map. Uncheck this option to remove the layer from the layer list. Markup Tools Tab UTM - click to enter a UTM coordinate and to zoom to that location. Polygon Identify - identify layers based on a polygon. Rectangle Identify - identify layers based on a rectangle. Display for... - allows you to select which layers can be identified. Buffered Identify - adds a buffer to any identify process. Buffers can be added to the map. Measure Distance - calculates the distance of a user-defined line. Measure Area - calculates the area of a user-defined polygon. External Map Layer - click to access Web Mapping Services (WMS). Layer Drawing Order - click to change the drawing order of the layers. Add Shapefile - click to add a shapefile to the map. Select all three files required at one time. Add CSV file - click to add CSV points to the map. Show Layers - click to view the layers added to your project in the information panel. Enable Map Tips - turns on map tips which display attribute information for a feature when the mouse cursor is on it. Display For - sets the list of layers for which Map Tips will be enabled. Reports and Printing Tools Tab Add as Drawing - adds the measurements to the map as a drawing. Print Map - click to create a PDF map of your project. Erase Drawing - erases selected measurements that have been added to the map as a drawing. Export Map - click to export the map as an image. Clear All - erases all measurements that have been added to the map as a drawing. SOE Report- click to create a Spatial Overlay Engine report for a defined location. Measurement Info - displays the measurement information. Units - click to change the measurement units. Quick Reference for iMapBC - Province of British Columbia - 2013 View Results - view previous results from a search or identify. View Selected - view previous selections made in the current project. iMapBC 2 Quick Reference Guide - Basic Access through: http://www.data.gov.bc.ca/dbc/geographic Printing Maps Saving and Opening Projects Save Project - iMapBC projects are saved as .gvsp files. These .gvsp files can then be sent to other iMapBC users to view the same map with the same layers. 1. Click the Save Project tool. 2. Navigate to an appropriate location on your computer where you wish to save your project and click Save. 3. In the Save Project window, the Project Name field is required. The Created By and Description fields are optional. Click OK. Open Project - opens a previously saved project file (.gvsp). 1. Click the Open Project tool. 2. Navigate to your saved project and click OK. 3. The saved project will load in your iMapBC session. Print Map 1. Click on the Print Map tool to open the Create a Printable Map dialogue in the information panel. 2. Select the Layout from the drop-down menu. 3. Set any other print options and click Create File. 4. Click Open File to view your map. Exporting Maps I want to... Menu Right-Click Menu The I want to… Menu is found at the top left of the iMapBC Map Window. This menu provides shortcuts to several of the most commonly used iMapBC tools. The Right-Click Menu can be accessed by right-clicking anywhere in the iMapBC Map Window. This menu provides shortcuts to several mapping tools used in iMapBC. Menu options include: - Full Extent - Zoom to Previous Extent - Zoom to Next Extent - Center Map Here - What’s Here? (Identify) - Add Map Layers from BCGW - Draw a Point - Add Some Text - Export a Map Image I want to... Menu options include: - Add DataBC Layers - Find Location - Create a printable map - Draw on the map - Add a Grid to the Map - Measure distance - Turn map data on/off - Show/hide advanced toolbar - View Results Export Map - creates an image of the Map Window in various formats. An option is available to export the image to include georeferenced data that can be used to import the image into a GIS program. 1. Click the Export Map tool in the 'Reports and Printing' tab. 2. Select the Image Format. 3. Optionally, check the box if you would like the file to include georeferencing information. 4. Click Create Image. 5. Click View Image (or Download if you included georeferencing information). Identifying Features On the ‘Analysis’ tab, the Point, Freehand, Line, Polygon, and Rectangle Identify tools are used to search the layers on the map to determine a list of features and provide additional information on specific features. Instead of using the Search box to generate results, an identify area is defined on the map by drawing a shape. The Display for... option allows users to select which layers are returned in the Results List. The Buffered Identify option adds a spatial buffer to your shape drawn with the Identify tools. The identify results will be displayed in the Results List window in the Information Panel. Results List Once you have a set of results in the Results List, there are many options you can use to work with these results. You can view additional information about each feature in the Results List or use the feature(s) to find out more information about other features that are in close proximity. Click the Globe Icon to zoom to the feature. Click the Star Icon to select a feature. Selected features will have a bright yellow Star Icon. Click the Blue text to view the Feature Details window which shows additional attribute information and options for the feature. In the Feature Details window, you can Zoom or Pan to the feature, Copy to Drawing, or Add to selected. Right-clicking a feature in the Results List will return additional options: Refine Results - refines results by adding or removing layers that have been identified. Hide Results From This Layer - removes all results from the clicked layer. Removed results can be redisplayed later using the Refine Results option. Show Feature Details opens the Feature Details window. Add to Selected - adds the feature to the Selected Features list. Buffer Feature - allows you to use the feature to identify other features within the buffered distance. The results will open in a new Results List. Other Result List options include: Wide View - moves the Results List to the bottom of the window. View History - view previous identify results. View Selected - view selected features. Table View - View the results in the table view, where you have the option to export results to a .CSV table. Run SOE Report - Use the features in the Results List to generate an SOE Report. Quick Reference for iMapBC - Province of British Columbia - 2013


