Installation – Handleset/One and Two-Piece
Design Elements from Yale
™
®
Active or Dummy
09E642 2/13
www.yalelocks.com
Copyright © Yale Security Inc., an ASSA ABLOY Group Company. All rights reserved.
Reproduction in whole or in part without the express written permission of Yale Security Inc. is prohibited.
Handleset
Installation
Exterior Deadbolt
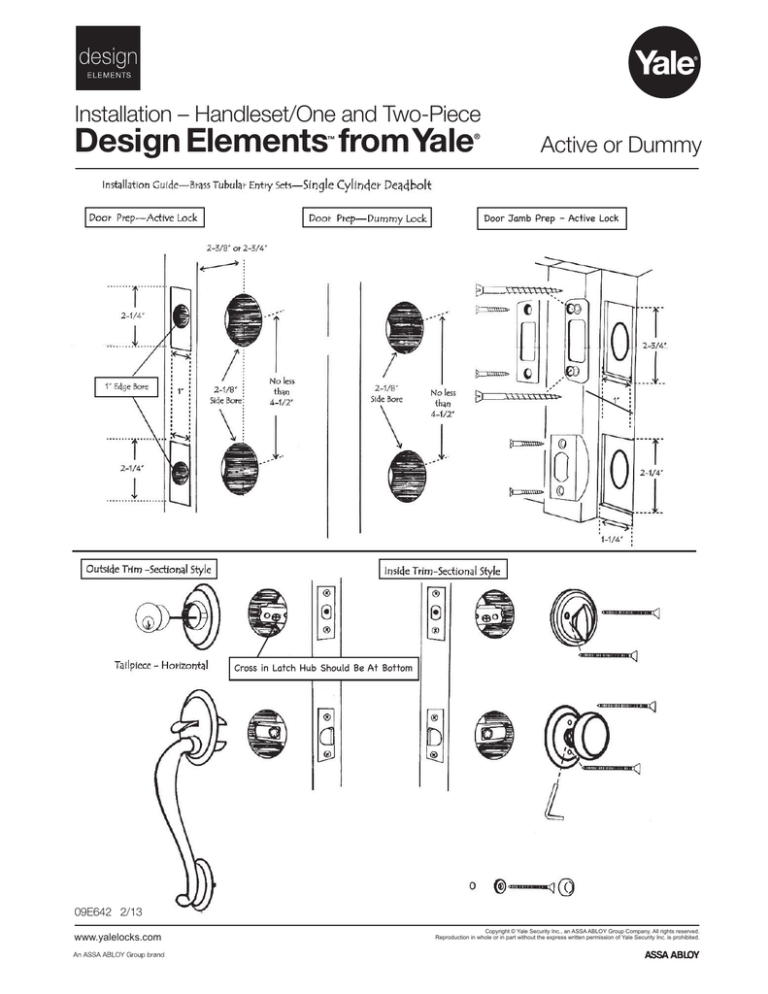
1. Position cylinder assembly
through rosette (2 piece handleset)
or top hole in exterior handle
Door Prep: Use attached
assembly (1 piece handleset).
template for door preparation.
"Yale" must be aligned at the top.
Note: Tailpiece should be in a
Latch Installation
1. Insert passage latch (has curved horizontal position and must be in
position to rotate a full half-turn (180
bolt extending from latch-face)
degrees) toward the exterior edge
through lower bore hole in edge
of door.
of door. Position latch to ensure
curved face of bolt faces the strike 2. Insert cylinder assembly into top
2 1/8 inch bore hole, with tailpiece
on the door frame.
in horizontal position as above,
2. Insert deadbolt latch (has
evenly through the cross in the latch
square latch bolt) in upper bore
hub.
hole in door edge.
3. Align interior mounting plate and
Note: The cross in the latch hub
attach to cylinder housing with two
should be on the bottom.
screws provided.
3. Slide decorative latch plates
Note: Ensure deadbolt is aligned in
over latch bolts and align to fixed
center of hole to avoid binding.
plate on latch.
4. Screw latches in place using
four Phillips head screws provided. Interior Lever/Knob
1. Align interior lever/knob assembly
to door with spindle inserting into
Exterior Handleset
1. Place exterior handle assembly latch. Insert screws through holes
above and below lever/knob and
against door. Align and insert
screw into the exterior housing.
square spindle on handle into
2. Once these are secure tighten
lower 2 1/8 inch bore hole,
bottom screw securely. Screw
engaging the square center
decorative cap onto bottom screw
of the latch. Housing will fit over
washer.
the latch body.
3. Using the Allen-wrench (supplied)
Note: Exterior handle assembly
tighten the lever/knob set screw
must be aligned in the middle of
the lower bore hole. Do not install securely.
with assembly on bottom of hole
Interior Deadbolt
or this will cause latch binding.
2. Insert bottom screw through the 1. Align interior thumb turn
brass washer. Screw head should assembly over interior mounting
plate with thumbturn in vertical
sit flush with washer. From the
position. Slide onto tailpiece.
interior side of door, insert screw
2. Insert finished screws through
with washer through the bottom
rosette and tighten.
hole drilled in door.
Note: Combine interior lever/ knob
and interior deadbolt installation
steps for 1 piece handleset interior
assembly.
Strike Installation
1. Install lower strike (passage)
Line up strike in door jamb and
screw in place using the 2 Phillips
head screws.
2. Install upper strike
(deadbolt) Line up the steel strike
in door jamb and fix in place using
3 inch screws. Install decorative
strike plate over steel plate using
the 2 Phillips head screws. Steel
plate is required for improved
security.
Dummy Handleset
Installation
3. Place knob/ lever mounting plate
(with threaded post) against the
interior side of the lower bore hole.
With two screws affix to the exterior
handle assembly.
4. Fit the interior escutcheon plate
over the two mounting plates and
affix with 1screw placed at the top of
the interior escutcheon plate.
5. Screw on the knob or lever.
Tighten the set screw to fix in place.
6. Tighten the bottom screw at the
foot of the handleset. Screw on the
decorative cap.
Interior – 2 piece
1. From outside of door place
deadbolt housing through exterior
deadbolt rosette (with large center
Exterior – 1 and 2 piece
1. Place exterior handle assembly hole). Place into the top 2 1/8 inch
bore hole. Screw posts on deadbolt
against door. Align
housing should be at bottom.
the housing in the middle of the
2. Affix from the interior of the door
lower 2 1/8 inch bore hole.
by using two screws through the
2. From the inside of the door
interior deadbolt rosette. Screw holes
insert screw through washer and
into the bottom screw hole drilled should be aligned at top of plug on
in the door. Affix to the screw hole interior escutcheon plate.
3. Unscrew the knob or lever from
in the bottom of the exterior
the interior knob/ lever mounting
housing. Do not tighten until all
plate (with threaded post).
interior assemblies are complete
4. Place knob/ lever mounting plate
and aligned.
(with threaded post) against the
interior side of the lower bore hole.
Interior – 1 piece
1. Place deadbolt housing through With two screws affix to the exterior
handle assembly.
exterior handle assembly. Screw
posts on deadbolt housing should 5. Align the interior knob/ lever
be at bottom. Affix from interior of escutcheon plate over the mounting
plate and screw on knob or lever.
the door by using the deadbolt
Tighten the set screw to fix in place.
mounting plate with two screws
6. Tighten the bottom screw at the
aligned horizontally, with the 3rd
foot of the handleset. Screw on the
screw hole at the top.
2. Unscrew the knob or lever from decorative cap.
the knob/ lever mounting plate
(with threaded post).
Do not remove the 2 screws
in the interior escutcheon plate.


