Export Service Bulletin 99-029
Applies To:
May 2000
1996–99 Civic – See VEHICLES AFFECTED
MIL Is On With Blown Fuse 15
SYMPTOM
PARTS INFORMATION
The MIL is on with a DTC 20 (electrical load detector),
DTC 41 (primary heated oxygen sensor), or DTC 17
(vehicle speed sensor). Fuse 15 in the under-dash fuse
box is blown.
Corrugated Tubing: P/N 17132-P2E-999
7.5 A Fuse: P/N 98200-40750
REQUIRED MATERIALS
PROBABLE CAUSE
Electrical Tape: 3M P/N 54007-06132
The engine wire harness is rubbing on the intake
manifold bracket.
WARRANTY CLAIM INFORMATION
VEHICLES AFFECTED
1996–98 Civic: All
1999 Civic
KK:
2-door – From VIN 1HGEJ6...XL500001 thru
1HGEJ6...XL500013
3-door – From VIN 2HGEJ6...XH350001 thru
2HGEJ6...XH350006
4-door – From VIN 1HGEJ6...XL500001 thru
1HGEJ6...XL500156
4-door –(VIN 2HGEJ6) ALL
In warranty: The normal warranty applies.
Operation Number: 737001
Flat Rate Time:
0.5 hour
Failed Part:
P/N 17132-P2E-A00
Defect Code:
064
REPAIR PROCEDURE
1.
2.
3.
4.
Write down the customer’s radio station presets.
Disconnect the negative cable from the battery.
Raise the car on a hoist.
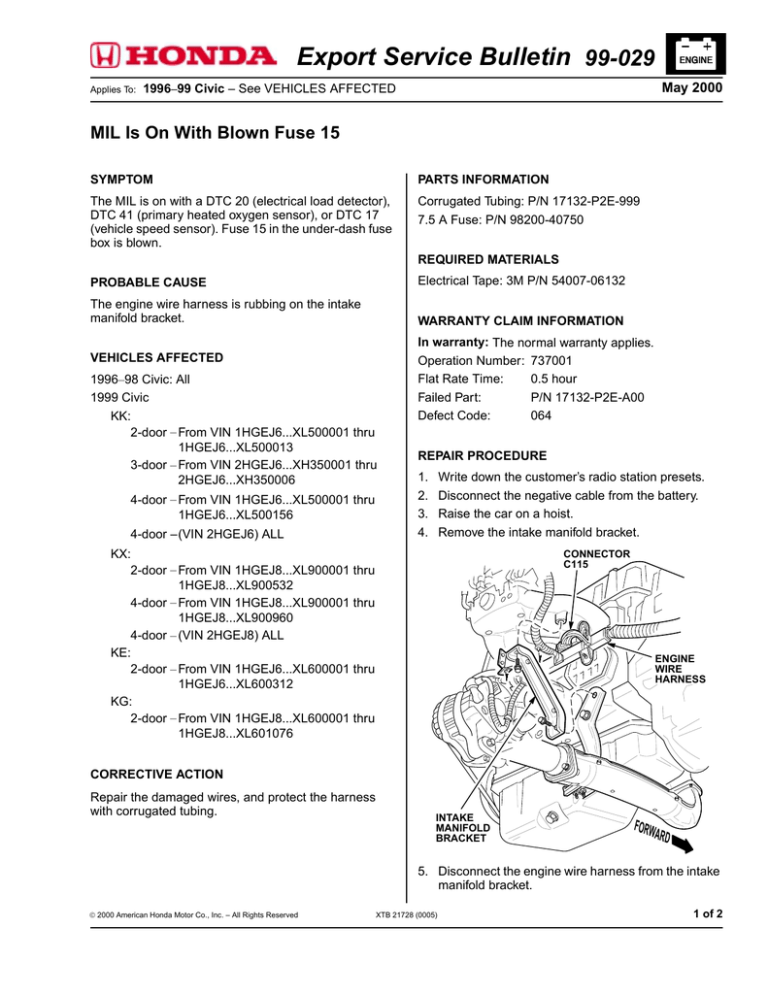
Remove the intake manifold bracket.
KX:
2-door – From VIN 1HGEJ8...XL900001 thru
1HGEJ8...XL900532
4-door – From VIN 1HGEJ8...XL900001 thru
1HGEJ8...XL900960
4-door – (VIN 2HGEJ8) ALL
KE:
2-door – From VIN 1HGEJ6...XL600001 thru
1HGEJ6...XL600312
KG:
2-door – From VIN 1HGEJ8...XL600001 thru
1HGEJ8...XL601076
CONNECTOR
C115
ENGINE
WIRE
HARNESS
CORRECTIVE ACTION
Repair the damaged wires, and protect the harness
with corrugated tubing.
INTAKE
MANIFOLD
BRACKET
FORW
ARD
5. Disconnect the engine wire harness from the intake
manifold bracket.
2000 American Honda Motor Co., Inc. – All Rights Reserved
XTB 21728 (0005)
1 of 2
6. Tape any damaged wires in the harness that go to
C115.
7. Install the corrugated tubing over the harness. Tape
the tubing to the harness to hold it in position.
C115
HARNESS
CLIP
CORRUGATED
TUBING
ENGINE WIRE
HARNESS
8. Reinstall the engine wire harness to the intake
manifold bracket. Reinstall the bracket to the
engine. Torque the bolts to 24 N·m.
9. Lower the car.
10. Reconnect the negative battery cable.
11. Enter the customer’s radio station presets. Set the
clock.
2 of 2
99-029
