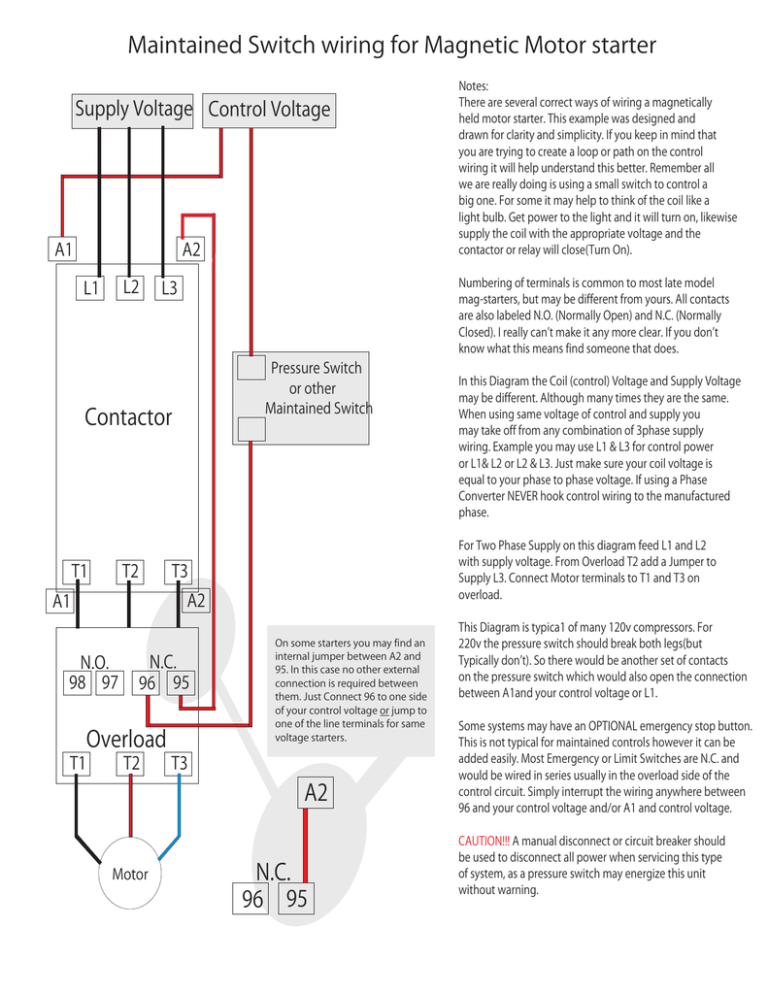
Contactor Overload Maintained Switch wiring for Magnetic Motor
advertisement

Maintained Switch wiring for Magnetic Motor starter Supply Voltage Control Voltage A1 A2 L2 L1 Numbering of terminals is common to most late model mag-starters, but may be different from yours. All contacts are also labeled N.O. (Normally Open) and N.C. (Normally Closed). I really can’t make it any more clear. If you don’t know what this means find someone that does. L3 Pressure Switch or other Maintained Switch Contactor T1 T2 N.O. 98 97 T3 N.C. 96 95 Overload T1 T2 On some starters you may find an internal jumper between A2 and 95. In this case no other external connection is required between them. Just Connect 96 to one side of your control voltage or jump to one of the line terminals for same voltage starters. T3 A2 Motor In this Diagram the Coil (control) Voltage and Supply Voltage may be different. Although many times they are the same. When using same voltage of control and supply you may take off from any combination of 3phase supply wiring. Example you may use L1 & L3 for control power or L1& L2 or L2 & L3. Just make sure your coil voltage is equal to your phase to phase voltage. If using a Phase Converter NEVER hook control wiring to the manufactured phase. For Two Phase Supply on this diagram feed L1 and L2 with supply voltage. From Overload T2 add a Jumper to Supply L3. Connect Motor terminals to T1 and T3 on overload. A2 A1 Notes: There are several correct ways of wiring a magnetically held motor starter. This example was designed and drawn for clarity and simplicity. If you keep in mind that you are trying to create a loop or path on the control wiring it will help understand this better. Remember all we are really doing is using a small switch to control a big one. For some it may help to think of the coil like a light bulb. Get power to the light and it will turn on, likewise supply the coil with the appropriate voltage and the contactor or relay will close(Turn On). N.C. 96 95 This Diagram is typica1 of many 120v compressors. For 220v the pressure switch should break both legs(but Typically don’t). So there would be another set of contacts on the pressure switch which would also open the connection between A1and your control voltage or L1. Some systems may have an OPTIONAL emergency stop button. This is not typical for maintained controls however it can be added easily. Most Emergency or Limit Switches are N.C. and would be wired in series usually in the overload side of the control circuit. Simply interrupt the wiring anywhere between 96 and your control voltage and/or A1 and control voltage. CAUTION!!! A manual disconnect or circuit breaker should be used to disconnect all power when servicing this type of system, as a pressure switch may energize this unit without warning.

