Appendix C
advertisement
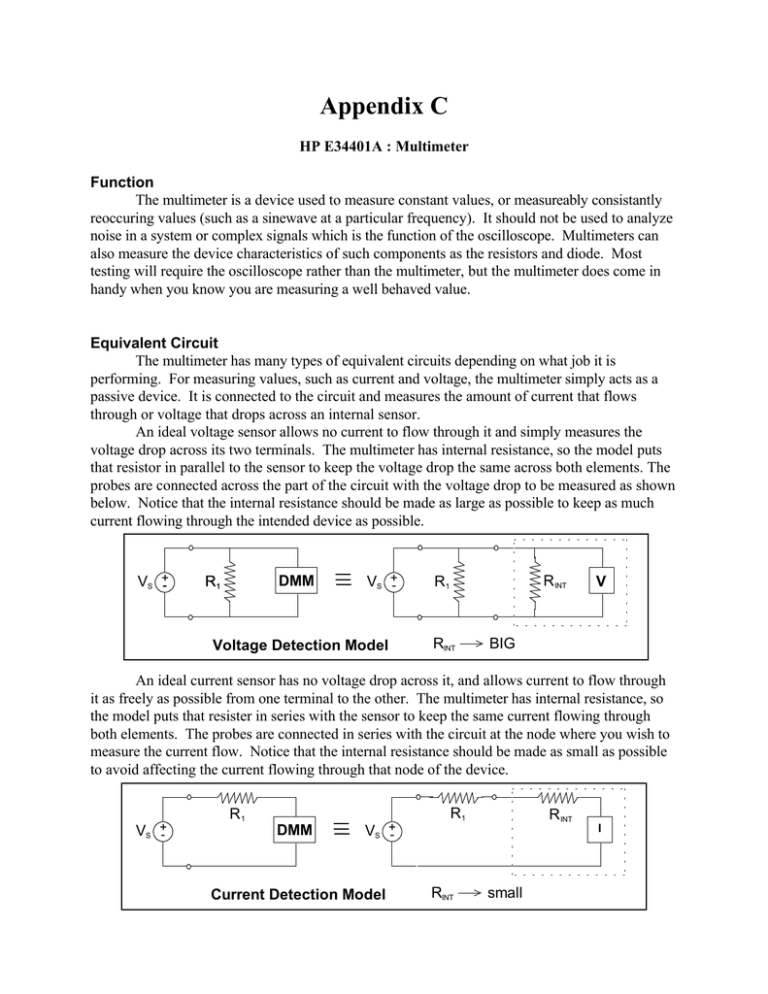
Appendix C HP E34401A : Multimeter Function The multimeter is a device used to measure constant values, or measureably consistantly reoccuring values (such as a sinewave at a particular frequency). It should not be used to analyze noise in a system or complex signals which is the function of the oscilloscope. Multimeters can also measure the device characteristics of such components as the resistors and diode. Most testing will require the oscilloscope rather than the multimeter, but the multimeter does come in handy when you know you are measuring a well behaved value. Equivalent Circuit The multimeter has many types of equivalent circuits depending on what job it is performing. For measuring values, such as current and voltage, the multimeter simply acts as a passive device. It is connected to the circuit and measures the amount of current that flows through or voltage that drops across an internal sensor. An ideal voltage sensor allows no current to flow through it and simply measures the voltage drop across its two terminals. The multimeter has internal resistance, so the model puts that resistor in parallel to the sensor to keep the voltage drop the same across both elements. The probes are connected across the part of the circuit with the voltage drop to be measured as shown below. Notice that the internal resistance should be made as large as possible to keep as much current flowing through the intended device as possible. VS +- DMM R1 VS +- Voltage Detection Model R INT R1 RINT V BIG An ideal current sensor has no voltage drop across it, and allows current to flow through it as freely as possible from one terminal to the other. The multimeter has internal resistance, so the model puts that resister in series with the sensor to keep the same current flowing through both elements. The probes are connected in series with the circuit at the node where you wish to measure the current flow. Notice that the internal resistance should be made as small as possible to avoid affecting the current flowing through that node of the device. VS +- R1 R1 DMM R INT VS +- Current Detection Model I RINT small For measuring values of circuit components, the multimeter must be active and produce its own voltages and/or currents. For example, one way to find the resistance of an element is to drive a small current through it and an internal reference resistor and then measure the voltage drop across the reference resistor1. Simple math can then give you the resistance of the resistor. IS R1 RREF V Resistance Measurement Model When measuring a resistance, the resistor must not be connected to a circuit. If the resistor is connected to a circuit, the multimeter would actually be measuring the apparent resistance between the two probes. This would not only include the resistor, but the rest of the circuit as well. 1 This may not be how the HP multimeter measures resistance, it is simply an example. Control Layout The multimeter is a pontentially complex device, so you need to know the function of the available terminals and buttons. Ω 4W Sense/ Input VΩ Ratio Ref HI HI 200V Max AC I DC V AC V FUNCTION Ω 4W Ω 2W MENU On/Off Recall 4 > > Off On > CHOICES Period Freq dB Cont RANGE / DIGITS 5 6 > Power DC I LEVEL MATH dBm Null Min Max 1000V Max LO LO Terminals 500Vpk Max 3A RMS I Auto/Hold Auto/ Man ENTER Single TRIG Shift Front Rear LOCAL Fused on Rear Panel ! Terminals 200V Max: The inputs to use when measuring small voltages and resistors. 1000V Max: The inputs to use when measuring large voltages and resistors. The frequency and period of a signal, and turn on voltage of a diode can also be measured between these two inputs. 3A RMS: The inputs to use when measuring currents. Power Button Power: This button turns the function generator on and off. Don’t use this if you only want to turn off the outputs. Local Button Shift: After pressing this button, the alternative button definitions are enabled (those described above, instead of on, the button). Function Buttons DC V: This button tells the multimeter to measure a DC voltage. AC V: This button tells the multimeter to measure an AC voltage. Ω 2W: This button tells the multimeter to measure resistance across the 1000V Max input terminals. Used for large resistors. Freq: This button tells the multimeter to display the frequency of the signal across the 1000V Max input terminals. Function Buttons using Shift DC I: This button tells the multimeter to measure a DC current. AC I: This button tells the multimeter to measure an AC current. Ω 4W: This button tells the multimeter to measure resistance across the 200V Max input terminals. Used for small resistors. Period: This button tells the multimeter to display the period of the signal across the 1000V Max input terminals. : This button tells the multimeter to determine the turn on voltage of a diode across the 1000V Max input terminals. Trigger Buttons Single: This button tells the multimeter to stop and hold the next output value in memory. Trigger Buttons with Shift Auto/Hold: This button toggles between the “auto” and “hold” modes. The “auto” mode triggers at normal intervals. The “hold” mode will wait until a value stays constant for a reasonable period of time and then stop and hold the value in memory. Quick Start Instructions When you first turn on the HP 34401A Multimeter, it should start displaying whatever voltage it detects at one of the terminal pairs used for measuring voltage. After pressing the correct buttons as discussed above you can connect it to your device. It is good to always tell the multimeter to measure voltage before fiddling with attached probes so that if you accidentally attach them in the wrong locations, the high internal resistance/impedence will help to avert possible damage from occuring to the multimeter and/or your circuit. Common Usage Errors and Problems n/a

