114-6016
Application
Specification
26 JAN 16 Rev L
Modular Plug Connectors (Standard and Small Conductor)
NOTE
All numerical values are in metric units [with U.S. customary units in brackets]. Dimensions are in millimeters [and inches].
Unless otherwise specified, dimensions have a tolerance of ±0.13 [±.005] and angles have a tolerance of ±2°. Figures are for
identification only.
1. INTRODUCTION
This specification covers the requirements for application of standard and small conductor modular plug
connectors for voice and data applications. The modular plugs are available in standard and small conductor,
unshielded or shielded, with 2, 4, 6, 8, or 10 terminals on 1.02 [.040] centerline spacing. These modular plugs
are also available in line and keyed housing styles. The modular plugs contain universal terminals for use with
solid or stranded wire.
Each modular plug features two internal strain reliefs to protect the modular plug-to-cable and terminal-toconductor interface from damage when subjected to pulling or bending forces. The primary strain relief grips
the jacket and the secondary strain relief acts on the conductors. These modular plugs are terminated using the
insulation piercing technique. The modular plugs are available in loose piece for terminating with manual or
pneumatically-powered tools.
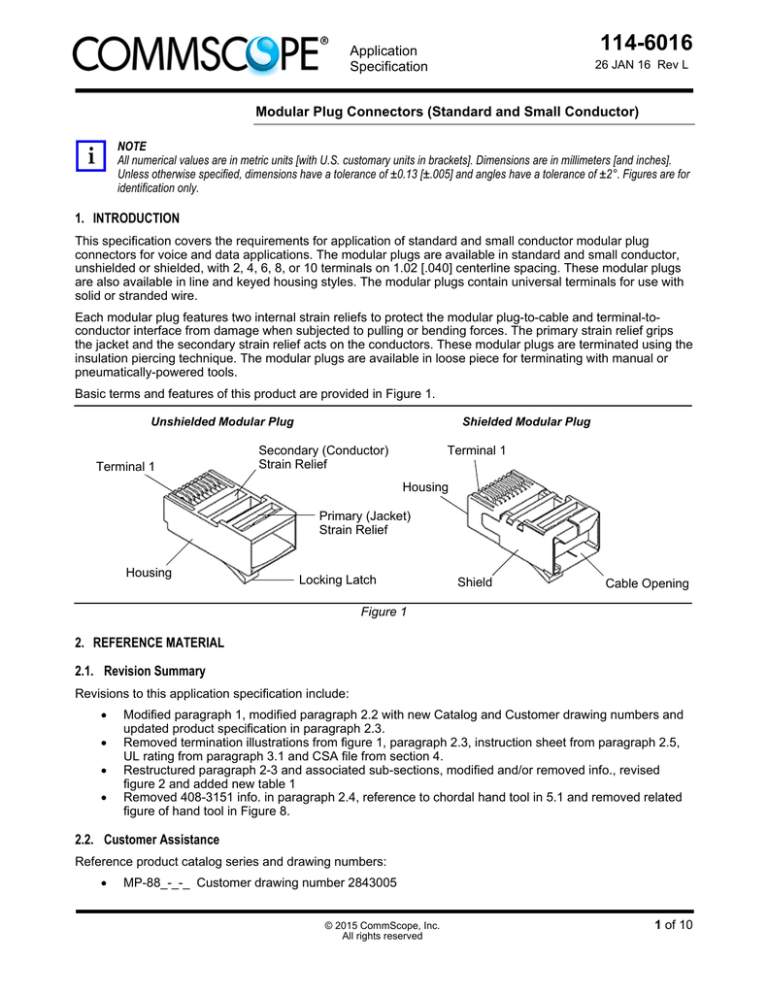
Basic terms and features of this product are provided in Figure 1.
Unshielded Modular Plug
Terminal 1
Shielded Modular Plug
Terminal 1
Secondary (Conductor)
Strain Relief
Housing
Primary (Jacket)
Strain Relief
Housing
Locking Latch
Shield
Cable Opening
Figure 1
2. REFERENCE MATERIAL
2.1. Revision Summary
Revisions to this application specification include:
Modified paragraph 1, modified paragraph 2.2 with new Catalog and Customer drawing numbers and
updated product specification in paragraph 2.3.
Removed termination illustrations from figure 1, paragraph 2.3, instruction sheet from paragraph 2.5,
UL rating from paragraph 3.1 and CSA file from section 4.
Restructured paragraph 2-3 and associated sub-sections, modified and/or removed info., revised
figure 2 and added new table 1
Removed 408-3151 info. in paragraph 2.4, reference to chordal hand tool in 5.1 and removed related
figure of hand tool in Figure 8.
2.2. Customer Assistance
Reference product catalog series and drawing numbers:
MP-88_-_-_ Customer drawing number 2843005
© 2015 CommScope, Inc.
All rights reserved
1 of 10
114-6016
MP-66_-_-_ Customer drawing number 2843026
MP-6__-_-_ Customer drawing number 2843025
MP-44U-_-_ Customer drawing number 2843027
MP-1010U-R-_ Customer drawing number 2843028
These catalog series represent standard and small conductor modular plug connectors. Additionally, the
number of contacts vary based on the catalog series selected. Use this information to obtain catalog number/
material number and tooling information.
2.3. Specifications
Product Specification 108-131013 provides product performance and test information.
2.4. Instructional Material
Instruction sheets (408-series) provide product assembly instructions or tooling setup and operation procedures
and customer manuals (409-series) provide machine setup and operating procedures. Instructional material
that pertains to this product is:
408-4093
408-4167
408-4389
408-9743
408-9767
408-9919
409-10010
PRO-CRIMPER* III Hand Tool Assembly 58560-1 (for 10-Position Modular Plugs)
PRO-CRIMPER III Hand Tool Assembly 224928-1 (for External Strain Relief Application)
Crimp Height Gage 904170-1
Terminating Modules 856196-[ ] for Use with Modular Plug Dual Terminators 1320840-[ ]
Modular Plug Hand Tools (Premium Grade) 231652-[ ]
Modular Plug Single Terminators 354711-[ ] and Tooling Kits 354714-[ ]
Modular Plug Dual Terminators 1320840-[ ]
3. REQUIREMENTS
3.1. Material
Modular plug housings are made of flame retardant polycarbonate. The terminals are made of phosphor
bronze under-plated with nickel; terminal area is plated with gold or palladium nickel and gold. Shields are
made of brass plated with bright tin-lead and under-plated with copper or stainless steel plated with nickel.
External strain reliefs are made of brass plated with tin and under-plated with copper.
3.2. Storage
3.2.1.
Ultraviolet Light
Prolonged exposure to ultraviolet light may deteriorate the chemical composition used in the product
material.
3.2.2.
Shelf Life
The product should remain in the shipping containers until ready for use to prevent deformation to
components. The product should be used on a first in, first out basis to avoid storage contamination that
could adversely affect performance.
3.2.3.
Chemical Exposure
Do not store product near any chemical listed below as they may cause stress corrosion cracking in the
material.
Alkalies
Amines
Ammonia
Carbonates
Citrates
Nitrites
Phosphates Citrates
Sulfur Nitrites
Sulfur Compounds
Tartrates
3.3. Cable Selection and Preparation
3.3.1.
Selection
The modular plugs accept the wire described below.
Rev L
2 of 10
114-6016
Description Conductor (AWG)1 Insulation OD Cable Type Cable Jack OD (Max) Strip Length Round
0.20"
(5.1mm)
12.7-14.3
[.50-.56]
Flat Oval
0.10" x 0.35"
(2.54 x 8.89 mm)
12.7-14.3
[.50-.56]
Round
0.20"
(5.1mm)
14.3
[.56]
Flat Oval
0.10" x 0.35"
(2.54 x 8.89 mm)
14.3
[.56]
Round
0.20"
(5.1mm)
14.3
[.56]
Flat Oval
0.10" x 0.35"
(2.54 x 8.89 mm)
14.3
[.56]
Unshielded 8-Postion
24-26 Solid
24-26 Stranded
0.034" to 0.039"
(0.86 to 0.99mm)
Shielded 8-Position
Unshielded 8-Postion,
Small Conductor
Unshielded Keyed, 8-Postion
Shielded Keyed, 8-Position
26-28 Solid
26-28 Stranded
24-26 Solid
24-26 Stranded
0.029" to 0.034"
(0.74 to 0.86mm)
0.034" to 0.039"
(0.86 to 0.99mm)
Unshielded 6-Postion,
Standard Body
Unshielded 6-Postion,
Long Body
24-26 Solid
24-26 Stranded
0.034" to 0.039"
(0.86 to 0.99mm)
Shielded 6-Position,
Long Body
Unshielded 6-Postion, Small
Conductor, Standard Body
Unshielded 6-Postion,
4-Contacts
Unshielded 6-Postion,
2-Contacts
26 -28 Solid
26 -28 Stranded
0.029" to 0.034"
(0.74 to 0.86mm)
24-26 Solid
24-26 Stranded
0.034" to 0.039"
(0.86 to 0.99mm)
26 -28 Solid
26 -28 Stranded
0.029" to 0.034"
(0.74 to 0.86mm)
24-26 Solid
24-26 Stranded
0.034" to 0.039"
(0.86 to 0.99mm)
Unshielded 4-Postion,
Headset
24-26 Solid
24-26 Stranded
0.034" to 0.039"
(0.86 to 0.99mm)
Unshielded 10-Postion,
24-26 Solid
24-26 Stranded
0.034" to 0.039"
(0.86 to 0.99mm)
12.7-14.3
[.50-.56]
Round
0.20"
(5.1mm)
Round
0.18"
(4.6mm)
6.35-7.14
[.25-.28]
Flat Oval
0.09" x 0.26"
(2.29 x 6.61 mm)
6.35-7.14
[.25-.28]
Round
0.195"
(4.96mm)
14.3
[.56]
Flat Oval
0.11" x 0.27"
(2.79 x 6.85 mm)
14.3
[.56]
Round
0.195"
(4.96mm)
14.3
[.56]
Flat Oval
0.11" x 0.27"
(2.79 x 6.85 mm)
14.3
[.56]
Flat Oval
0.09" x 0.26"
(2.29 x 6.61 mm)
6.35-7.14
[.25-.28]
Flat Oval
0.09" x 0.26"
(2.29 x 6.61 mm)
14.3
[.56]
6.35-7.14
[.25-.28]
Round
0.11"
(2.8mm)
6.35-7.14
[.25-.28]
Flat Oval
0.09" x 0.19"
(2.29 x 4.83 mm)
6.35-7.14
[.25-.28]
Round
0.21"
(5.3mm)
12.7-14.3
[.50-.56]
Note 1: Typical conductor size supported by insulation OD. Insulation OD is the determining specification.
Table 1
Rev L
3 of 10
114-6016
3.3.2.
Preparation
Proper strip length as shown in Figure 2 is necessary to properly insert the cable into the modular plugs.
The strip length for the cable and specific cable and modular plug combinations are shown in Table 1.
NOTE
Reasonable care must be taken not to nick or cut the cable conductor insulation during the stripping operation.
Flat Oval Shielded Cable
This cable must be prepared according to the following. Refer to Figure .
3.3.2.1.1.1.1. Insert a blade tip between the conductors and shield. Slit the jacket and shield 14.29
[9/16] back from the end along one edge of the cable. Repeat on the opposite cable edge.
3.3.2.1.1.1.2.
the jacket.
Pull the slit ends away from the conductors. Separate the shield from the slit ends of
3.3.2.1.1.1.3. Cut off the slit ends of the jacket 14.29 [9/16] from the end of the conductors. Care
should be taken not to cut shield ends.
3.3.2.1.1.1.4.
Fold each shield end back on itself to approximately one-half of its length.
3.3.2.1.1.1.5. Bend each folded shield back on top of the jacket. The shield must extend
approximately 9.52 [3/8] back on the jacket and the exposed conductors must be approximately 14.29
[9/16] in length.
3.3.2.1.1.1.6. If the drain wire is to be terminated within the modular plug, insert the drain wire into
the wire circuit of the modular plug, and terminate according to the instructions packaged with the
applicable tooling.
3.3.2.1.1.1.7. If the drain wire is to be terminated to the modular plug shield, bend the drain wire
back tightly across the center of the cable shield on the side of the cable that will face the locking latch
side of the modular plug when the cable is inserted. Cut the drain wire to the same length as the cable
shield.
Typical Round Cable
Typical Flat Oval Cable
Unshielded
Shielded
Shielded
Unshielded
Insulated
Conductors
Strip Length
(Refer to Table)
Strip Length
(Refer to Table)
Figure 2
Round Shielded Cable
This cable must be prepared according to the following. Refer to Figure .
(a) Insert a blade tip between the shield and jacket. Slit the jacket 15.88 [5/8] back from the end.
3.3.2.1.1.1.8. Pull the jacket away from the shield, and fold it back over the cable. Cut off the slit
portion of the jacket 15.88 [5/8] from the end of the conductors. Care shall be taken not to cut the
shield.
Rev L
4 of 10
114-6016
3.3.2.1.1.1.9. Find the overlap seam in the shield, and pull the shield away from the conductors while
being careful not to damage the shield.
3.3.2.1.1.1.10. Fold the shield back over the cable.
Flat Oval Shielded Cable
Flat Oval
Shielded Cable
Shield
Folded
Note: Not to Scale
Jacket
Shield
14.9 [9/16]
Slit
Conductors
9.52 [3/8]
Shield
Trimmed
14.29 [9/16]
Shield Cut
14.29 [9/16] Length
of Exposed
Conductors
Drain Wire
Figure 3
3.3.2.1.1.1.11. Trim the shield to approximately a length of 9.52 [3/8]. Form the shield smoothly
around the outside of the cable. Untwist the conductors and orient them in desired sequence. Trim the
conductors evenly to a length of 14.29 [9/16].
3.3.2.1.1.1.12. If the drain wire is to be terminated within the modular plug, insert the drain wire into
the wire circuit of the modular plug, and terminate according to the instructions packaged with the
applicable tooling.
3.3.2.1.1.1.13. If the drain wire is to be terminated to the modular plug shield, bend the drain wire
back tightly across the center of the cable shield on the side of the cable that will face the locking latch
side of the modular plug when the cable is inserted. Cut the drain wire to the same length as the cable
shield.
Rev L
5 of 10
114-6016
Round Shielded Cable
Round
Shielded
Cable
Shield Folded
Shield
Conductors
Jacket
9.52 [3/8]
Shield
Trimmed
14.29 [9/16]
Conductors
Trimmed
Drain
Wire
15.88
[5/8]
Figure 4
3.4. Termination Requirements
3.4.1.
Conductor Location
Conductors must be fully inserted into the proper wire circuit of the modular plug to ensure that the
terminals pierce a sufficient wire area. It is preferred that all conductors be visually bottomed against the
end of the wire circuits. If individual conductors are not completely inserted after termination, they must be
inserted at least past the terminal and into the reference zone to ensure a proper electrical interface. See
Figure 5.
3.4.2.
Crimp Height
The crimp height shall be measured from the top of the terminals to the bottom of the housing (not
including locking tab) and must be within the dimension provided in Figure 5.
NOTE
All terminals must be at approximately the same height. A crimp height gage is available for measuring modular plug crimp
height (refer to Section 5 for part number and description).
3.4.3.
Internal Strain Reliefs
The primary strain relief must be fully engaged on the cable jacket, and the secondary strain relief must
be fully engaged on the cable conductors. Both strain reliefs must be fully engaged to isolate the
termination area from external forces applied to the cable. It is acceptable for the primary strain relief to
cut into the jacket as long as the conductor insulation is not compromised. See Figure 5.
NOTE
For unshielded modular plug, the primary and secondary strain reliefs can be visually inspected through the side of the
housing.
Rev L
6 of 10
114-6016
Secondary
Strain Relief
Primary
Strain
Relief
Section X-X
6.02±0.13 [.237±.005]
Crimp Height (Requirement
Per FCC Part 68, Subpart F)
Conductors
Against
End of Wire
Circuits
(Preferred
Conductor
Location)
Secondary Strain Relief
Engaging Conductors
Primary Strain Relief
Engaging Cable Jacket
Terminal
0.00-0.64 [.000-.025]
Reference Zone
(Conductor Location)
Figure 5
3.5. Ancillary Items
3.5.1.
External Strain Relief
NOTE
The external strain relief can only be used with select 8- and 10-position (shielded and unshielded) modular plugs.
The external strain relief provides a secure grip (360º wrap) on the cable jacket for extraordinary strain
relief on the cable and a redundant low impedance ground path to equipment. For shielded modular
plugs, the external strain relief also provides a secure grip on the foil shield and a chassis ground through
the modular plug shield. If a boot is used, an external strain relief containing a retention hole for securing
the boot is available (the boot must be installed after the external strain relief with retention hole).
NOTE
Using the boot and the external strain relief with retention hole will provide optimum strain relief performance.
Assembly of the external strain relief onto the modular plug must meet the requirements given in Figure 6.
3.5.2.
Boot
A boot is used to prevent the cable from kinking and bending too sharp at the modular plug cable opening.
The boot is available with or without a hood. The hooded boot also prevents the modular plug locking
latch from snagging other locking latches or cables.
The boots are available to fit maximum cable insulation diameters of 5.33 [.210] for unshielded modular
plugs and 5.72 [.225] for shielded modular plugs. The maximum cable diameter is marked on the inside of
each boot. The boots are colored to provide a color-coded cable configuration to ensure appropriate
connections. The boot must be installed, small diameter end first, onto the cable before the stripping
procedure. Boots are made of elastomer polyolefin. Refer to Figure 7.
Rev L
7 of 10
114-6016
External Strain
Relief
External Strain Relief Seated
Flat Against Modular Plug
Support Barrel
Evenly Crimped
and Firm Around
the Cable
External Strain Relief
with Retention Hole (for
Securing the Boot)
Support Barrel Does
Not Cut Into Cable
Figure 6
NOTE
Some modular plugs (including categories 6A, 6, and some 5e) require custom fit slim-line boots. These boots are made of
clear plastic, which allows the cable color to be visible after installation. The slim-line boot must be installed on the cable
before wiring the modular plug and must be placed in final position before crimping. See Figure 7.
Boot Without Hood
Boot With Hood
Hood or Boot Over
Modular Plug Locking Latch
Notch in Boot Facing
Modular Plug Locking Latch
Cable Insulation Diameter
Within Maximum Cable
Diameter Marked Inside
Boot
Figure 7
3.6. Mating
The modular plug must be inserted into the mating jack until it bottoms. When fully inserted, the modular plug
locking tab will engage the jack housing and prevent the connectors from separating. The connectors will not
unmate unless the modular plug locking latch is fully depressed. After mating, there will be a small amount of
axial movement (travel) between the mated modular plug and jack, and with some combinations, depending on
tolerance variations between original equipment manufacturers (OEM), could be up to 0.76 [.030].
3.7. Repair
These modular plugs cannot be repaired; damaged modular plugs must be removed and discarded. The cable
must be cut from the modular plug and re-terminated onto a new modular plug.
4. QUALIFICATION
Standard and small conductor modular plug connectors are Component Recognized by Underwriters
Laboratories Inc. (UL) in File E81956 (DUXR2).
Rev L
8 of 10
114-6016
5. TOOLING
Tooling part numbers and instructional material packaged with the tooling are shown in Figure 8.
5.1. Hand Tools
The premium grade modular plug hand tool terminates these modular plugs to all types of cable indicated in
this document. The tool also cuts and strips unshielded flat oval cable. This tool is designed for field
application, installation, and repair.
PRO-CRIMPER III hand tool assemblies are commercial grade tools designed primarily for field installation or
repair. One tool terminates 10-position modular plugs and another tool applies the external strain relief.
5.2. Terminators
The terminators are pneumatically powered, bench-mounted tools controlled by a foot valve to terminate
modular plugs to create a cable assembly. Terminating modules fit interchangeably into the dual terminators.
During termination, the dual terminators test the assembly for electrical circuit continuity. The single terminators
require a specific tooling kit to terminate one modular plug style and does not provide testing. These tools
provide for high-volume applications.
5.3. Crimp Height Gage
The crimp height gage is used to measure the crimp height of the terminated modular plug. The crimp height
gage is used for 2-, 4-, 6-, 8-, and 10-position modular plugs. Take note that the gage cannot be used for
4-position handset modular plugs. The gage consists of a connector nest and a GO/NO-GO spanner.
Modular Plug Hand
Tools (Premium Grade)
231652-[ ] with Die
Sets 853400-[ ] (4089767)
Terminating Modules
856196-[ ] for Use with
Modular Plug Dual
Terminators 1320840-[ ]
(408-9743)
PRO-CRIMPER III Hand
Tool Assembly 58560-1 (for
10-Position Modular Plugs)
(408-4093)
Modular Plug Single
Terminators 354711-[ ] and
Tooling Kits 354714-[ ]
(408-9919)
PRO-CRIMPER III Hand Tool
Assembly 224928-1 with Die
Assembly 224928-2
(for External Strain Relief
Application) (408-4167)
Modular Plug Dual
Terminators
1320840-[ ] (40910010)
Crimp Height
Gage 904170-1
(408-4389)
Figure 8
Rev L
9 of 10
114-6016
6. VISUAL AID
The illustration below shows a typical application of standard and small conductor modular plug connectors.
This illustration should be used by production personnel to ensure a correctly applied product. Applications
which do not appear correct should be inspected using the information in the preceding pages of this
specification and in the instructional material shipped with the product or tooling.
Figure 9
Rev L
10 of 10


